CH11: Mobile Device Forensics
Introduction
Throughout this course, you have learned to image hard drives behind write-blockers, carve deleted files from unallocated space, and validate forensic images with cryptographic hashes. These skills form the foundation of cyber forensics and data recovery. Mobile device forensics builds directly on those principles, but it introduces a critical distinction: you cannot simply remove the storage medium and image it in isolation. The flash memory inside a smartphone is soldered to the motherboard and integrated with a live operating system. To extract data, you must interact with the device, and that interaction always leaves a footprint.
This chapter provides a field-to-lab walkthrough of mobile forensics. You will learn how to legally authorize a mobile device search, properly seize and isolate the device at the scene, select the correct acquisition method for the situation, and analyze the SQLite databases and timestamps that contain the evidence. The goal is not to replicate the depth of a dedicated mobile forensics course, but to equip you with the core competencies needed to handle mobile evidence in your role as a cyber forensics examiner.
Learning Objectives
By the end of this chapter, you will be able to:
- Explain why mobile forensics differs from traditional media forensics and why standard write-blocking techniques do not apply.
- Apply the NIST SP 800-101 framework and first responder protocols to properly seize, isolate, and preserve a mobile device.
- Differentiate between BFU and AFU encryption states and explain their impact on data accessibility.
- Identify the legal requirements for mobile device searches, including the significance of Riley v. California and the concept of legal nexus.
- Compare the four acquisition levels (Manual, Logical, File System, Physical) and select the appropriate method for a given scenario.
- Examine SQLite databases and decode common mobile timestamp formats to locate and validate evidence.
11.1 Mobile vs. Traditional Forensics
In traditional computer forensics, the acquisition process follows a well-established pattern. You remove the hard drive from the suspect's computer, connect it to a hardware write-blocker, and create a bit-for-bit forensic image without ever altering the original data. The storage medium is passive, and the write-blocker prevents the forensic workstation from sending any write commands to the drive.
Mobile forensics is fundamentally different.
Because the storage medium (NAND flash memory) is soldered directly to the device's motherboard and integrated with the operating system, you cannot separate the storage from the device to image it independently. To extract data from a mobile device, a "conversation" must occur between your forensic tool and the phone's operating system. The tool sends a request ("Please provide the SMS database"), and the operating system responds with the data. If you were to place a traditional write-blocker between the phone and the workstation, you would block that request, and the extraction would fail immediately.
This reality forces a shift in what "forensically sound" means. In traditional forensics, the standard is zero alteration of the original evidence. In mobile forensics, the standard becomes minimized and documented alteration. When you connect a phone to a forensic workstation, the battery begins to charge (altering system logs), the data port becomes active (triggering USB events), and the forensic software may push a temporary application to facilitate data transfer. These changes are unavoidable. Your obligation is to ensure they are minimal, necessary for the extraction, and thoroughly documented in your report.
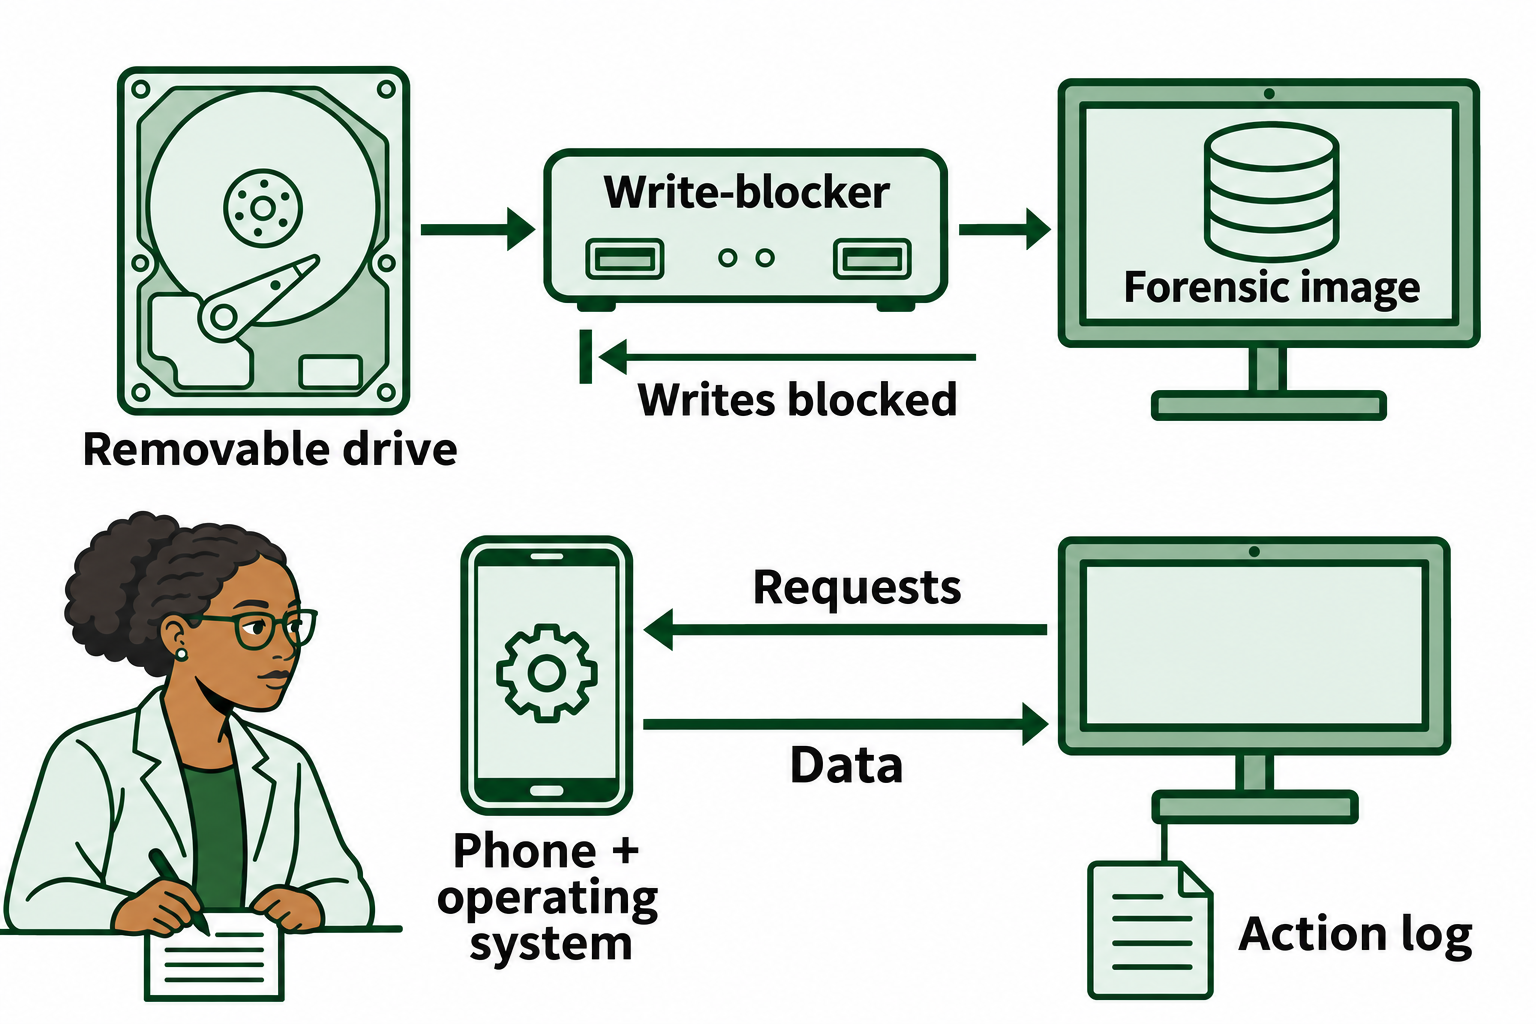
Figure 11.1: Common acquisition paths show why mobile examinations require an action log alongside the extracted data.
Text description of Figure 11.1
The upper path connects a removable drive through a write-blocker to a forensic workstation. The lower path shows requests flowing to the phone and data returning to the workstation. The action log records necessary changes during the mobile examination. These are representative workflows; device architecture and acquisition method can vary.
Concept references: NIST mobile device forensics guidance.
Why Modern Phones Resist Physical Imaging
Beyond the write-blocker problem, modern smartphones employ hardware-backed encryption that makes traditional physical acquisition (a bit-for-bit copy of the flash memory) extremely difficult.
Apple devices use the Secure Enclave Processor (SEP), a dedicated security chip physically isolated from the main processor. The SEP generates, stores, and manages encryption keys. It enforces passcode retry limits and can permanently erase keys after too many failed attempts. Even if you could desolder the flash memory chip and read every bit, the data would be encrypted, and the decryption key lives inside the SEP, bound to both the hardware and the user's passcode.
Android flagship devices use equivalent hardware: Google's Titan M chip and Samsung's Knox secure element perform similar functions. These chips ensure that raw physical images of modern smartphones yield encrypted, unreadable data without the correct passcode and the specific hardware key tied to that device.
This is the single most important architectural concept for understanding why mobile forensics has evolved: the hardware itself is designed to resist the exact techniques that work on traditional storage media.
Warning
Do not confuse "encrypted" with "unrecoverable." Hardware-backed encryption makes traditional physical imaging ineffective, but it does not prevent all data recovery. File System Acquisitions (covered in Section 11.5) work within the operating system's decryption layer, accessing data after the device has been unlocked. The encryption barrier specifically affects attempts to image raw flash memory without OS cooperation.
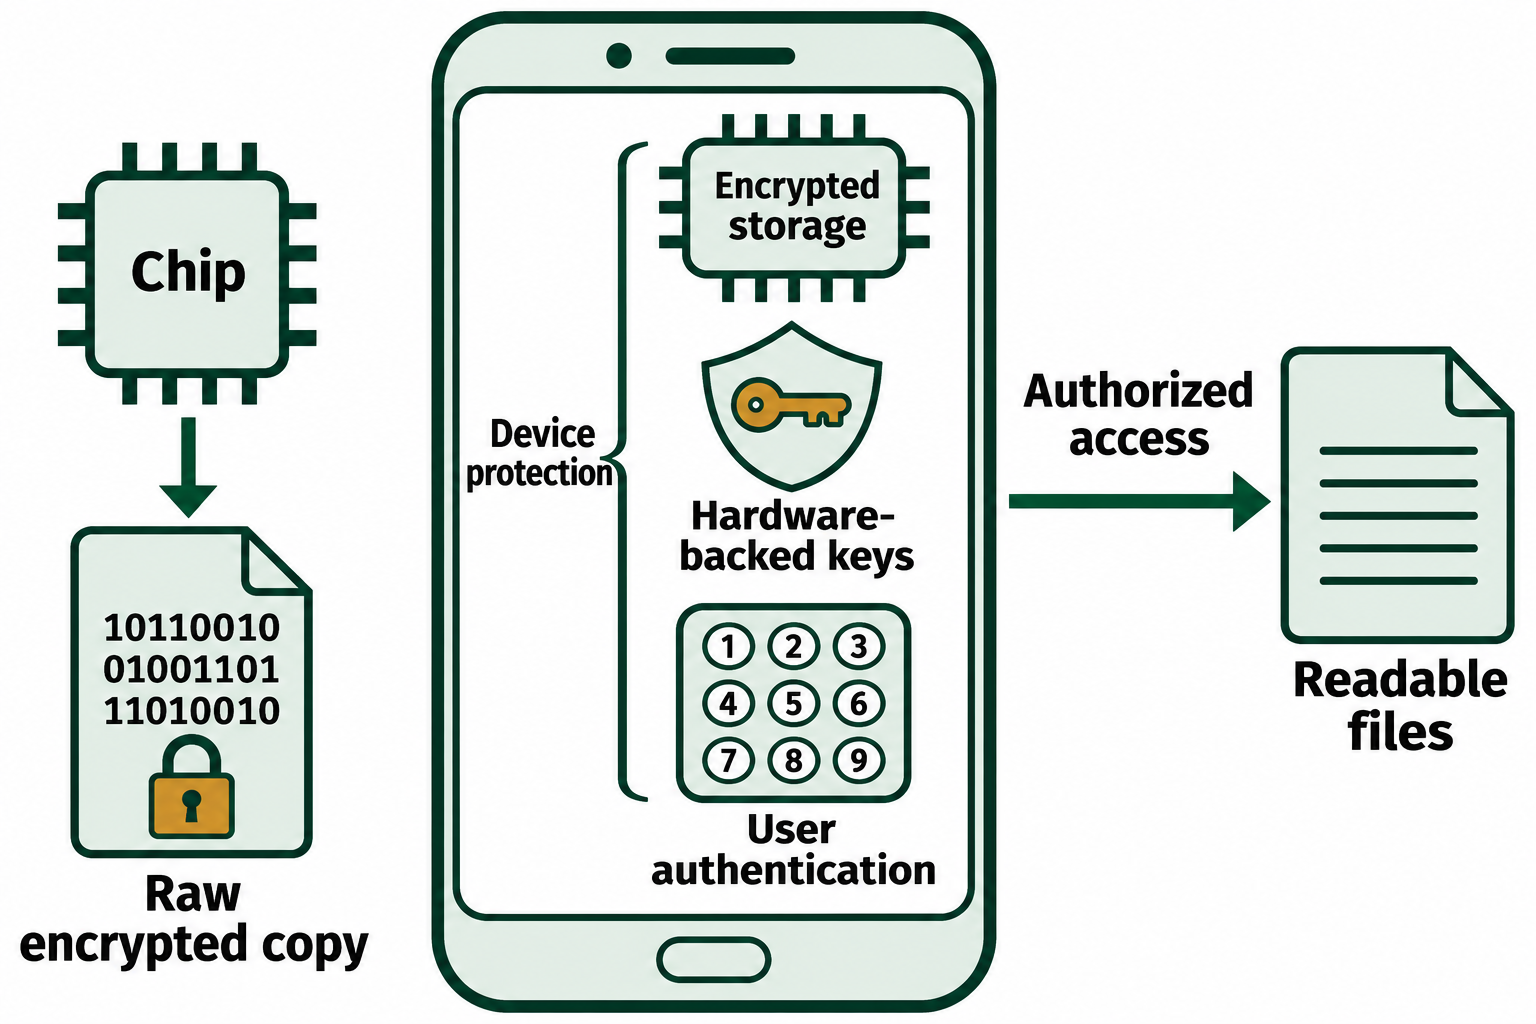
Figure 11.2: A raw copy of encrypted storage can preserve bytes while access to readable files still depends on the device's key-protection system.
Text description of Figure 11.2
Encrypted storage, device-bound secrets, and user authentication participate in protecting access to file keys. The simplified illustration treats these as related components, not as one universal hardware design. Extracting flash alone does not automatically supply the keys needed to read its contents.
Concept references: Android file-based encryption, Apple Data Protection classes.
Traditional vs. Mobile Forensics Comparison
| Factor | Traditional Media Forensics | Mobile Device Forensics |
|---|---|---|
| Storage Access | Removable (hard drive, SSD, USB) | Soldered to motherboard |
| Write Protection | Hardware write-blocker | Not possible; software-based documentation |
| Imaging Approach | Bit-for-bit copy (dd, FTK Imager) | OS-mediated extraction via forensic tool |
| Encryption Default | Varies (often not enabled) | Always-on hardware-backed encryption |
| Deleted Data Recovery | Carving from unallocated space | SQLite free pages, WAL files, limited carving |
| Primary Evidence Format | Files and file system metadata | SQLite databases and application containers |
| Forensic Soundness Standard | Zero alteration | Minimized and documented alteration |
11.2 Legal Authority for Mobile Device Searches
Before any technical extraction can occur, you must have legal authority to search the device. The Fourth Amendment protects citizens from unreasonable searches and seizures, and courts have established that the expectation of privacy in a mobile phone is exceptionally high. A smartphone contains communications, location history, financial data, medical information, and private thoughts. The Supreme Court has recognized that searching a phone is fundamentally different from searching a physical container like a wallet or a purse.
Riley v. California (2014)
The landmark case that reshaped mobile forensics law is Riley v. California (2014). Prior to this ruling, officers could search a person and their immediate possessions incident to arrest, including opening a notebook found in a pocket. The Supreme Court unanimously ruled that this exception does not extend to the digital contents of a cell phone. You may seize a phone during arrest to prevent destruction of evidence, but you may not unlock it and examine its contents without a warrant.
The practical implication: Get a warrant. While exceptions exist (consent, exigent circumstances), the default legal posture for mobile forensics must always be warrant-first.
The Consent Exception
If a person voluntarily agrees to a search, a warrant is not required. However, valid consent in the legal context demands four elements:
- Voluntariness: The consent is freely given without coercion, threats, or pressure.
- Authority: The person granting consent has standing to do so (the device owner, not a roommate who found the phone on the couch).
- Capacity: The person understands what they are agreeing to and is not impaired.
- Scope: Consent can be limited. If a suspect says "You can look at my text messages," you cannot open their photo gallery or banking app. Consent can also be revoked at any time.
The Legal Nexus
The most common reason mobile device search warrants are rejected or overturned is the failure to establish a legal nexus, a specific connection between the crime, the suspect, and the device. It is not sufficient to write: "The suspect committed a crime and owns a phone; therefore, search the phone." You must articulate why this device likely contains evidence of this specific crime. Examples of establishing nexus include:
- "The suspect was observed talking on a cell phone immediately prior to the drug transaction."
- "The victim received threatening text messages from the suspect's known phone number."
- "Surveillance footage shows the suspect photographing the restricted area with a mobile device."
Device Identification in Warrants
The Fourth Amendment requires particularity. Your warrant must describe the device with specificity. Always include the IMEI (International Mobile Equipment Identity), a unique 15-digit number that identifies the specific hardware. If the IMEI is not accessible, include a detailed physical description (make, model, color, case, condition). Also include explicit language covering SIM cards and any removable storage media (microSD cards), as a warrant for the "phone" may not legally cover these separate storage components.
Warning
A warrant to search the "internal memory of the phone" may not cover the removable microSD card or SIM card. These are separate storage media. Best practice warrant language explicitly includes: "The mobile device, any inserted Subscriber Identity Modules (SIM cards), and any inserted or attached external storage media (SD cards)."
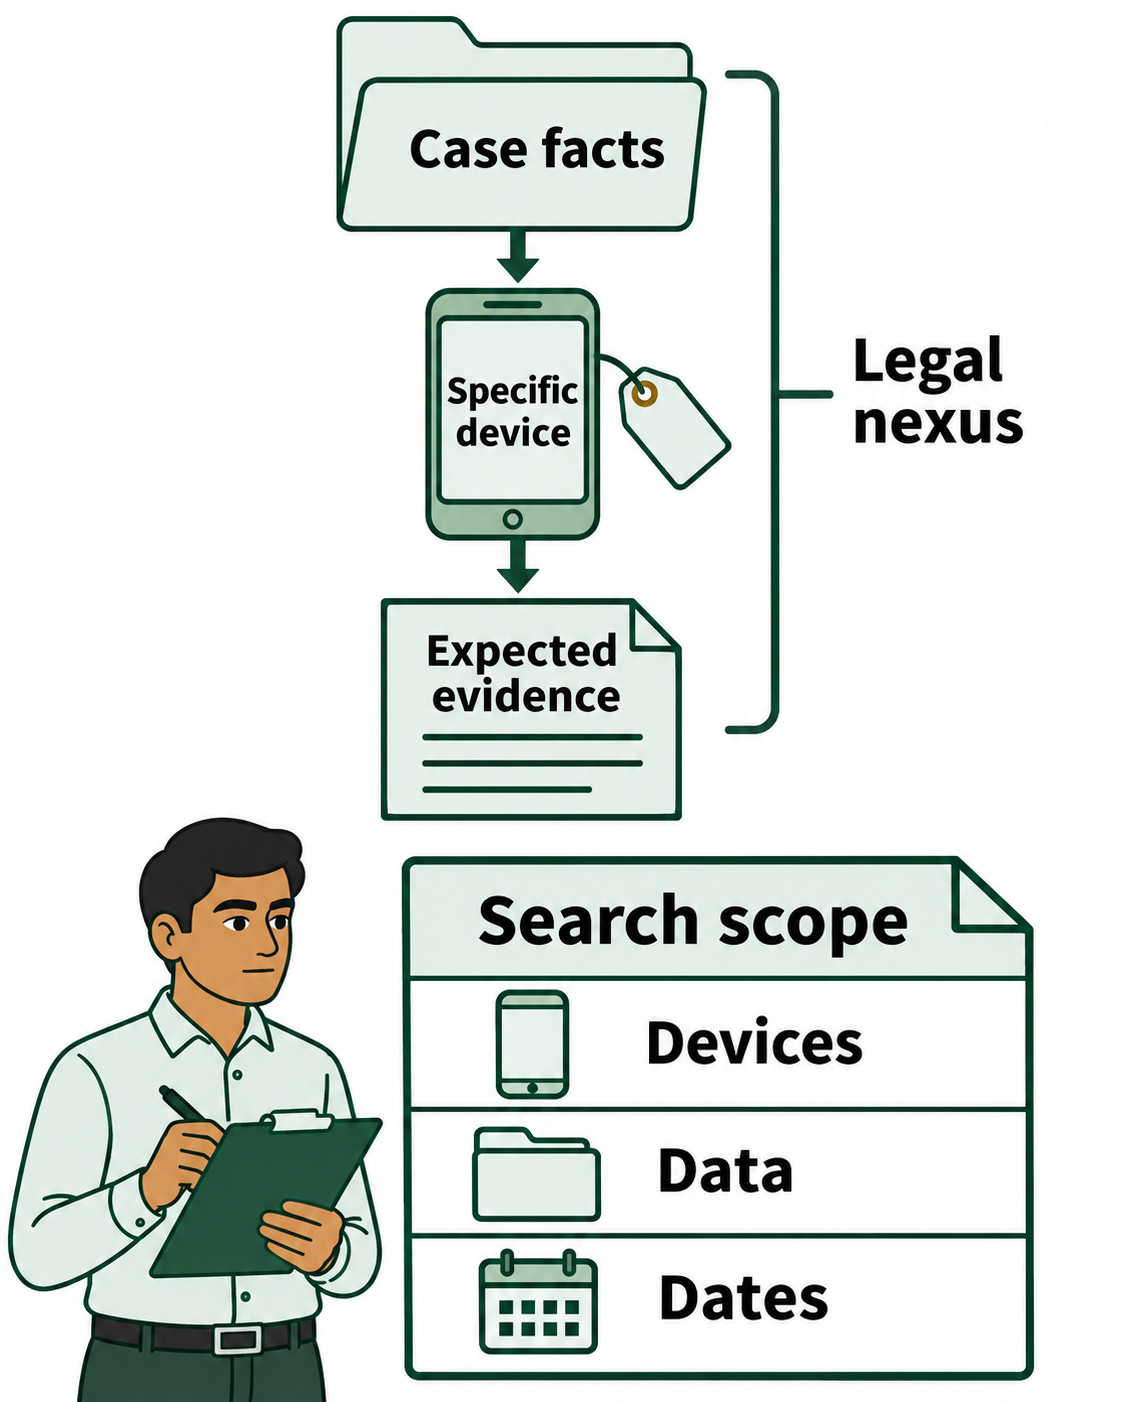
Figure 11.3: A search plan connects case facts to expected evidence and defines which devices, data, and dates fall within the legal authority.
Text description of Figure 11.3
Legal nexus means the factual connection between the investigation and evidence expected on a device. The diagram links case facts, the specific device, and expected evidence, then identifies search scope. Under Riley v. California, officers generally need a warrant to search digital contents after an arrest, unless a recognized exception applies. Scope and legal sufficiency require case-specific review.
Concept references: Riley v. California opinion.
11.3 First Responder Protocols and Scene Handling
The success or failure of a mobile forensic investigation is often determined in the first few minutes at the scene. Mobile evidence is volatile. A suspect or accomplice can remotely wipe a device in seconds, incoming data can overwrite deleted evidence, and a dead battery can lock you out of encrypted data permanently.
The NIST SP 800-101 Framework
NIST Special Publication 800-101 (Guidelines on Mobile Device Forensics) is the industry standard governing the lifecycle of a mobile investigation: Preservation, Acquisition, Examination, Analysis, and Reporting. This document provides the authoritative basis for your methodology. When a defense attorney asks why you handled a device a certain way, referencing NIST provides an authoritative answer.
The NIST "On-Site Decision Tree" standardizes the complex decision of whether to process a phone at the scene or transport it to a lab. The foundational rule is:
If the device is OFF, leave it OFF. If the device is ON, keep it ON.
Additional decision factors include: Is the device unlocked? Is there urgency (e.g., a kidnapping)? Can the lab be reached within two hours? Does the examiner have the right tools and training for this device? Is the battery above 50%?
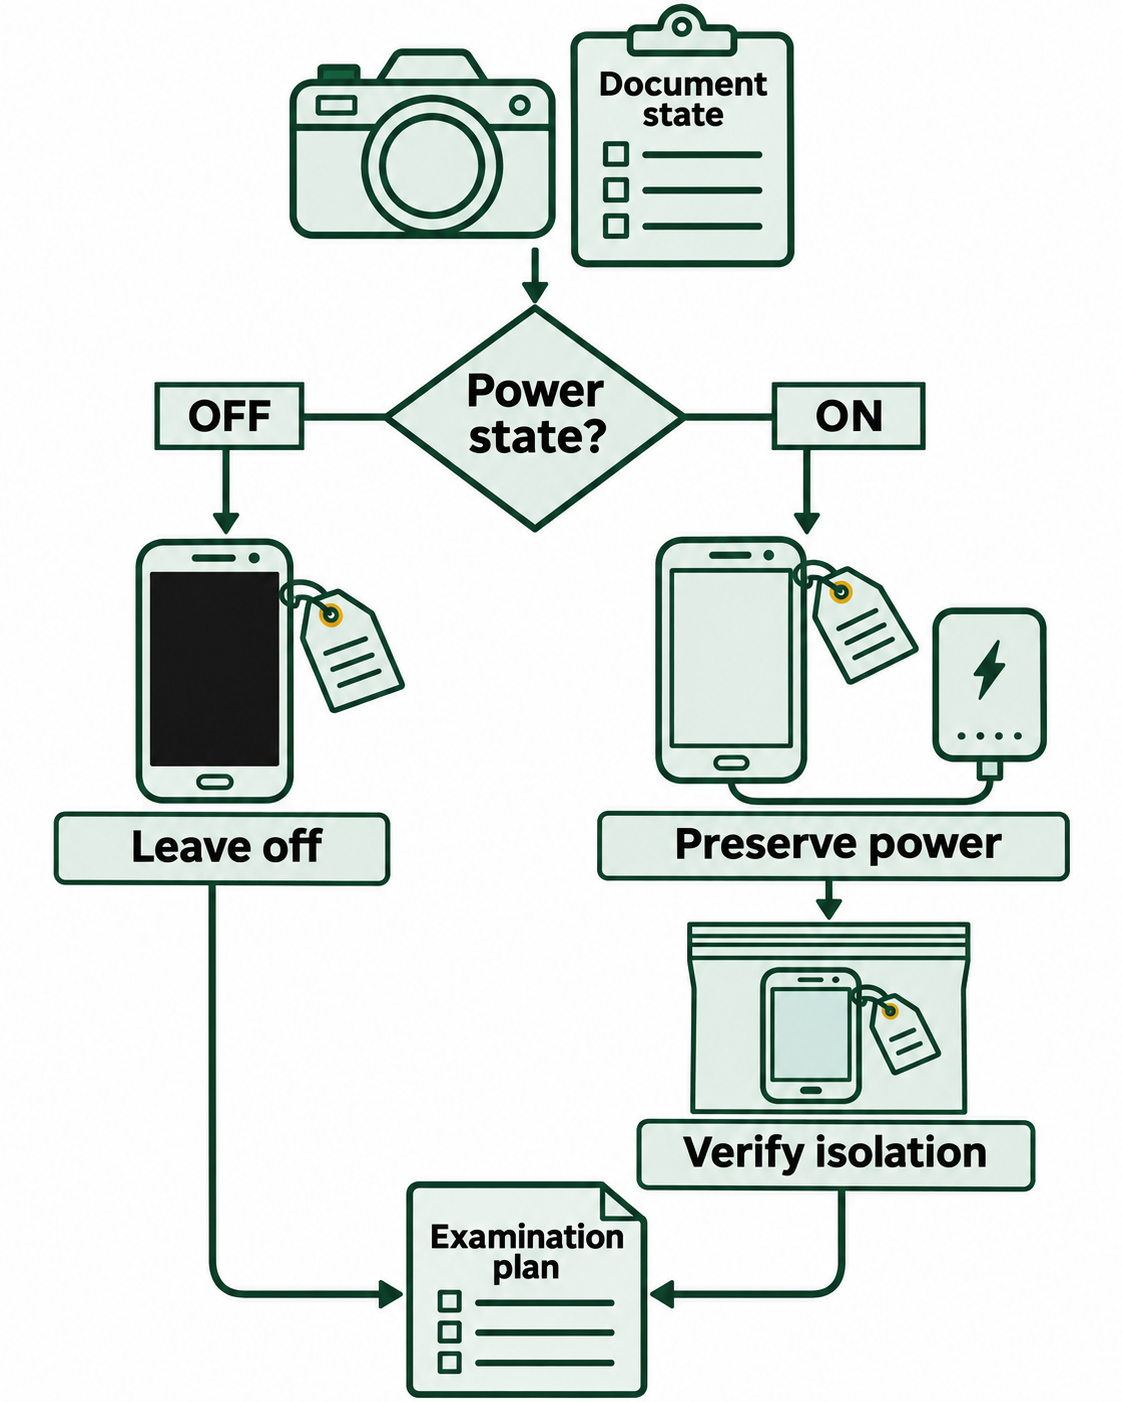
Figure 11.4: Initial handling preserves the observed state and records the decisions needed for an authorized examination.
Text description of Figure 11.4
Record the device's condition, displayed information, power state, and handling time. A powered-off device generally remains off pending an examination plan. For a powered-on device, qualified personnel assess safe power preservation and network isolation. Both branches lead to an authorized examination plan and a documented handoff. Battery damage and other hazards can change the handling decision.
Concept references: NIST mobile device forensics guidance.
BFU vs. AFU: The Encryption States That Define Your Options
Understanding the distinction between BFU (Before First Unlock) and AFU (After First Unlock) is critical for every decision you make with a mobile device.
BFU (Before First Unlock): When a modern smartphone is powered off or freshly rebooted, it enters a state where encryption keys are not loaded into RAM. The user's data partition is fully encrypted. Without the passcode, nearly all user data is inaccessible, even to sophisticated forensic tools. This is the "coldest" forensic state.
AFU (After First Unlock): Once the user enters their passcode at least once after boot, the operating system loads decryption keys into RAM. Even if the screen subsequently locks, those keys remain in memory. A device in AFU state is significantly more accessible to forensic tools, even if the screen is locked, because the keys are present in volatile memory.
This is why keeping a powered-on device alive is paramount. If a modern phone's battery dies, it reboots into BFU. You may never recover the data without the passcode.
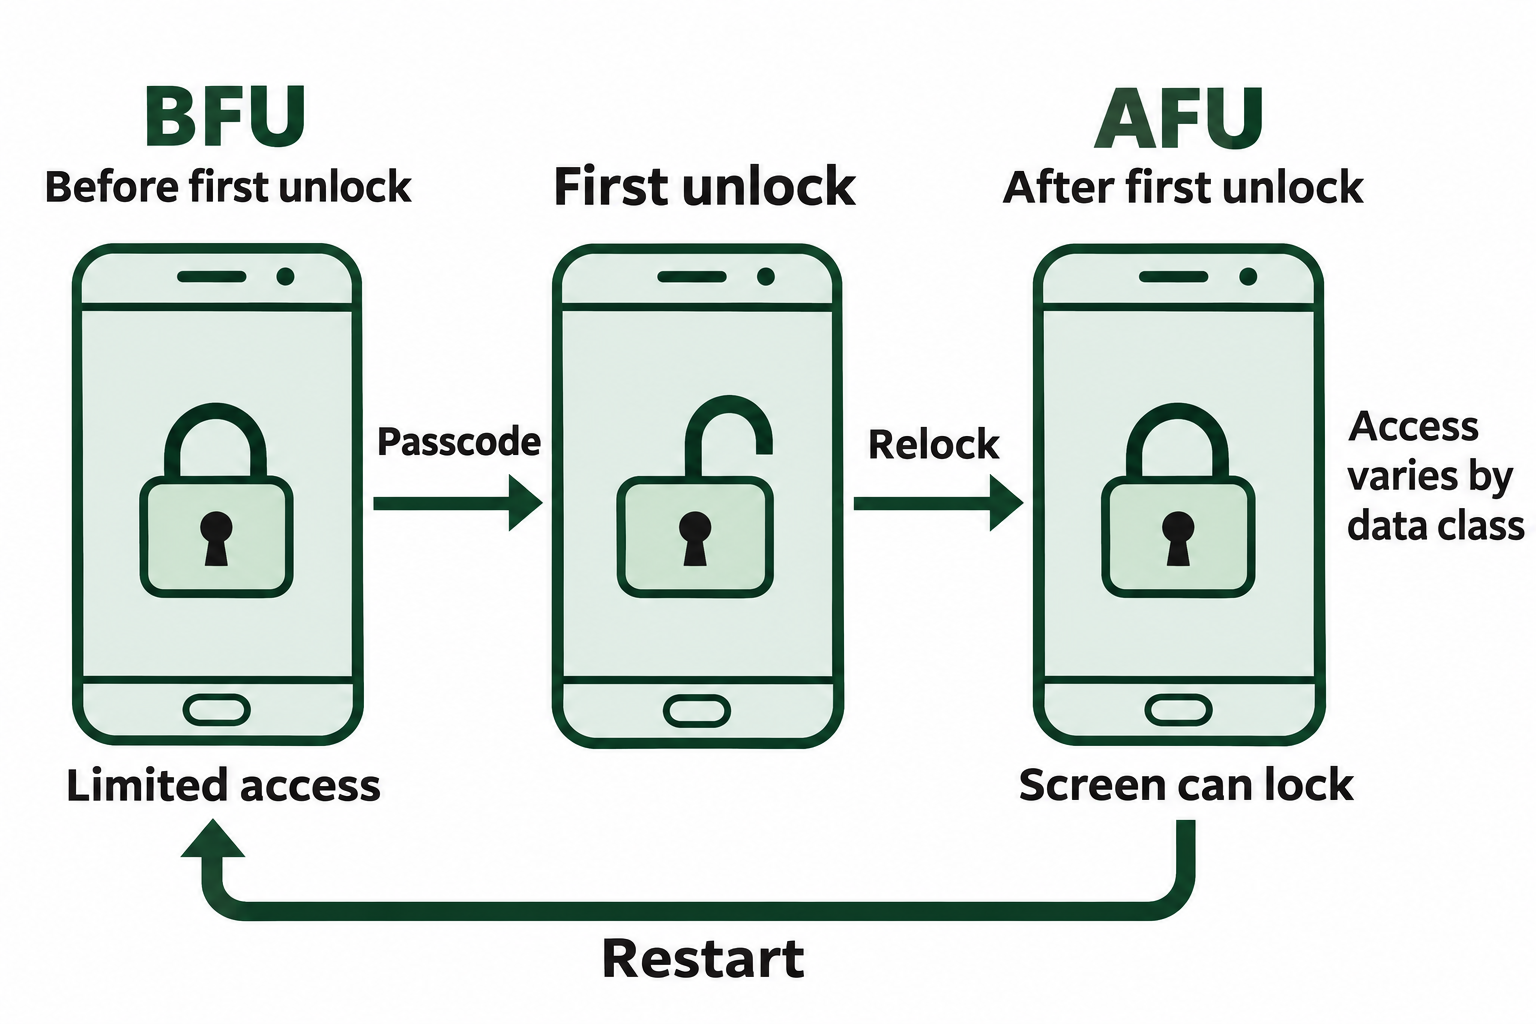
Figure 11.5: First unlock changes data availability. A later screen lock can leave some data classes available, while a reboot returns the device to its before-first-unlock state.
Text description of Figure 11.5
Before first unlock (BFU) describes a booted device that has not yet received the user's first successful unlock. After first unlock (AFU) describes the subsequent state. Some data classes remain accessible after the screen relocks; others become protected again. The exact behavior depends on the platform, protection class, version, and security settings. A reboot ends that session, and the device starts again in BFU.
Concept references: Apple Data Protection classes, Android file-based encryption.
Analyst Perspective
The Faraday bag paradox is one of the most practical challenges in the field. When a phone loses signal inside a Faraday bag, the cellular radio boosts to maximum power searching for a tower, draining the battery at an accelerated rate. A phone that would last 8 hours normally may die in under an hour inside a Faraday bag. Always connect a portable power bank to the device before sealing it in the bag, or use a specialized Faraday bag with a shielded USB power pass-through.
Network Isolation
A powered-on device connected to a network is vulnerable to remote wipe commands (via "Find My iPhone" or Google's "Find My Device") and data overwrites from incoming messages. Isolation techniques include:
- Faraday Bags: Lined with conductive mesh that blocks RF signals (cellular, Wi-Fi, Bluetooth, GPS). The standard method for transport.
- Airplane Mode: Effective if the device is unlocked and accessible, but carries legal risk. Manipulating settings on the device before a warrant is obtained could be argued as a warrantless search. If you have a warrant or exigency, verify that Wi-Fi and Bluetooth are also disabled, as some OS versions leave them active in Airplane Mode.
- SIM Removal: For powered-off devices, removing the SIM card before powering on prevents cellular network connection. Process the SIM separately using a SIM reader.
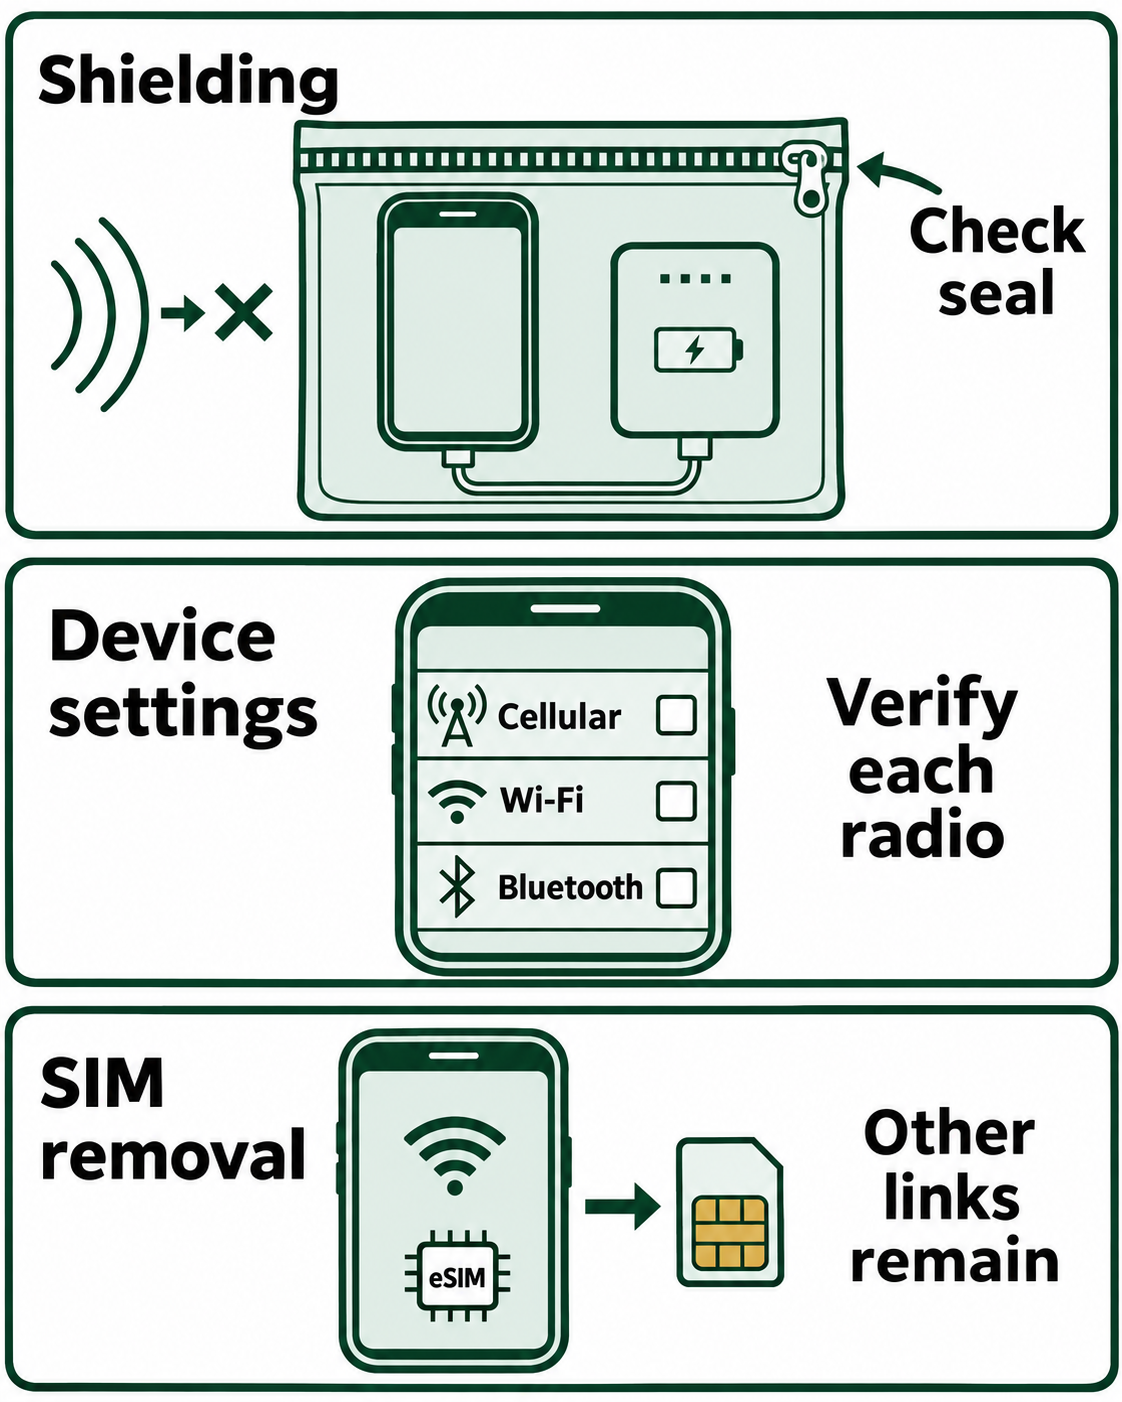
Figure 11.6: Radio shielding and device settings require verification. Removing one SIM does not address every possible connection.
Text description of Figure 11.6
A Faraday enclosure uses conductive material to reduce radio communication. The illustration places the phone and its power bank inside the enclosure so a loose cable does not cross the closure. Actual shielding depends on the enclosure, its condition, and its seal. If lawful and appropriate to change device settings, verify cellular, Wi-Fi, and Bluetooth individually. Removing a physical subscriber identity module (SIM) does not disable an embedded SIM or Wi-Fi.
Concept references: NIST mobile device forensics guidance.
Evidence Contamination Risks
Mobile evidence faces contamination threats beyond network signals. A cooperative witness who scrolls through messages may alter timestamps and read receipts. An untrained officer who guesses the passcode may trigger the device's 10-attempt wipe. Anti-forensics applications can be configured to wipe data if a specific PIN is entered or if the device leaves a GPS geofence. Environmental factors (heat, cold, water, static) can physically damage memory chips.
Chain of Custody
Document the Who, When, Where, Why, and What for every evidence transfer. For mobile devices, "What" must include the device make, model, color, physical condition, IMEI (if visible), and the power state at time of seizure.
Powered-On vs. Powered-Off Handling
| Step | Powered-On Device | Powered-Off Device |
|---|---|---|
| 1. Identify | Photograph the screen immediately | Check for physical damage, identify model |
| 2. Isolate | Enable Airplane Mode (if unlocked) or Faraday bag | Remove SIM card to prevent network connection on boot |
| 3. Preserve Power | Connect power bank; prevent screen lock | Charge to 50%+ before any boot attempt |
| 4. Legal Check | Verify warrant scope before extraction | Verify warrant covers digital contents and bypass |
| 5. Extract | Triage extraction if unlocked (keep it awake) | Boot and prepare for bypass or brute-force |
| 6. Validate | Spot-check extracted data against screen | Hash verification of forensic image |
| 7. Document | Record seizure time, battery %, isolation method | Record all steps, tools, and anomalies |
11.4 The SIM Card and Subscriber Identity
A mobile device carries multiple layers of identity. Understanding these layers is essential for writing accurate warrants, requesting the correct records from carriers, and attributing evidence to the right person.
The Identity Hierarchy
Three primary identifiers operate in mobile forensics:
- IMEI (International Mobile Equipment Identity): Identifies the physical hardware. Think of it as the device's serial number on the cellular network. The IMEI is 15 digits, and the first 8 digits (the TAC, or Type Allocation Code) identify the exact make and model. You can find it on the SIM tray, in Settings > About, by dialing
*#06#, or on the original packaging. - IMSI (International Mobile Subscriber Identity): Identifies the subscriber account within the cellular network. The IMSI is stored on the SIM card, not the phone. Its structure (MCC + MNC + MSIN) identifies the country, carrier, and specific account.
- ICCID (Integrated Circuit Card Identifier): Identifies the physical SIM card itself. This is the serial number printed on the card and is the primary way to link a physical SIM to a subscription plan.
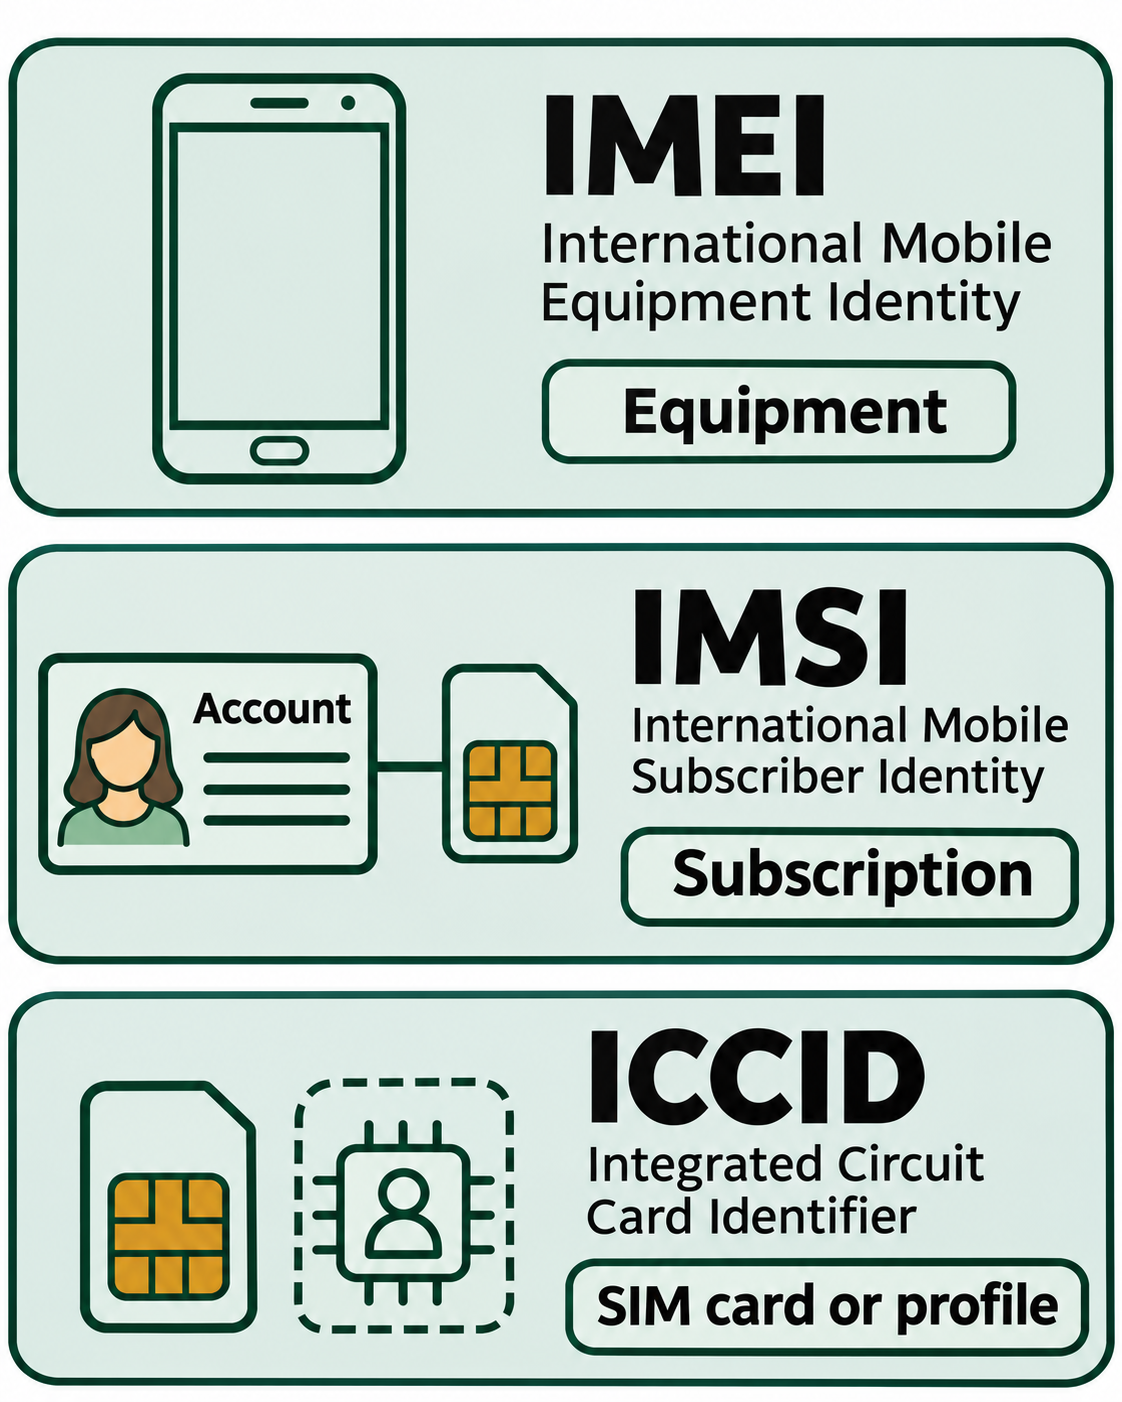
Figure 11.7: Equipment, subscriber, and SIM identifiers answer different attribution questions.
Text description of Figure 11.7
International Mobile Equipment Identity (IMEI) identifies cellular equipment. International Mobile Subscriber Identity (IMSI) identifies a subscription on the network. Integrated Circuit Card Identifier (ICCID) identifies a SIM card or an eSIM profile. These identifiers can help connect records, but they do not by themselves prove who used a device at a particular time.
Concept references: NIST mobile device forensics guidance.
MNO vs. MVNO: Where to Send the Warrant
This distinction is the most common stumbling block for new investigators. Mobile Network Operators (MNOs) own the towers and infrastructure. In the U.S., the "Big Three" are Verizon, AT&T, and T-Mobile. Mobile Virtual Network Operators (MVNOs) are resellers. They lease bulk access from MNOs and sell service under their own brand: Mint Mobile, Boost Mobile, Cricket Wireless, TracFone/Straight Talk, Google Fi, and others.
The entity you serve the warrant to depends on what data you need:
| Evidence Type | Primary Custodian | Notes |
|---|---|---|
| Subscriber Name/Address | MVNO | The company that sends the bill knows the customer |
| Payment Method | MVNO | Critical for de-anonymizing prepaid "burner" phones |
| Call Logs | MVNO (sometimes MNO) | Both usually retain for billing |
| Tower Dumps (Geo-fence) | MNO only | MVNOs do not own towers |
| Per-Call Location (CSLI) | Context-dependent | Start with MVNO; they may redirect to MNO |
Serving a tower dump warrant to an MVNO like Mint Mobile will result in a response of "Not our infrastructure." You must identify the underlying MNO (in Mint's case, T-Mobile) and serve the warrant there.
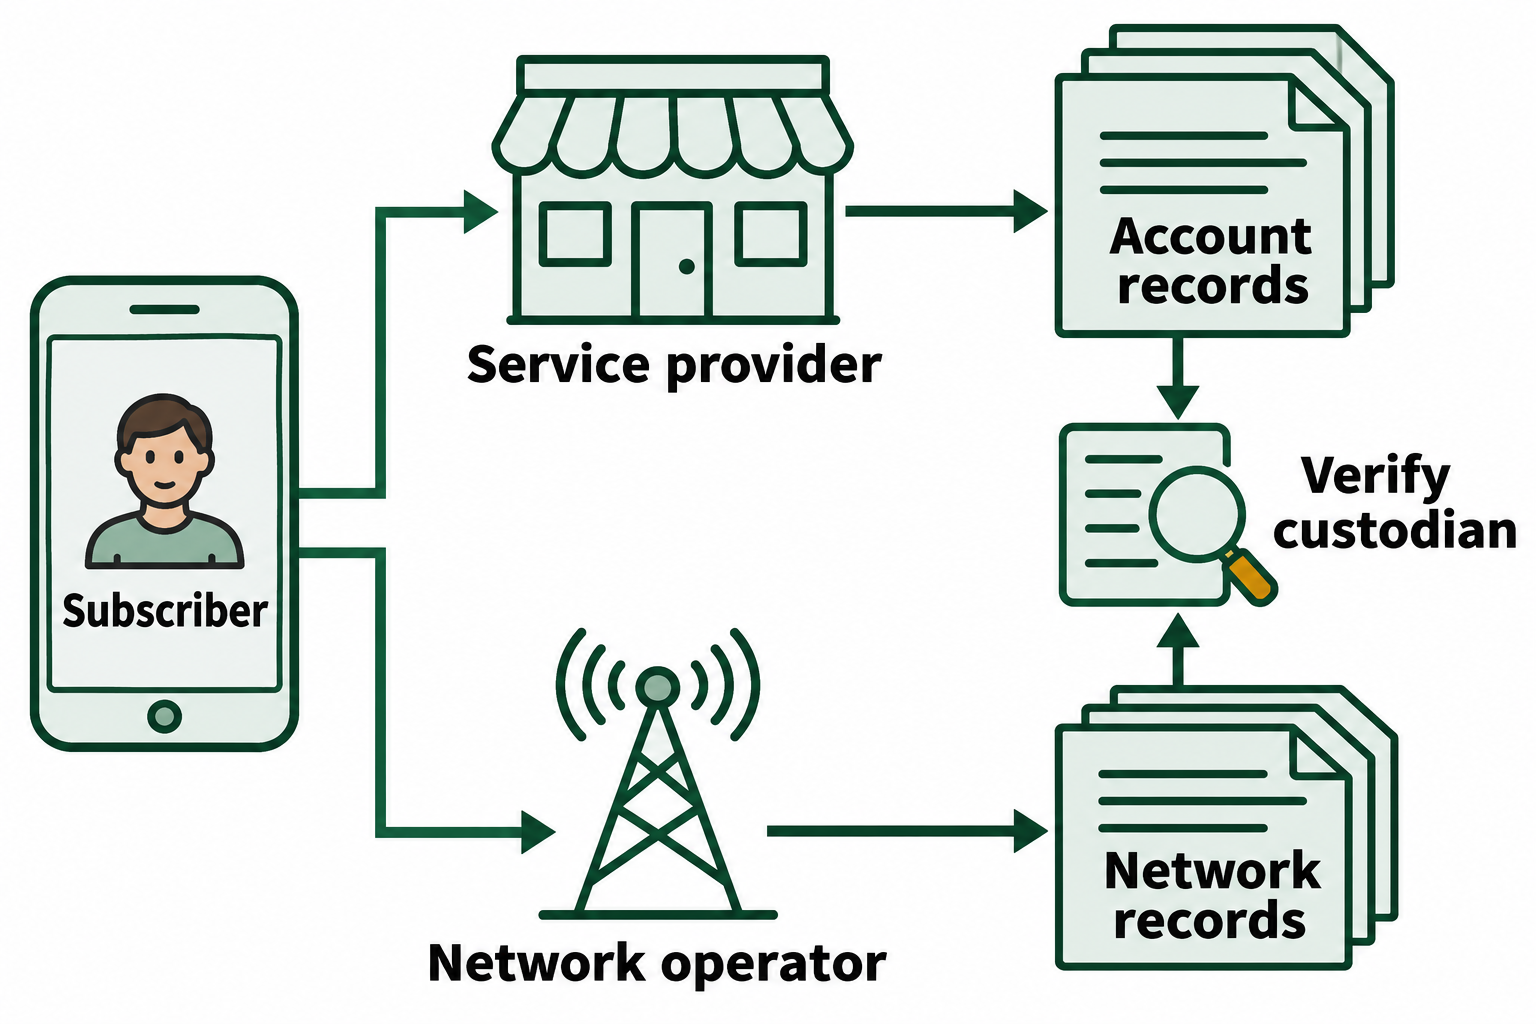
Figure 11.8: Start with the type of record needed, then confirm which service provider or network operator holds it.
Text description of Figure 11.8
A mobile network operator (MNO) runs cellular infrastructure. A mobile virtual network operator (MVNO) sells service using another operator's network. Subscriber and billing records often begin with the service provider; radio-network records may require the underlying operator. Contracts, retention, and technical arrangements vary, so the examiner verifies the records custodian and the required legal process rather than relying on a fixed routing rule.
Concept references: NIST mobile device forensics guidance.
SIM Card Forensics
The SIM card is a smart card with its own processor, operating system, and hierarchical file system. Its non-volatile storage (EEPROM) contains forensically valuable Elementary Files (EFs):
- EF_ICCID: The SIM serial number, linking the card to a subscription.
- EF_IMSI: The subscriber identity for network authentication.
- EF_LOCI: Location information for the last cell tower the device registered with. Not GPS-precise, but proves the device was in a general geographic area.
- EF_ADN: Abbreviated Dialing Numbers (contacts stored on the SIM).
- EF_SMS: Text messages stored on the SIM (limited capacity, typically 20-50 messages in a cyclic buffer).
- EF_LND: Last numbers dialed.
SIM cards are protected by a PIN (3 attempts before lockout) and a PUK (10 attempts before the SIM is permanently bricked). Never guess a PUK. Subpoena the carrier with the ICCID to obtain it.
The Shift to App-Based Communication
On modern smartphones, the SIM card stores relatively little user data. Contacts and messages are stored in internal SQLite databases, not on the SIM. More critically, criminal communication has shifted from cellular SMS to Over-the-Top (OTT) applications like WhatsApp, Signal, and Telegram. These apps transmit over data networks, so their messages never appear on the SIM card or in traditional Call Detail Records. This shift is one of the primary reasons why File System Acquisition (Section 11.5) has become the modern standard: it accesses the app databases that contain the actual communications.
The eSIM (Embedded SIM), a chip soldered directly to the motherboard, presents an additional challenge. You cannot physically remove an eSIM to isolate the device from the network. You must rely entirely on Faraday bags or Airplane Mode for isolation.
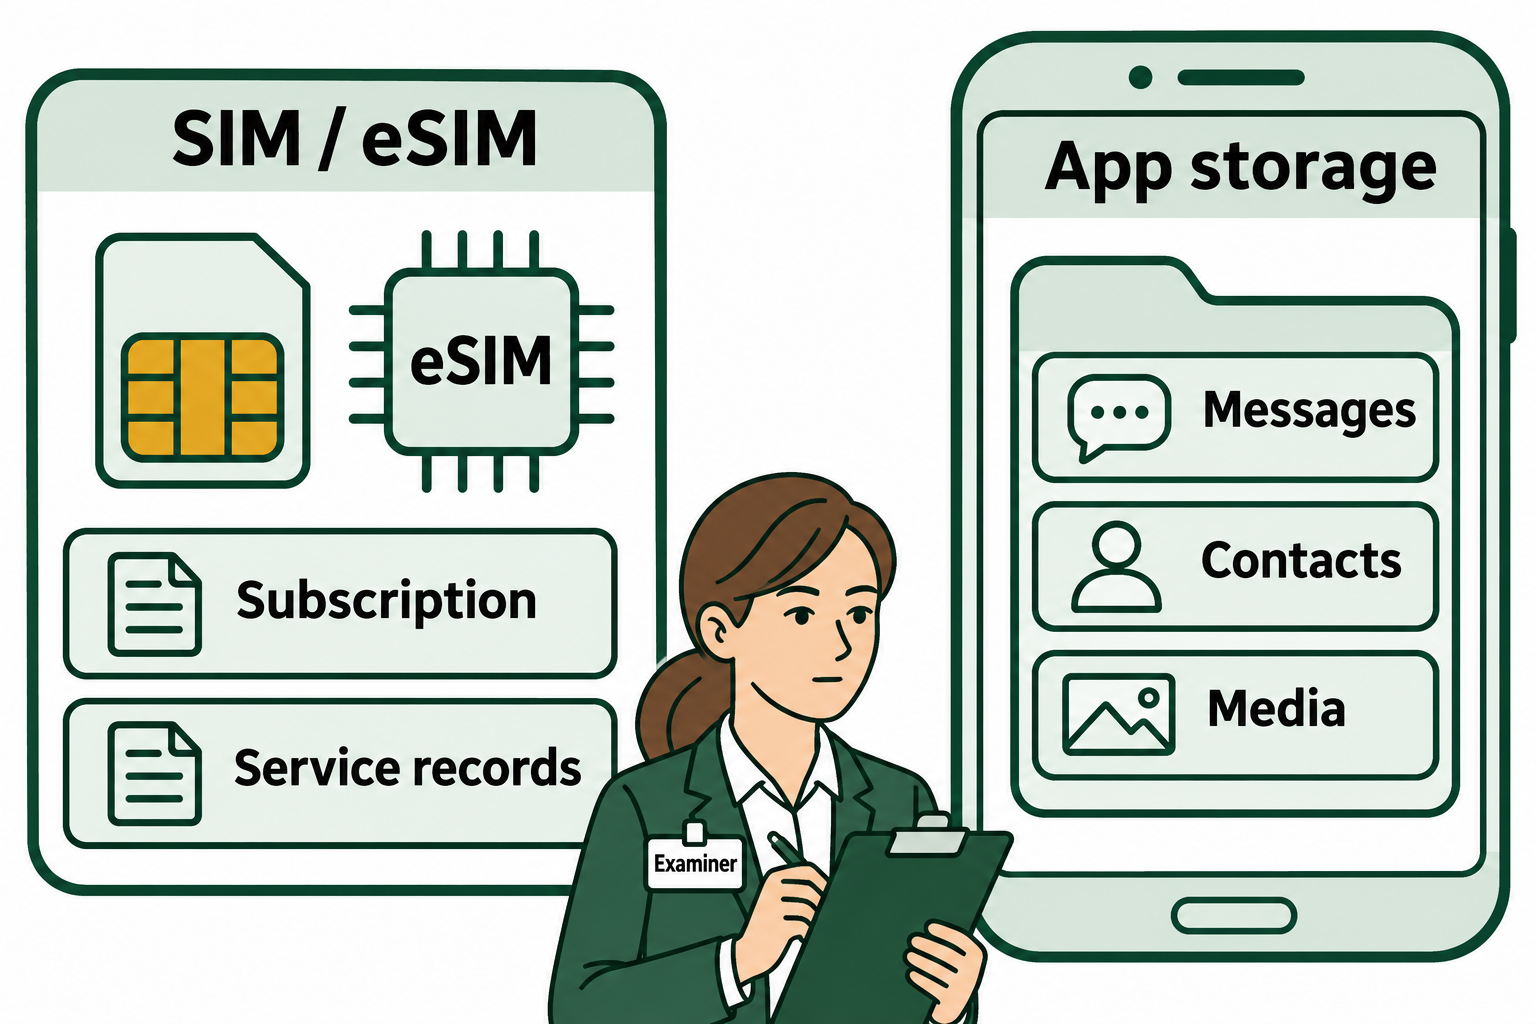
Figure 11.9: Subscriber records and app data occupy different evidence sources, so collection must match the question being investigated.
Text description of Figure 11.9
The subscriber identity module (SIM), including embedded SIM profiles, supports network identity and may contain limited service or legacy user records. Mobile applications keep their own databases and files on the device, and some services also retain cloud data. Internet messaging content generally does not appear as message text in ordinary carrier call-detail records. Availability depends on the app, device state, acquisition scope, and retention.
Concept references: NIST mobile device forensics guidance.
11.5 Acquisition Methods
Once the device is legally authorized and physically preserved, the examiner must choose an extraction method. Mobile forensics organizes these methods into a hierarchy, often visualized as a pyramid. As you move up the pyramid, the methods become more technically complex but yield significantly more data.
The Mobile Forensics Pyramid
1. Manual Acquisition (Base) The examiner physically scrolls through the device and photographs the screen. This method requires no special software and works on any device with a functioning display. It is the only option when data ports are damaged, the device is unsupported by forensic tools, or the user consents to showing a specific conversation. The drawbacks are significant: it recovers only visible (active) data, captures no deleted data, is extremely slow, and produces photographs that are not text-searchable without OCR processing.
2. Logical Acquisition The forensic tool communicates with the device using standard manufacturer protocols. On iOS, this is essentially an iTunes-style backup. On Android, it uses the Android Debug Bridge (ADB) backup command. The tool asks the operating system to package user data and send it over USB. Logical extractions recover active data: call logs, SMS/MMS, contacts, photos, and some application data. The device must be unlocked and the computer must be "trusted." The major limitation is that the OS will not provide deleted data, and many third-party apps exclude their data from standard backup protocols.
3. File System Acquisition (Advanced Logical / FFS) This is the modern industry standard for mobile forensics. It uses a temporary exploit or a helper application known as a forensic agent that is pushed onto the device. The agent exploits a vulnerability or uses elevated privileges to bypass the operating system's sandboxing rules, accessing raw database files, system logs, and third-party application containers. Because it retrieves the actual SQLite database files (rather than asking the OS for a curated backup), it can recover deleted records from database free pages and WAL files (covered in Section 11.6). File System Acquisition represents the best balance of data volume and success rate on modern encrypted devices.
4. Physical Acquisition (Peak) A physical extraction copies the entire flash memory bit-for-bit, including unallocated space where deleted files reside. This is the "holy grail" for deleted data recovery, equivalent to the full disk images you create with traditional media forensics. However, due to hardware-backed encryption on modern devices, physical images of current-generation phones are encrypted and unreadable without the decryption key. Physical acquisition is effectively limited to older devices, IoT hardware (drones, smartwatches), and scenarios where a high-level exploit can decrypt data during extraction.
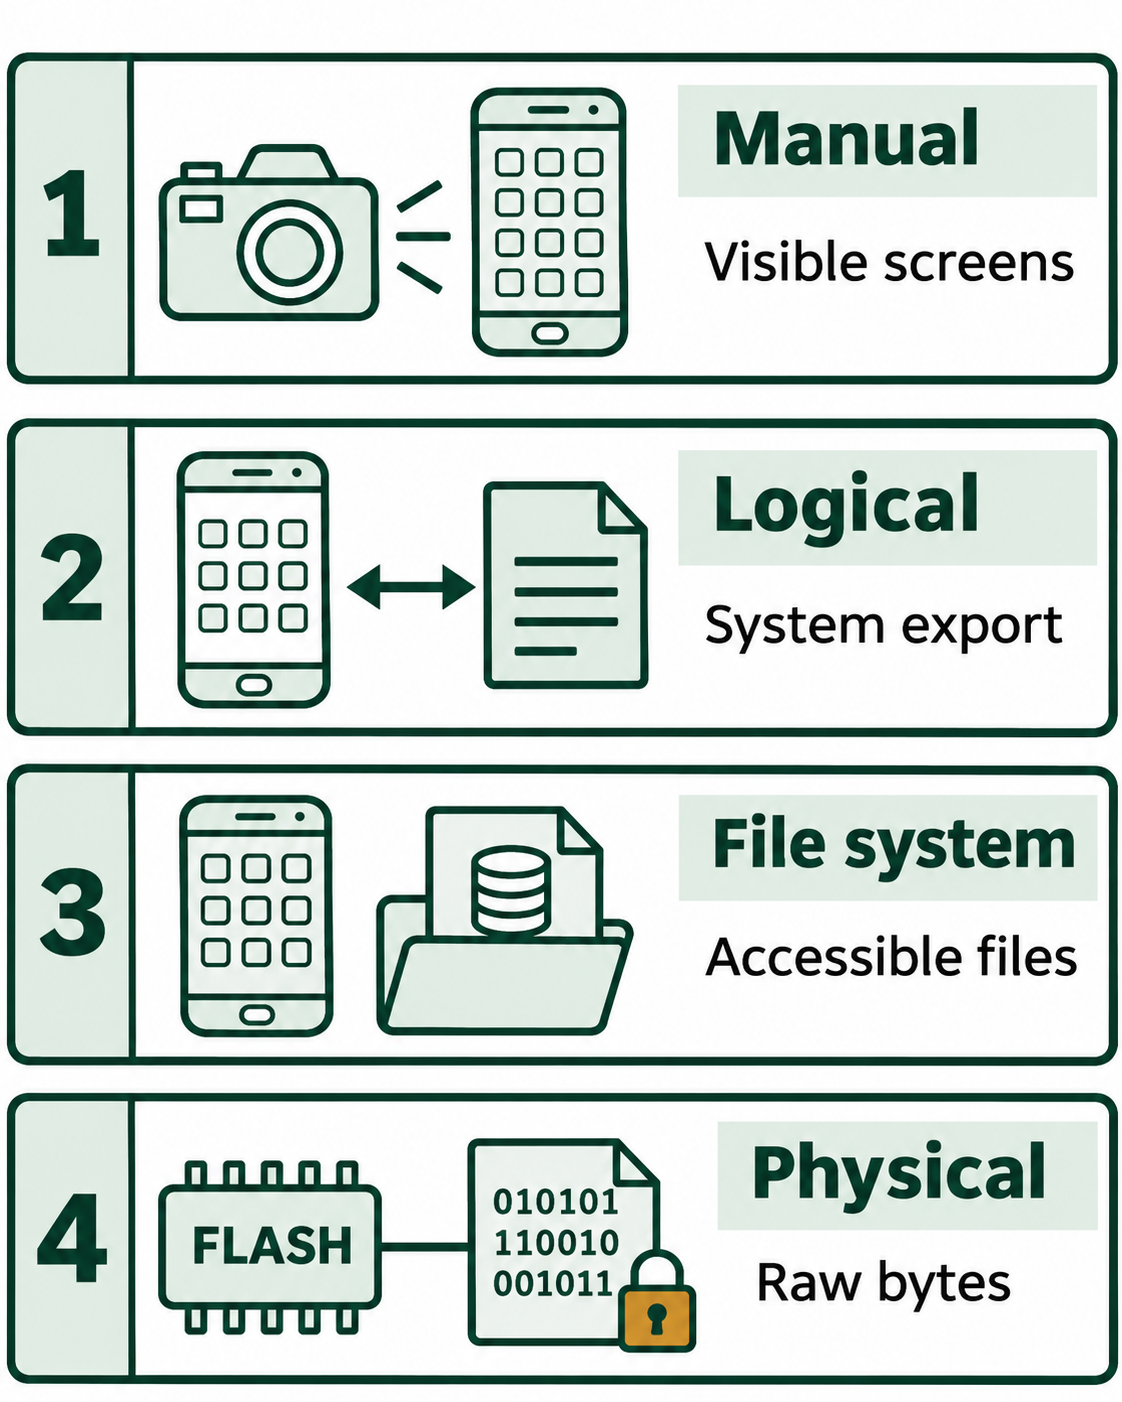
Figure 11.10: Acquisition methods expose different representations of data. Device support, encryption, and legal scope determine the usable result.
Open Figure 11.10 at full size
Text description of Figure 11.10
Manual acquisition records visible content. Logical acquisition requests data through supported operating-system or backup interfaces. File-system acquisition collects accessible files and app containers, potentially including database companion files. Physical acquisition copies raw storage bytes where the technique is supported. These categories do not guarantee increasing usable evidence: encryption and unavailable keys can limit a raw copy, while deleted-record recovery depends on surviving artifacts.
Concept references: NIST mobile device forensics guidance, Android 12 backup restrictions.
Physical Acquisition and Exploits: The checkm8 Case Study
To understand how physical acquisition works on modern devices, consider checkm8, a bootrom exploit discovered in 2019 that affects Apple devices with A5 through A11 chips (iPhone 4s through iPhone X). A bootrom is the very first code that executes when a device powers on. It is read-only, burned into the chip at the factory, and cannot be patched by software updates. The checkm8 exploit takes advantage of a vulnerability in this bootrom code to gain control of the device before the operating system loads, allowing forensic tools to bypass security restrictions and access the full file system or perform a physical extraction.
The checkm8 exploit illustrates three important principles about physical acquisition:
- Hardware vulnerabilities are permanent. Because the bootrom cannot be updated, Apple cannot patch checkm8 on affected devices. The exploit works regardless of the iOS version installed.
- Newer devices are not affected. Apple redesigned the bootrom for A12 and later chips (iPhone XR/XS and newer), closing the vulnerability. Physical acquisition of these newer devices requires different, often classified exploits.
- Exploits are the gatekeepers. Tools like Magnet GrayKey and Cellebrite Premium achieve physical-level extractions by leveraging exploits like checkm8. When the exploit is patched or the hardware changes, the tool loses that capability until a new vulnerability is found. This "cat and mouse" dynamic between device manufacturers and forensic tool vendors is constant.
Acquisition Method Comparison
| Method | How It Works | Data Recovered | Deleted Data? | Device Requirements | Best Use Case |
|---|---|---|---|---|---|
| Manual | Photograph the screen | Visible/active only | No | Functioning display | Unsupported devices, validation |
| Logical | OS backup protocol | Active files (SMS, photos, contacts) | Rarely | Unlocked + trusted | Quick triage, jury-friendly output |
| File System | Agent/exploit bypasses sandbox | Databases, logs, app data | Yes (free pages, WAL) | Unlocked or exploit available | Modern standard for investigations |
| Physical | Bit-for-bit flash copy | Everything including unallocated | Yes (full carving) | Exploit or older device | Legacy devices, IoT, maximum recovery |
Pre-Acquisition Checklist
Before connecting any device to a forensic workstation:
- Physical inspection: Check the charging port for debris (the leading cause of connectivity failure). Note screen damage, chassis damage, and liquid indicators.
- Power state: If off, leave off. If on, connect power immediately.
- Signal isolation: Faraday bag or Airplane Mode, depending on access level.
- Peripheral check: Is a SIM card present? Is there a microSD card? Image removable media separately using a standard write-blocker.
- Trust establishment: iOS requires tapping "Trust This Computer" (needs passcode). Android requires enabling USB Debugging in Developer Options.
Putting It Together: The "Gap" in the Evidence
Consider a narcotics investigation where officers seize a suspect's unlocked iPhone during arrest. The initial responding examiner performs a Logical Extraction (iTunes-style backup) in the field.
The report shows standard SMS messages to family and friends. WhatsApp and Signal are installed, but the report contains zero messages from either app. Based on this extraction alone, there is no evidence of drug distribution.
The gap exists because WhatsApp and Signal exclude their data from standard backup protocols. The Logical extraction politely asked the operating system for data, and the OS politely refused to include those apps.
The device is sent to the lab, where the examiner performs a File System Acquisition using a forensic agent. The agent bypasses the OS sandbox and locates WhatsApp's private database: ChatStorage.sqlite. Inside, the examiner finds thousands of messages coordinating drug deliveries, photos of shipping labels, and contacts stored only within the app. Because the examiner has the raw SQLite file, they also parse the database's free pages and recover 50 messages the suspect deleted two days before the arrest.
The File System extraction provided the evidence the Logical extraction missed entirely. This case illustrates why the acquisition method you choose directly determines the evidence you can recover.
Analyst Perspective
When a Logical extraction shows that encrypted messaging apps are installed but contains no data from them, that is not the end of the investigation. It is a signal that a deeper File System extraction is needed to access the app's private database containers.
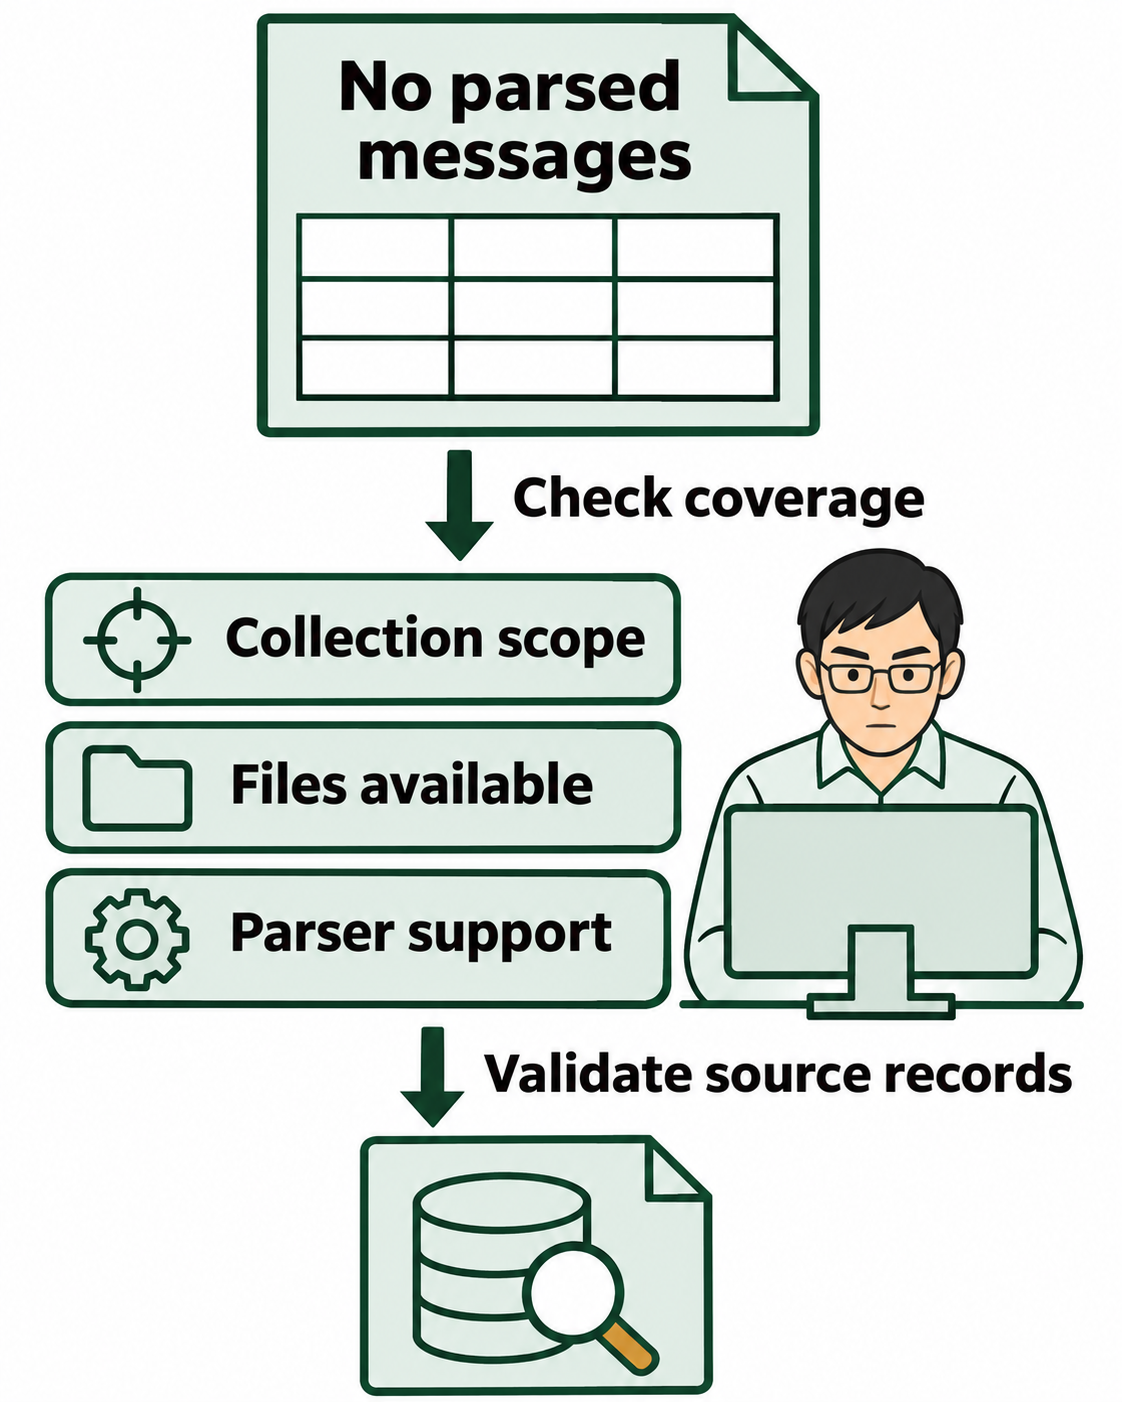
Figure 11.11: An empty report category calls for a coverage check before drawing conclusions about the source device.
Open Figure 11.11 at full size
Text description of Figure 11.11
An extraction report may omit an application's messages because collection excluded the app, files were inaccessible, the parser did not support the schema, or records were absent. The examiner checks the acquisition scope, available source files, and parser support before interpreting the result. A deeper supported acquisition may add evidence, but neither the presence of an app nor a larger extraction guarantees recoverable messages.
Concept references: Android 12 backup restrictions.
11.6 Mobile Evidence Analysis: Timestamps and SQLite Databases
Once data is acquired, the analysis phase requires two core skills: decoding timestamps and navigating SQLite databases. These are the fundamental tools for transforming raw extracted data into a coherent, court-admissible narrative.
Why Timestamps Matter
Timestamps serve three functions in mobile forensics. First, corroboration: they confirm or contradict alibis. If a suspect claims to have been asleep at 2:00 AM, but their health app logged 450 steps at 2:05 AM, the digital timeline contradicts the physical alibi. Second, sequencing: establishing the order of events proves intent. A threatening text sent before an assault has different legal meaning than the same text sent after. Third, normalization: because mobile devices cross time zones and some apps store time in different formats, all timestamps must be converted to Coordinated Universal Time (UTC) to build a consistent, unambiguous timeline.
Key Epoch Formats
Computers store time as integers counting from a fixed starting point called an epoch. To decode a raw timestamp, you must know the epoch date and the unit of measurement.
| Format | Epoch Origin | Resolution | Common In |
|---|---|---|---|
| Unix / POSIX | January 1, 1970 | Seconds | Android, Linux, most apps |
| Unix (Milliseconds) | January 1, 1970 | Milliseconds | WhatsApp, Telegram, many Android apps |
| Mac Absolute Time | January 1, 2001 | Seconds | iOS native apps (iMessage, Photos, Notes) |
| Chrome / WebKit | January 1, 1601 | Microseconds | Chrome browser history, Android web apps |
Quick identification by digit count: 9-10 digits = Unix seconds or Mac Absolute. 13 digits = Unix milliseconds. 17-18 digits = Chrome/WebKit or Windows FILETIME.
Warning
If you interpret a Mac Absolute timestamp as Unix time, the resulting date will be off by exactly 31 years (the difference between 1970 and 2001). Always verify the source application before assuming an epoch format.
Decoding tools: DCode (standalone software with the broadest format support), CyberChef (web-based, supports Unix and FILETIME), and EpochConverter (web-based, fast for quick validation). Commercial forensic suites decode timestamps automatically, but never trust an automated result without manual verification, especially if a date appears impossible (e.g., 1969 or 2040).
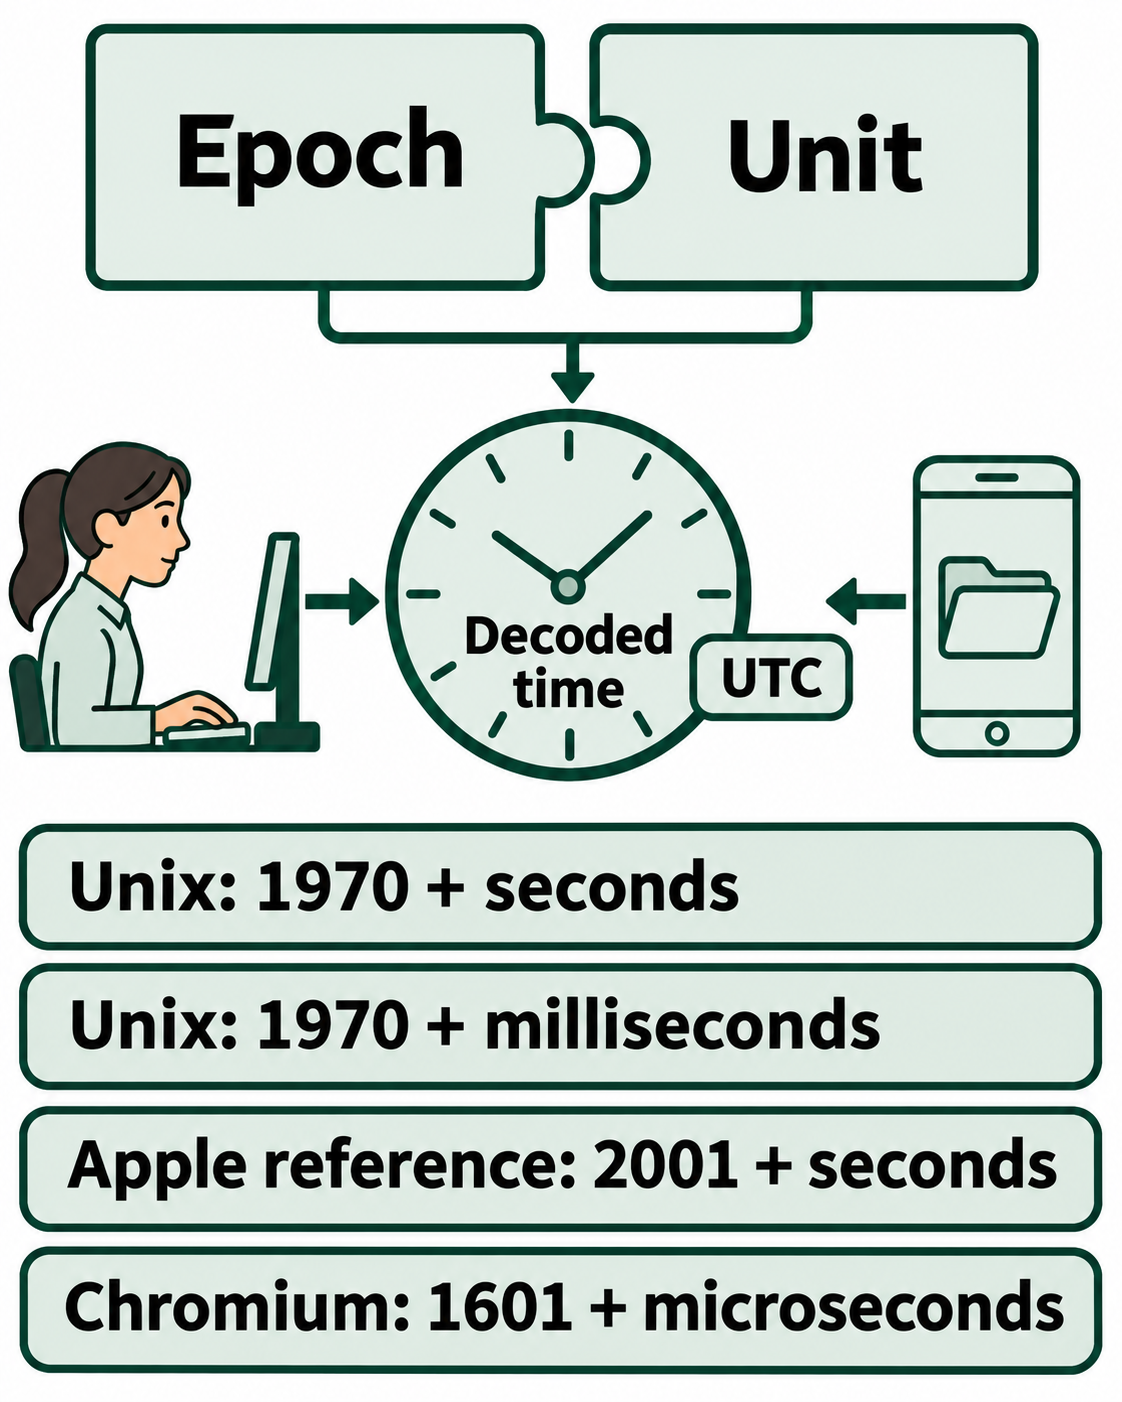
Figure 11.12: Decode a timestamp using both its starting date and its unit, then state the time zone used for the result.
Open Figure 11.12 at full size
Text description of Figure 11.12
An epoch is a timestamp's starting date. Unix seconds and milliseconds both count from 1 January 1970. Apple's reference time counts seconds from 1 January 2001, while individual application fields can use other units. Chromium time commonly counts microseconds from 1 January 1601. Verify the field definition and unit before conversion; digit count alone is insufficient. Preserve the raw value and document the conversion to Coordinated Universal Time (UTC), along with any local-time display.
Concept references: Apple reference date, Chromium time representation.
SQLite: The Backbone of Mobile Evidence
Nearly every piece of user-generated data on a modern smartphone is stored in SQLite databases. SQLite is a serverless, self-contained database engine embedded directly into applications. The "database" is a single file (typically .db or .sqlite) sitting on the device's flash storage. Both iOS and Android use SQLite for core functions: contacts, call logs, messages, browser history, and location data. Every third-party app uses it as well.
Key database paths (for examiner reference):
| Artifact | iOS Database & Path | Android Database & Path |
|---|---|---|
| SMS / iMessage | sms.db at /private/var/mobile/Library/SMS/ |
mmssms.db at /data/data/com.android.providers.telephony/databases/ |
| Call Logs | CallHistory.storedata at /private/var/mobile/Library/CallHistoryDB/ |
calllog.db at /data/data/com.android.providers.contacts/databases/ |
| Contacts | AddressBook.sqlitedb at /private/var/mobile/Library/AddressBook/ |
contacts2.db at /data/data/com.android.providers.contacts/databases/ |
| Web History (Safari/Chrome) | History.db at /private/var/mobile/Library/Safari/ |
History at /data/data/com.android.chrome/app_chrome/Default/ |
ChatStorage.sqlite in /private/var/mobile/Containers/Shared/AppGroup/<GUID>/ |
msgstore.db at /data/data/com.whatsapp/databases/ |
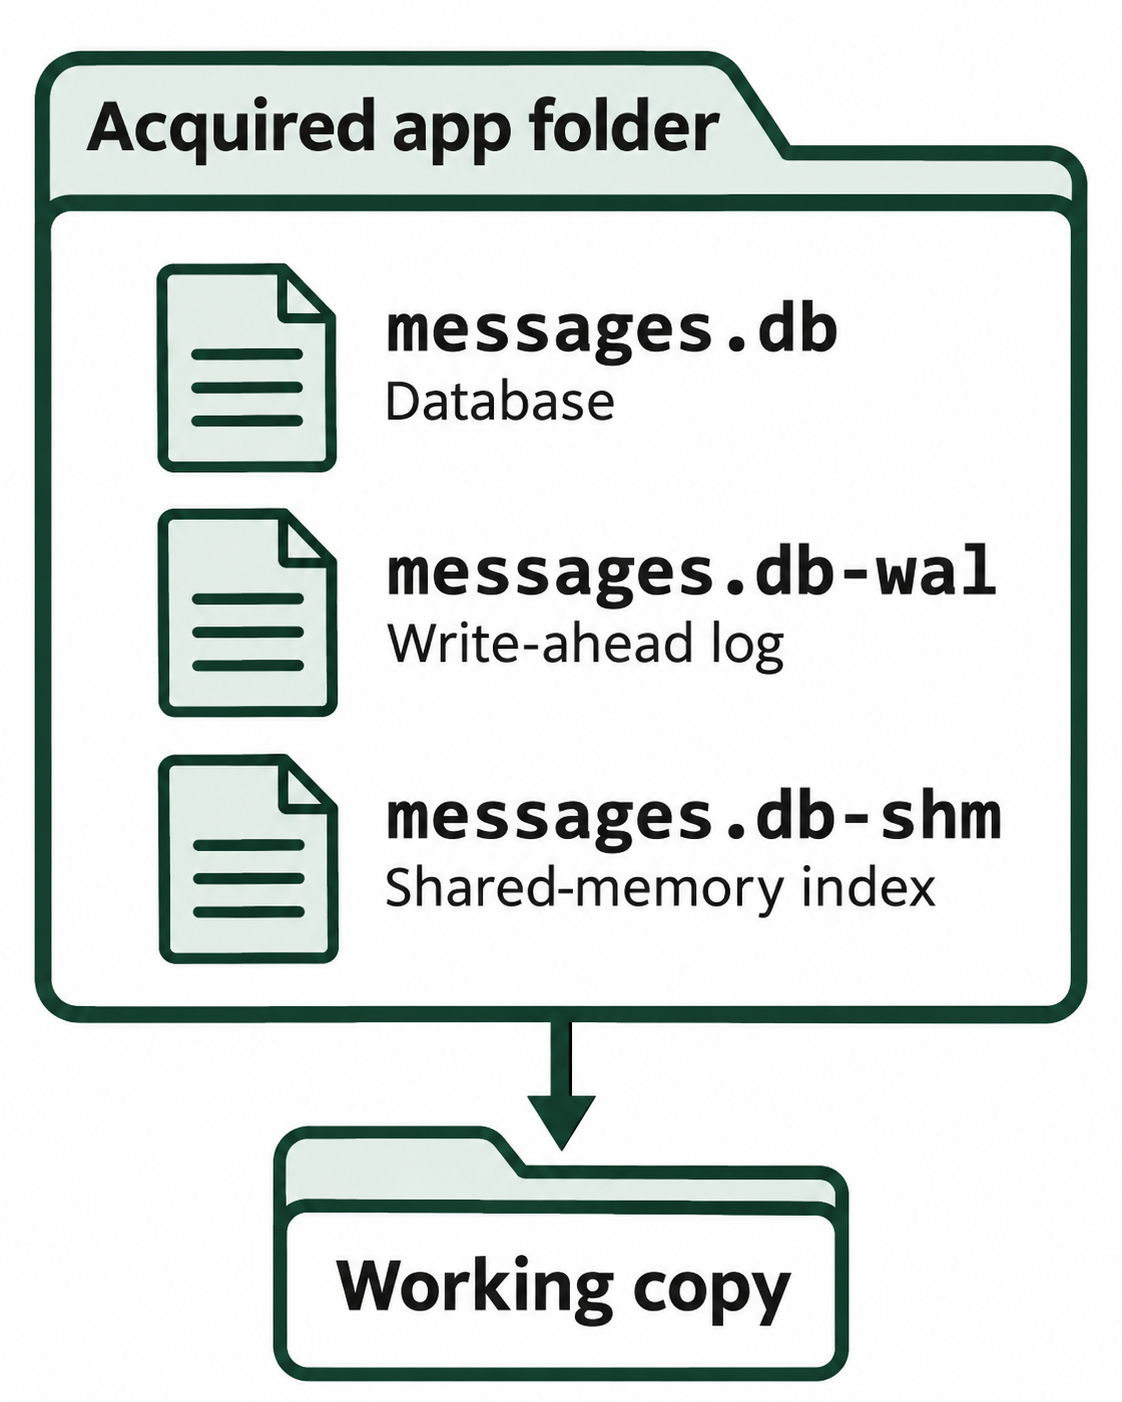
Figure 11.13: Keep a database and its acquired companion files together, then examine working copies.
Open Figure 11.13 at full size
Text description of Figure 11.13
In SQLite write-ahead-log mode, the main database and its companion log may both contribute to the current database state. The example names are illustrative: messages.db is the database, messages.db-wal is its write-ahead log, and messages.db-shm supports the shared-memory index. Preserve the files as acquired and work on copies. A companion file may be absent, and its absence alone does not establish whether messages were deleted.
Concept references: SQLite WAL file format.
Recovering Deleted Records
When a user deletes a text message, the SQLite database does not shrink. Instead, the space occupied by that record is marked as a free page, internal unallocated space within the database file. Until new data overwrites that page, the deleted record remains intact.
Three mechanisms preserve deleted data in SQLite:
- Free Pages: Deleted rows remain in the database file as freed space. Forensic tools (and manual hex inspection) can carve these pages to recover deleted records.
- WAL (Write-Ahead Log) Files: Modern SQLite (used extensively in both iOS and Android) uses WAL mode. All changes, including deletions, are written first to a
.walfile before being committed to the main database. A deleted message often still exists in plain text in the WAL file until a "checkpoint" occurs. The WAL file is the single most valuable artifact for recovering recently deleted mobile data. - Rollback Journals (
.journal): An older mechanism with the same forensic value. If a transaction was interrupted, the journal preserves the pre-change state of the database.
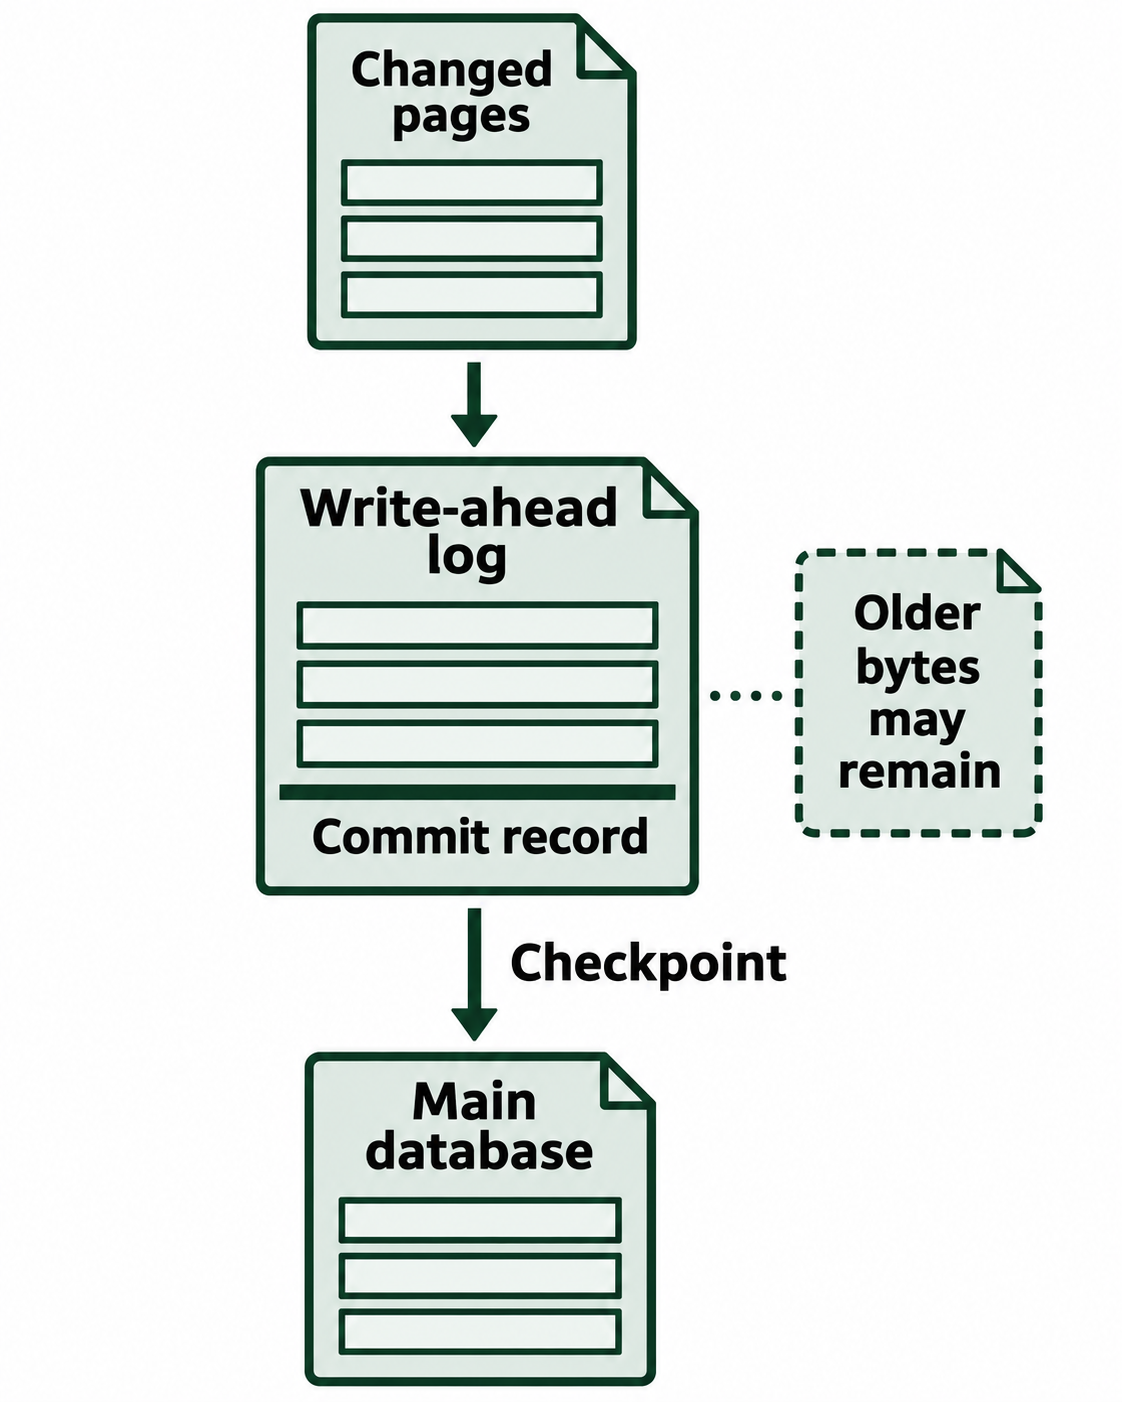
Figure 11.14: A SQLite transaction can commit in the write-ahead log before a checkpoint copies page changes into the main database.
Open Figure 11.14 at full size
Text description of Figure 11.14
A write-ahead log (WAL) stores changed database pages and commit information. Committing a transaction and checkpointing it into the main database are separate operations. Older page versions or freed space may retain recoverable bytes, but overwriting, secure deletion, vacuuming, and app behavior can remove them. A large WAL file does not by itself prove uncommitted changes or recoverable messages. Ordinary queries show the logical database state; specialist recovery may be needed for remnants.
Concept references: SQLite write-ahead logging, SQLite secure-delete behavior.
Manual Validation with DB Browser for SQLite
Automated forensic suites (Cellebrite, Magnet AXIOM) parse databases automatically and present data in readable reports. However, app developers update database schemas constantly. If a tool has not been updated for a new app version, it may miss critical evidence. Additionally, defense attorneys can challenge the accuracy of automated tools.
DB Browser for SQLite is a free, open-source tool that allows you to open raw .db files and write custom SQL queries. The fundamental commands you need are:
SELECT column1, column2 FROM table_name;(retrieve specific columns)WHERE condition;(filter results)ORDER BY column DESC;(sort chronologically)JOIN table2 ON table1.id = table2.id;(connect related tables, such as linking a message to a contact name)
By manually querying the source database and comparing results to the automated tool's report, you scientifically validate the findings. This transforms you from a tool operator into a forensic expert who can testify to the accuracy of the evidence.
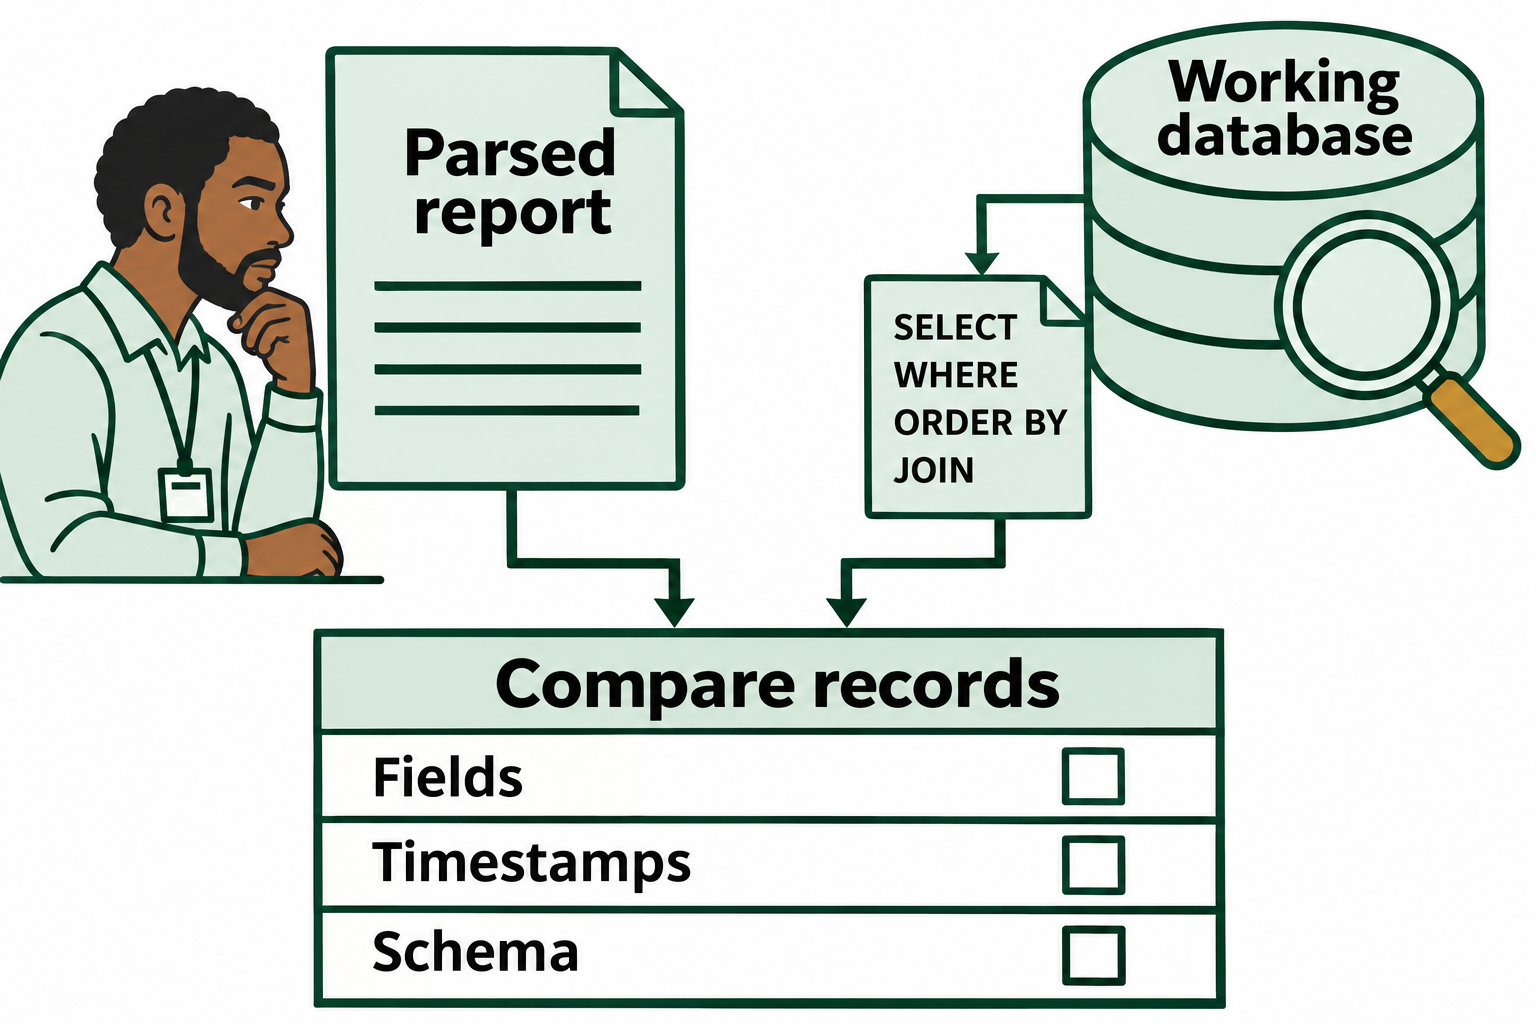
Figure 11.15: Manual review ties a reported result back to its source records, field meanings, and timestamp interpretation.
Open Figure 11.15 at full size
Text description of Figure 11.15
Structured Query Language (SQL) retrieves and relates database records. SELECT chooses fields, WHERE filters records, ORDER BY sorts results, and JOIN relates tables using compatible keys. The examiner first verifies the actual database schema, meaning its table and field structure, then compares source records with the automated report. Query agreement supports a finding but does not by itself establish the identity, intent, or truth of a message's author.
Putting It Together: Breaking the Digital Alibi
At 2:15 AM, an electronics store is burglarized. A suspect is identified and his Android phone is seized under warrant. During interrogation, the suspect claims he was home all night reading news articles on his phone.
The examiner performs a Full File System extraction. The Chrome browser's History database confirms the phone loaded news articles every few minutes between 1:00 AM and 4:00 AM. On the surface, the digital alibi holds.
However, the examiner checks the native messaging database, mmssms.db. The automated tool shows no text messages sent during the crime window. Knowing that automated tools can miss uncommitted transactions, the examiner manually locates the database directory and finds three files: mmssms.db, mmssms.db-shm, and mmssms.db-wal. The presence of a large WAL file indicates data has not been checkpointed.
Using a SQLite forensic recovery tool, the examiner parses the WAL file and discovers deleted SMS records. A custom query joins the recovered messages with the contacts table:
SELECT Contacts.Name, sms.address, sms.body, sms.date
FROM sms
JOIN Contacts ON sms.address = Contacts.Phone_Number
WHERE sms.date > '1708930800000';
The query returns a deleted text with a 13-digit Unix millisecond timestamp: 1708931700000. Decoded, this translates to 2:15 AM, the exact moment of the burglary. The message body reads: "Grab the laptops, I have the car running in the alley." The joined contact name is "Driver," a known associate.
The suspect deleted the messages, but SQLite's WAL mechanism preserved them. The automated tool missed them because the deletion had not yet been checkpointed into the main database. Manual examination of the WAL file broke the alibi.
Analyst Perspective
When automated tools report "no messages found," always check for WAL files and manually inspect the database free pages. The most critical evidence is often in the data the suspect tried to destroy.
11.7 Reporting and Validation
The investigation does not end when data is extracted. It ends when the evidence is presented in a report that is accurate, replicable, and understandable to a layperson jury. A forensic report is the bridge between technical extraction and legal admissibility.
NIST SP 800-101 Reporting Standard
According to NIST, a forensic report must document three components:
- Actions: Every step taken ("Connected device to Cellebrite UFED via Lightning cable at 09:15").
- Observations: The results of each step ("Device entered DFU mode successfully; extraction completed at 10:42").
- Inferences: Conclusions drawn from the data ("The presence of
img_1234.jpgin the Downloads folder indicates it was saved from the web browser, not captured by the camera").
Replicability and Objectivity
A court-ready report must be detailed enough that another competent examiner could follow your steps and arrive at the same result. If your process is not replicable, the scientific validity of your evidence is in question.
Objectivity means reporting facts without advocacy. You are a neutral finder of fact, not an advocate for the prosecution.
- Avoid: "The suspect suspiciously deleted the messages to hide his crime."
- Use: "The message database indicates records between 14:00 and 16:00 were marked as deleted. These records were recovered from the WAL file."
Documenting Anomalies
A forensic examination is rarely perfect. Cables fail, tools crash, and apps go unparsed. You must be transparent about limitations. If the extraction recovered only 60% of the file system, state this and explain why. If an application database could not be parsed by current tools, document the file name and export it for manual review. If the device's system clock was incorrect, note the discrepancy and how you adjusted timestamps.
Validation Methods
Every critical finding must be validated before inclusion in the report:
- Visual Verification: Compare the tool's report output to what is visible on the device screen (if accessible).
- Cross-Tool Validation: Process the same data with a second tool (e.g., Cellebrite and Magnet AXIOM). If both produce identical results, confidence increases significantly.
- External Validation: Compare device call logs against Call Detail Records (CDRs) from the carrier to confirm timestamps and phone numbers.
- Manual Database Validation: Open the raw SQLite database in DB Browser, write a targeted query, and compare the result to the automated report.
Integrity Through Hashing
Hash the forensic image at acquisition. Hash the final report files at delivery. When the defense attorney opens the evidence six months later, matching hashes prove the files have not been altered since your examination. If hashes do not match, the evidence is compromised.
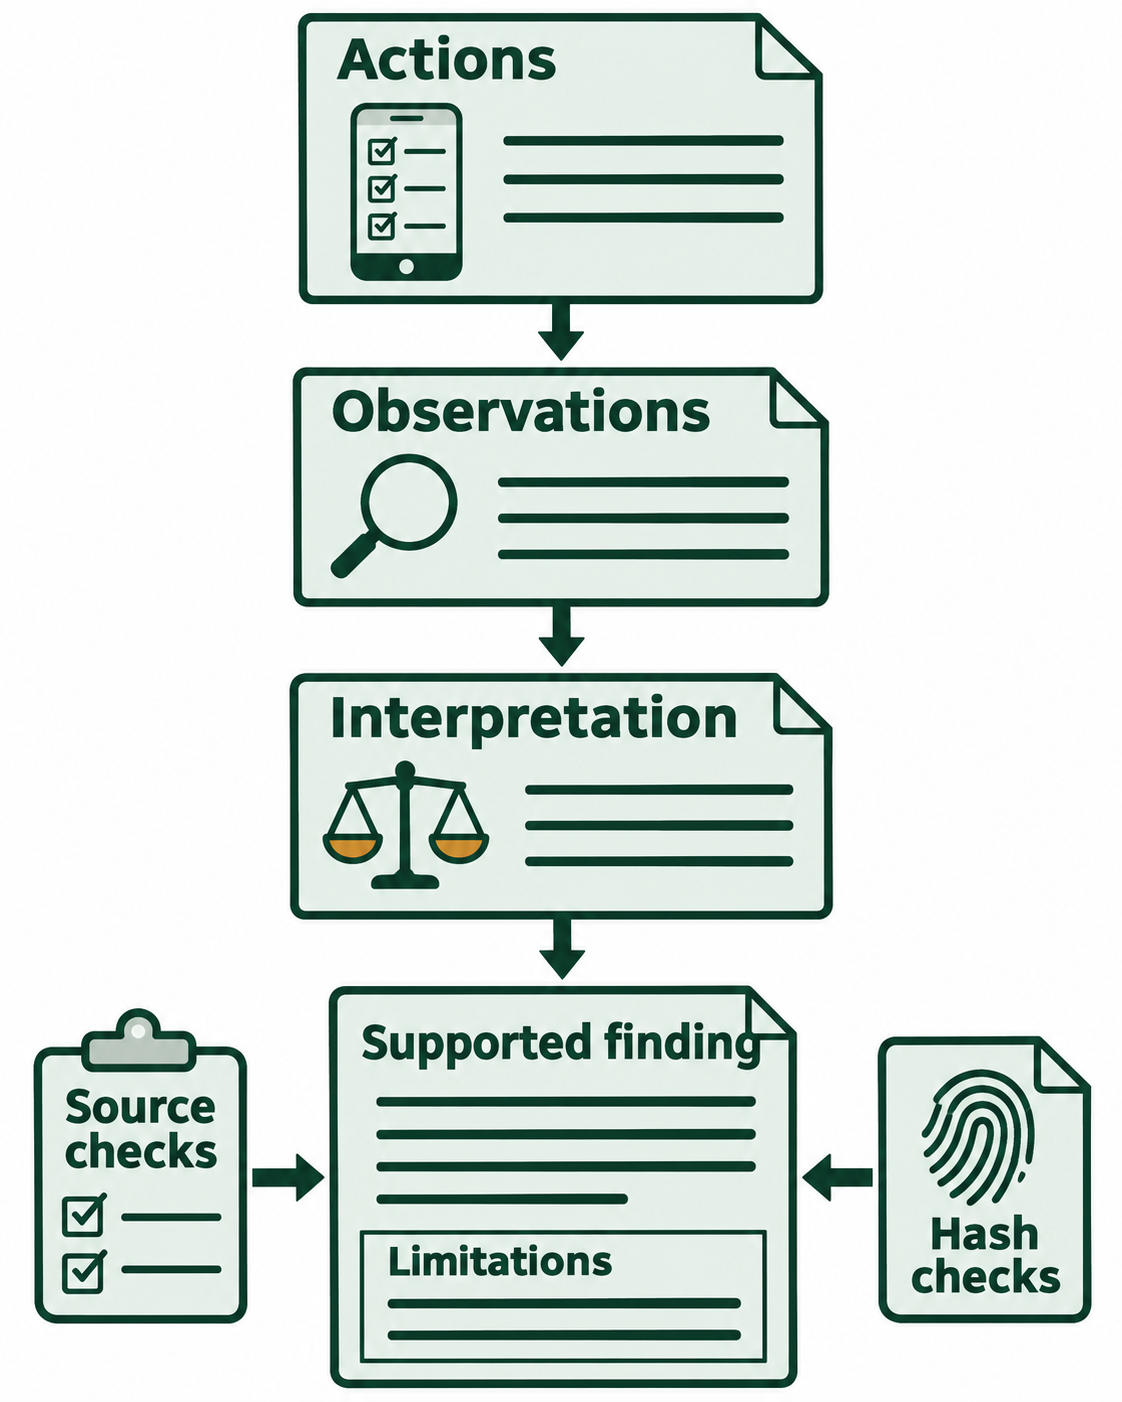
Figure 11.16: A supported finding keeps the action record, observations, interpretation, and validation evidence connected.
Open Figure 11.16 at full size
Text description of Figure 11.16
Record what the examiner did, what the tools or source records showed, and what conclusions those observations support. Validate critical records against appropriate independent sources or methods, and explain discrepancies. A cryptographic hash is a calculated file fingerprint: matching hashes support that the compared bytes remain unchanged, but do not prove that the interpretation is correct or that every source artifact was collected. Report limitations and preserve the evidence trail.
Concept references: NIST mobile device forensics guidance.
Report Delivery Formats
| Format | Strengths | Best Use |
|---|---|---|
| Static, secure, difficult to accidentally edit | Court presentation, official narrative | |
| HTML | Interactive, clickable thumbnails, searchable | Investigator's working copy |
| CSV / Excel | Sortable, filterable, supports pivot tables | Financial analysis, timeline reconstruction |
Warning
If you cannot explain the origin and meaning of every artifact in your report, do not include it. Courts require that you understand the data you present, not merely that a tool generated it.
Chapter Summary
- Mobile forensics requires live interaction with the device OS. Standard write-blockers cannot be used, and every interaction must be minimized and documented.
- Hardware-backed encryption (Secure Enclave, Titan M) has made traditional physical acquisition near-impossible on modern devices. The BFU/AFU distinction determines how much data is accessible: keeping a device in AFU state is paramount.
- Legal authority (Riley v. California) demands a warrant before searching a phone's digital contents. That warrant must establish a legal nexus between the crime, suspect, and device, and must explicitly include SIM cards and removable storage.
- First responder protocols (NIST SP 800-101) and proper isolation (Faraday bags, Airplane Mode) are the difference between preserving and losing evidence.
- The SIM card provides network identity (IMSI), device attribution (paired with IMEI), and last-known location (EF_LOCI). However, modern criminal communication has shifted to OTT apps whose data lives in device databases, not on the SIM.
- Distinguishing MNOs from MVNOs is essential for directing legal requests to the correct custodian. Tower dumps go to the MNO; subscriber data goes to the MVNO.
- File System Acquisition is the modern standard, offering the best balance of data recovery (including deleted records from free pages and WAL files) and success rate on encrypted devices.
- SQLite databases are the backbone of mobile evidence. Mastering timestamp decoding (Unix, Mac Absolute, Chrome) and SQL queries (SELECT, JOIN, WHERE) enables manual validation of automated findings.
- WAL files and database free pages are the primary sources for recovering deleted mobile evidence. When automated tools report "nothing found," manual examination of these artifacts often reveals the case-breaking data.
- Validation through cross-tool verification, manual SQL queries, and external records (CDRs) ensures every finding is defensible in court.