CH14: Data Hiding Techniques in Windows
Introduction
Suspects rarely store incriminating data in plain sight. Some hide files because they understand the technology; many more hide files because the operating system makes it almost effortless. By the time an examiner sits down with an image, the evidence may live behind a "hidden" attribute, inside a stream the user never saw, in the slack between clusters, or wrapped inside an unrelated image file. Chapter 14 catalogs the data hiding techniques you are most likely to encounter on a Windows endpoint, explains the file system or operating system mechanism that makes each one possible, and shows how to detect and recover the hidden content.
The chapter moves intentionally from low-effort hiding (attributes, naming, obscure paths) up through file system level concealment (Alternate Data Streams, slack, unallocated, sparse files) and finishes with steganography and a repeatable audit workflow. Earlier chapters of CFS257 taught you what each Windows artifact contains; this chapter teaches you to look at the same artifacts through an adversarial lens and ask "what could a determined user be hiding here, and how would I prove it?"
Learning Objectives
By the end of this chapter, you will be able to:
- Differentiate user level hiding (attributes, naming, location) from file system level hiding (Alternate Data Streams, slack, unallocated, sparse).
- Demonstrate creation and detection of NTFS Alternate Data Streams using both cmd.exe and PowerShell.
- Explain how slack space, unallocated space, and the $LogFile and $UsnJrnl preserve fragments of intentionally deleted or hidden data.
- Identify common steganographic carriers and evaluate when statistical or signature based detection is appropriate.
- Build an investigative workflow that systematically uncovers hidden data on a Windows endpoint and documents each finding to chain of custody standards.
14.1 The Data Hiding Mindset
Data hiding is less about cryptography than about exploiting assumptions. Most users assume that if a file does not appear in File Explorer, it is not there. Most tools assume that a file's logical size matches its physical footprint. Most investigators, when pressed for time, assume that the operating system is telling the truth about what it owns. A skilled examiner systematically challenges each of those assumptions.
It helps to think about concealment in three layers:
- Human layer. The user changes a file's name, extension, or location so that a casual observer overlooks it. No special tools required.
- Operating system layer. The user leverages OS conventions, such as the
HiddenandSystemattributes, the recycle bin, or the registry, to make content invisible to standard interfaces. - File system layer. The user, or malware acting on the user's behalf, takes advantage of NTFS structures that the operating system surfaces only when explicitly asked: Alternate Data Streams, sparse allocation, reparse points, and the residual data inside slack and unallocated space.
Your posture as the examiner has to shift from "search for a file by name" to "audit every container that could hold bytes." That single mental change is the most important takeaway in this chapter. Figure 14.1 maps the three layers visually so you can orient each technique you encounter in the sections that follow.
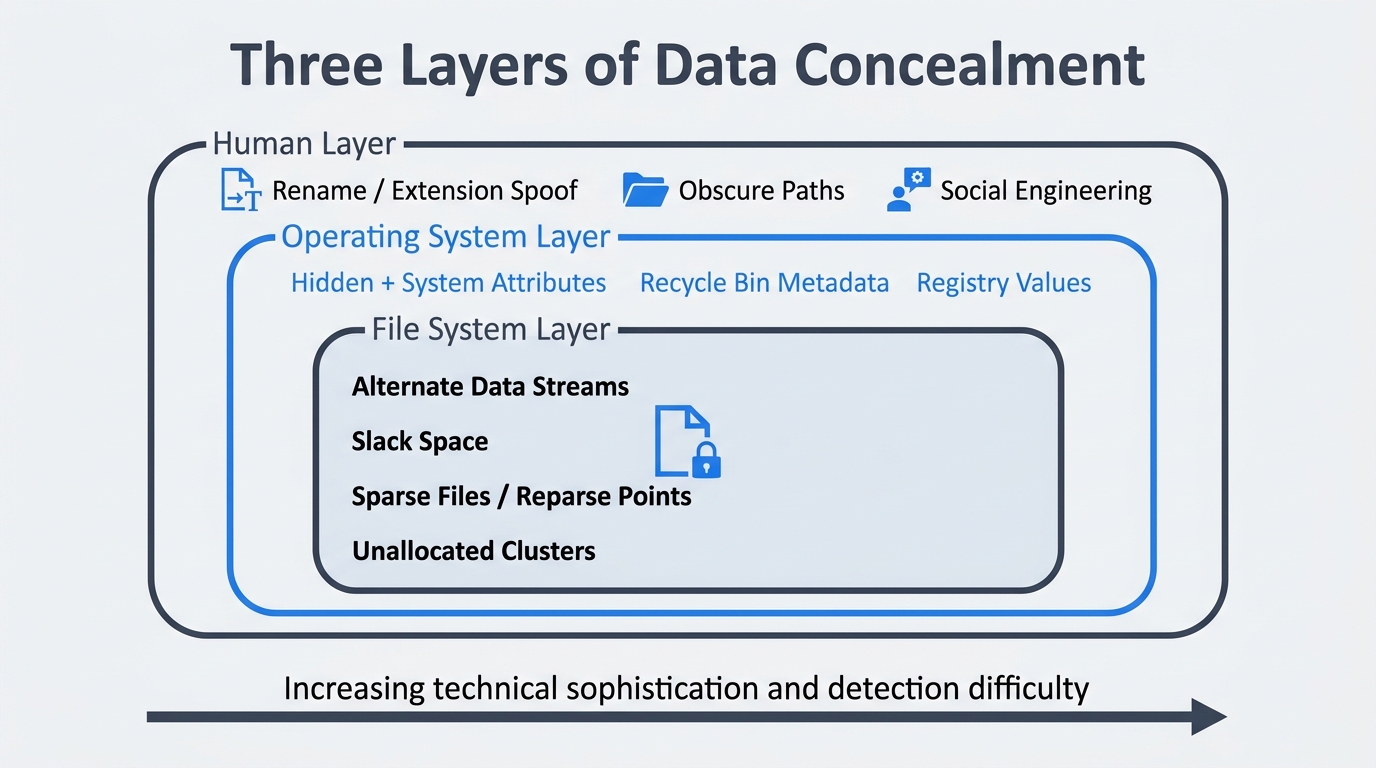
Figure 14.1: Three layers of data concealment. Techniques at the outer human layer require no special tools; techniques at the inner file system layer exploit NTFS structures invisible to default interfaces. Detection difficulty increases from outside in.
Putting It Together: The 0-Byte Anomaly
A junior analyst is triaging a workstation seized in an intellectual property theft case. File Explorer shows nothing unusual in the suspect's Documents folder. While reviewing the $MFT in a forensic suite, the analyst notices a file named notes.txt that reports a logical size of 0 bytes but consumes a 1,024 byte MFT record, which is unusually large for an empty file. A quick check reveals an Alternate Data Stream named :proj_q4 containing 480 KB of source code. The visible file was a decoy. The hidden stream was the actual evidence. The lesson: trust the structures, not the icons.
14.2 User Level Hiding: Low Effort, High Frequency
The vast majority of hidden data on a real Windows endpoint never moves beyond this layer. Users toggle attributes, rename files, or bury content inside paths they expect no one to look at. None of this is sophisticated, but it works on family members, casual coworkers, and in many cases, the first responder who only opens File Explorer.
Hidden and System Attributes
NTFS exposes per file attribute flags that the operating system honors when deciding what to display. Two of those flags drive most casual hiding: Hidden (H) and System (S). Files marked with both rarely appear in default Explorer views even when "show hidden files" is enabled, because Explorer treats System files as protected.
From cmd.exe:
attrib +h +s secret.docx
attrib secret.docx
dir /a:hs C:\Users\suspect\Documents
From PowerShell:
(Get-Item .\secret.docx -Force).Attributes = 'Hidden, System, Archive'
Get-ChildItem -Force -Attributes Hidden,System -Recurse
The -Force switch is critical. Without it, Get-ChildItem and Get-Item ignore items the user has marked hidden, which is exactly the blind spot the suspect was counting on.
Renaming and Extension Spoofing
Renaming payroll.xlsx to winupd.dll and dropping it into a system folder is a five second operation that defeats keyword based searches. The defense is to verify file content against the magic bytes in the header rather than trust the extension. From PowerShell, the first eight bytes of any file are enough to identify most common formats:
Get-Content -Path .\winupd.dll -AsByteStream -TotalCount 8
A .docx, .xlsx, or .pptx will reveal the ZIP signature 50 4B 03 04. A real DLL begins with 4D 5A (the MZ header). Any mismatch is worth investigating. Figure 14.2 shows this exact scenario side by side: what a casual user sees versus what the examiner's hex view reveals.
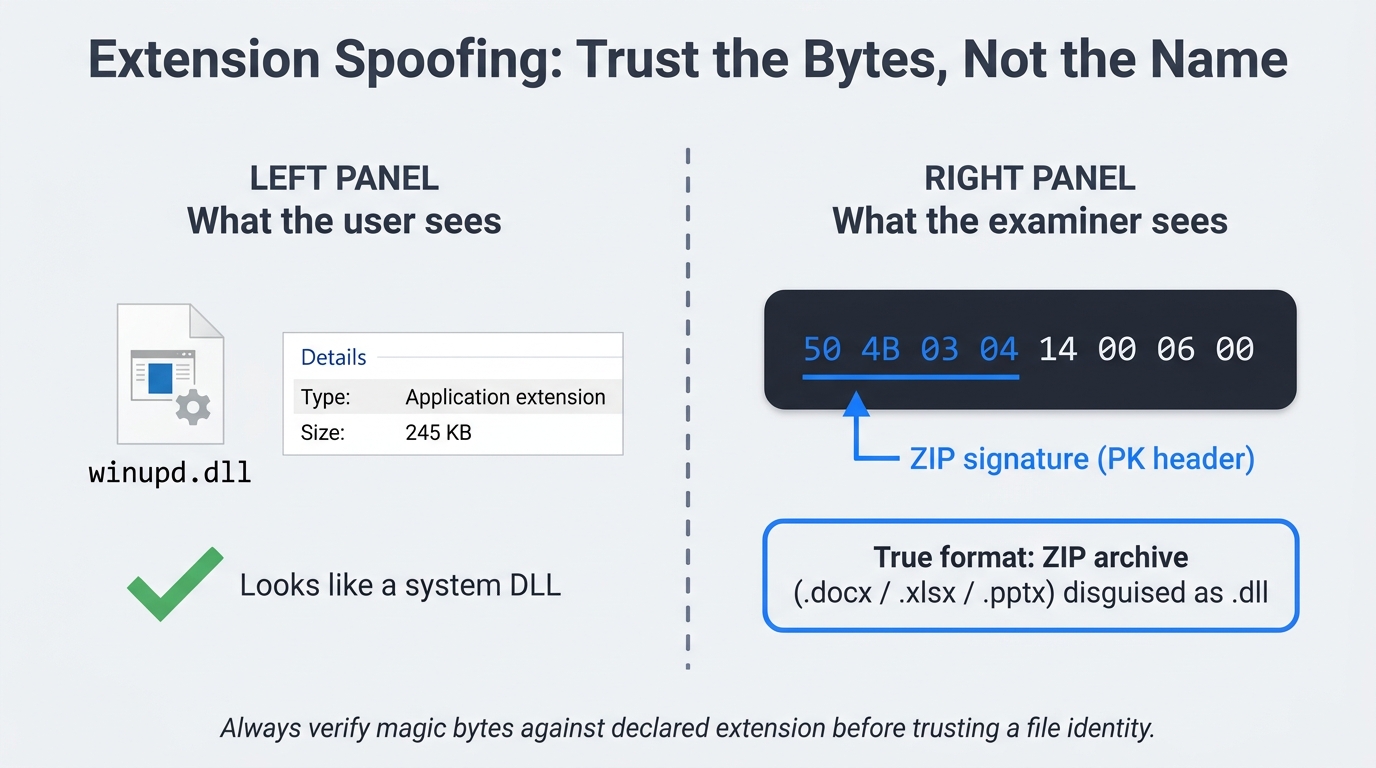
Figure 14.2: Extension spoofing in practice. The left panel shows the file as Explorer presents it; the right panel shows the first eight bytes in a hex view, where the ZIP signature (PK header) proves the file is a disguised Office document, not a system DLL.
Obscure but Legitimate Paths
Windows is full of folders that legitimate software writes to and ordinary users never visit. Suspects know this. The locations to audit on every case include %APPDATA%, %LOCALAPPDATA%, %PROGRAMDATA%, the per user Temp directory, the WindowsApps directory under Program Files, the OneDrive cache (covered in Chapter 13), and the $Recycle.Bin $I/$R pairs that retain deleted file metadata even after the user "empties" the bin from their own profile.
Reference Table: Attribute Flag Detection
| Flag | Meaning | cmd.exe detection | PowerShell detection |
|---|---|---|---|
| H | Hidden from default Explorer view | dir /a:h |
Get-ChildItem -Force -Hidden |
| S | System file, protected | dir /a:s |
Get-ChildItem -Force -Attributes System |
| H + S | Combined, suppressed even with "show hidden" | dir /a:hs |
Get-ChildItem -Force -Attributes Hidden,System |
| R | Read only, often used to discourage edits | dir /a:r |
Get-ChildItem -Attributes ReadOnly |
| O | Offline (Files On-Demand placeholder, see Ch. 13) | dir /a:o |
Get-ChildItem -Attributes Offline |
14.3 NTFS Alternate Data Streams
If you remember one technique from this chapter, make it Alternate Data Streams. ADS are a legitimate NTFS feature, they are invisible to almost every default tool, and they are still being abused in modern malware loaders.
To understand ADS from first principles, recall that NTFS does not store files as monolithic blobs. Every file is a collection of named attributes, and the actual content lives inside an attribute called $DATA. Most files have exactly one unnamed $DATA attribute, which is what you see when you open the file. NTFS allows additional, named instances of $DATA attached to the same file record. Each named instance is an Alternate Data Stream. They share the parent file's name, security descriptor, and timestamps, which is what makes them so effective at hiding. Figure 14.3 shows the anatomy of a single MFT record that contains both an unnamed default stream and a named alternate stream, along with the difference between what Explorer displays and what dir /R reveals.
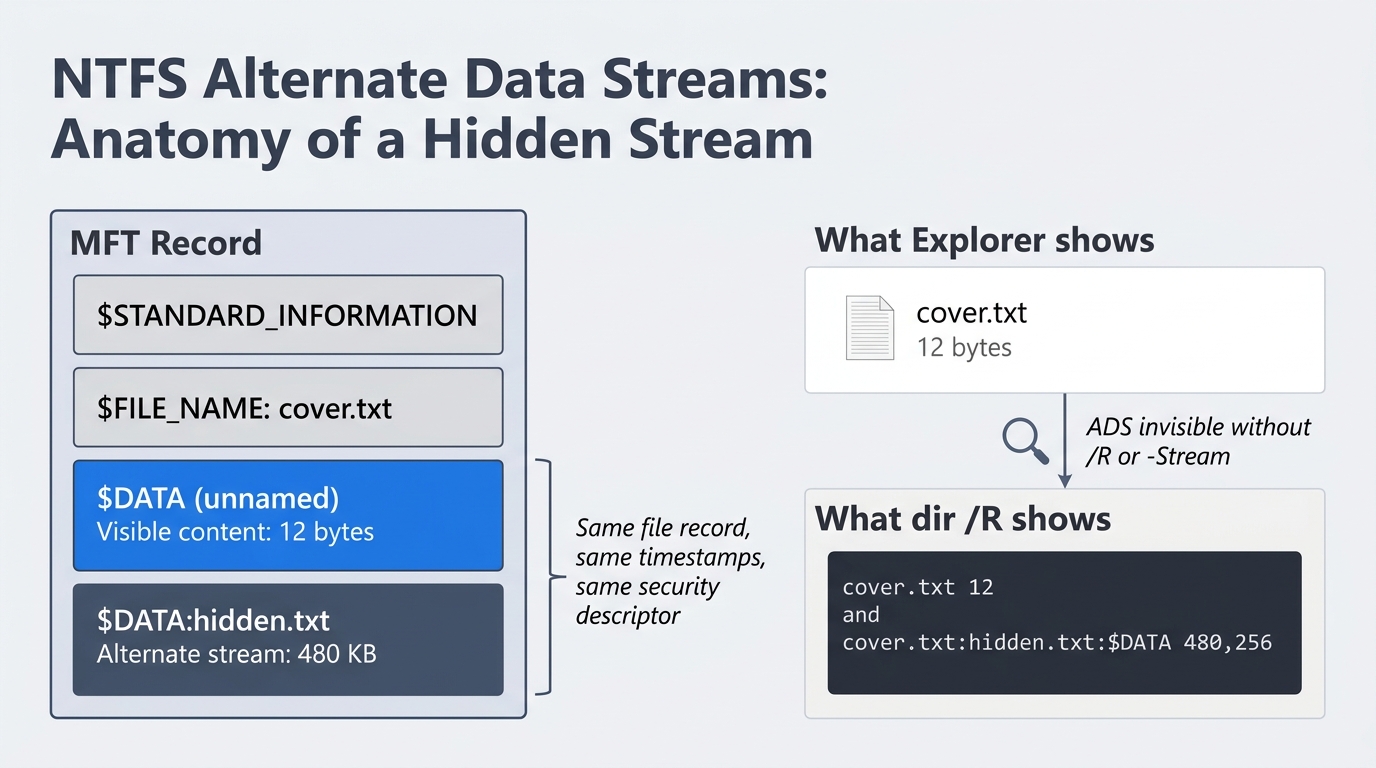
Figure 14.3: Anatomy of an NTFS Alternate Data Stream. The MFT record holds both the unnamed default $DATA attribute and a named alternate stream. Explorer shows only the default stream's 12-byte size; dir /R and Get-Item -Stream * expose the concealed 480 KB payload.
Creating an ADS from cmd.exe
echo Hidden payload text > cover.txt
type secret.txt > cover.txt:hidden.txt
echo Another stash >> notes.txt:stash.txt
After running these commands, cover.txt and notes.txt look entirely normal. Their reported size in dir reflects only the unnamed default stream.
Creating an ADS from PowerShell
Set-Content -Path .\cover.txt -Value 'visible content'
Add-Content -Path .\cover.txt -Stream hidden -Value (Get-Content .\secret.txt -Raw)
Set-Content -Path .\notes.txt -Stream stash -Value 'Hidden payload text'
Set-Content -Stream and Add-Content -Stream are the modern, scriptable way to write streams. They work on any file, including a 0 byte file created solely as a carrier.
Identifying an ADS from cmd.exe
dir /R
more < cover.txt:hidden.txt
dir /R is the only built in cmd.exe command that lists alternate streams. It has been present in every supported version of Windows since Vista. The output appends each stream on its own line directly under the parent file, with the stream's size in bytes.
Identifying an ADS from PowerShell
Get-Item -Path .\cover.txt -Stream *
Get-Content -Path .\cover.txt -Stream hidden
Get-ChildItem -Recurse -Force | ForEach-Object { Get-Item -LiteralPath $_.FullName -Stream * -ErrorAction SilentlyContinue } | Where-Object Stream -ne ':$DATA'
The third command is the workhorse. It walks an entire directory tree, asks each file for every stream it owns, and filters out the unnamed default stream so that only true alternates remain.
To remove an ADS for testing, use Remove-Item -Path .\cover.txt -Stream hidden from PowerShell, or copy the carrier to a FAT32 or exFAT volume. Neither file system supports streams, so the copy operation silently strips them.
The Zone.Identifier Stream
The most common ADS on any Windows system is Zone.Identifier, which Windows attaches to files downloaded from the internet to flag their origin and trigger the Mark of the Web warning. Attackers routinely strip this stream to bypass SmartScreen, and forensic examiners routinely read it to determine where a suspect file came from. From PowerShell:
Get-Content .\suspicious.exe -Stream Zone.Identifier
A populated Zone.Identifier typically reveals the referrer URL and host URL of the original download, which can corroborate browser history found in Chapter 11.
Analyst Perspective
ADS abuse is not historical. Modern loaders, including several variants in the BazarLoader and Gootloader families, store second stage payloads inside Alternate Data Streams attached to innocuous text or log files. Many EDR products inspect the parent file's primary stream and never enumerate alternates, which means a clean looking host can still be staging a payload. When you triage a suspected loader, sweep the user's profile and %PROGRAMDATA% for ADS before declaring the box clean.
Forensic Detection at Scale
For a single host, Get-ChildItem -Recurse | Get-Item -Stream * is enough. For an enterprise sweep, use AlternateStreamView from NirSoft, the KAPE !ADS module, or a Velociraptor hunt that wraps Get-Item -Stream * and reports back any non default stream. Note the streams you find, hash them as their own evidence items, and document the parent file separately.
14.4 File System Slack and Unallocated Space
Slack and unallocated space are not deliberate hiding techniques. They are byproducts of how NTFS allocates storage, and a knowledgeable suspect can use them on purpose, but more often they preserve fragments of activity the suspect believed was gone.
Cluster Geometry and File Slack
NTFS allocates storage in fixed size clusters. On most modern Windows installations, the cluster size is 4,096 bytes. When a file's logical content is smaller than its allocated clusters, the leftover space is called slack. A 1,200 byte text file occupies one 4,096 byte cluster, which leaves 2,896 bytes of slack. Whatever bytes lived in those clusters before the new file was written are still physically present until something else overwrites them.
There are three flavors of slack worth knowing:
- RAM slack is the very end of the file's last sector, padded by the OS at the time of write. On modern Windows, it is usually zeroed out, but on older systems it could leak in memory contents.
- File slack spans the remainder of the cluster after the file's last sector. This is where carving yields its biggest wins.
- Drive slack appears at the end of a partition or volume that does not align cleanly with the disk geometry.
Unallocated Space and the $MFT
When a user "deletes" a file, NTFS marks the corresponding $MFT record as free and releases the file's clusters back to the allocation pool. The bytes themselves stay on disk until something else claims those clusters. The longer a system runs after a deletion, the more likely the data is partially overwritten, but partial recovery is still common. Tools like bulk_extractor and Autopsy specialize in carving structured artifacts (emails, JPEGs, credit card numbers) out of unallocated regions without relying on file system metadata.
$LogFile and $UsnJrnl as a Paper Trail
Two NTFS structures preserve a record of recent file activity even when the files themselves are gone. $LogFile is the NTFS transaction log that records metadata changes for crash recovery. $UsnJrnl (the Update Sequence Number Journal) records every change to a file or directory in its own append only ring buffer. Both can show that a file existed, when it was created, and when it was renamed or deleted, even after the data has been wiped.
Warning
$UsnJrnl is a ring buffer with a finite size, and on a busy system it can roll over in days. If you are responding to an incident, image the volume immediately and parse the journal early. Waiting a week may mean the entries that prove tampering have already been overwritten.
Reference Table: Slack and Residual Artifacts
| Artifact | Where it lives | Recommended tool | Typical recovery yield |
|---|---|---|---|
| File slack | End of each allocated cluster | Autopsy, bulk_extractor |
Fragments of prior file content, deleted text |
| Unallocated clusters | Free pool tracked by $Bitmap |
Autopsy, X-Ways, PhotoRec | Carved files, deleted email, browser cache |
$MFT orphans |
$MFT records flagged free |
MFTECmd, Autopsy | Filename, timestamps, parent directory |
$LogFile |
NTFS metadata file | LogFileParser, Eric Zimmerman tools | Recent metadata changes, rename and delete records |
$UsnJrnl |
NTFS metadata file | MFTECmd -j, UsnJrnl2Csv |
Per file change history, USN reasons |
14.5 Sparse Files, Compression, and Reparse Points
NTFS gives applications several ways to make a file appear smaller, larger, or differently located than it really is. Each one is a legitimate feature, and each one can be used to obscure evidence.
A sparse file declares a logical size much larger than its allocated clusters, with the unwritten regions reported as zeros. A 10 GB sparse file might consume only 200 MB on disk. From an examiner's perspective, the danger runs in both directions. A suspect can use sparse semantics to make a small payload look like an unremarkable large file, and an imaging tool that does not honor sparse flags may try to read the file's full logical size and inflate the working image.
NTFS compression is a casual obfuscation layer. A compressed file is not encrypted, but it does require any tool reading it to be NTFS aware. Some keyword search utilities skip compressed files entirely, which is exactly the gap a suspect can exploit.
Reparse points are NTFS objects that redirect file access somewhere else. Junctions, symbolic links, and mount points are all reparse points. A suspect can create a junction inside a heavily monitored folder that silently redirects access to a hidden directory on a different volume. Files On-Demand placeholders from Chapter 13 are also reparse points, which is why Files On-Demand interacts so strangely with imaging. Figure 14.5 places both concepts side by side: the sparse file's logical-versus-physical size discrepancy on the left, and the reparse point's silent folder redirection on the right.
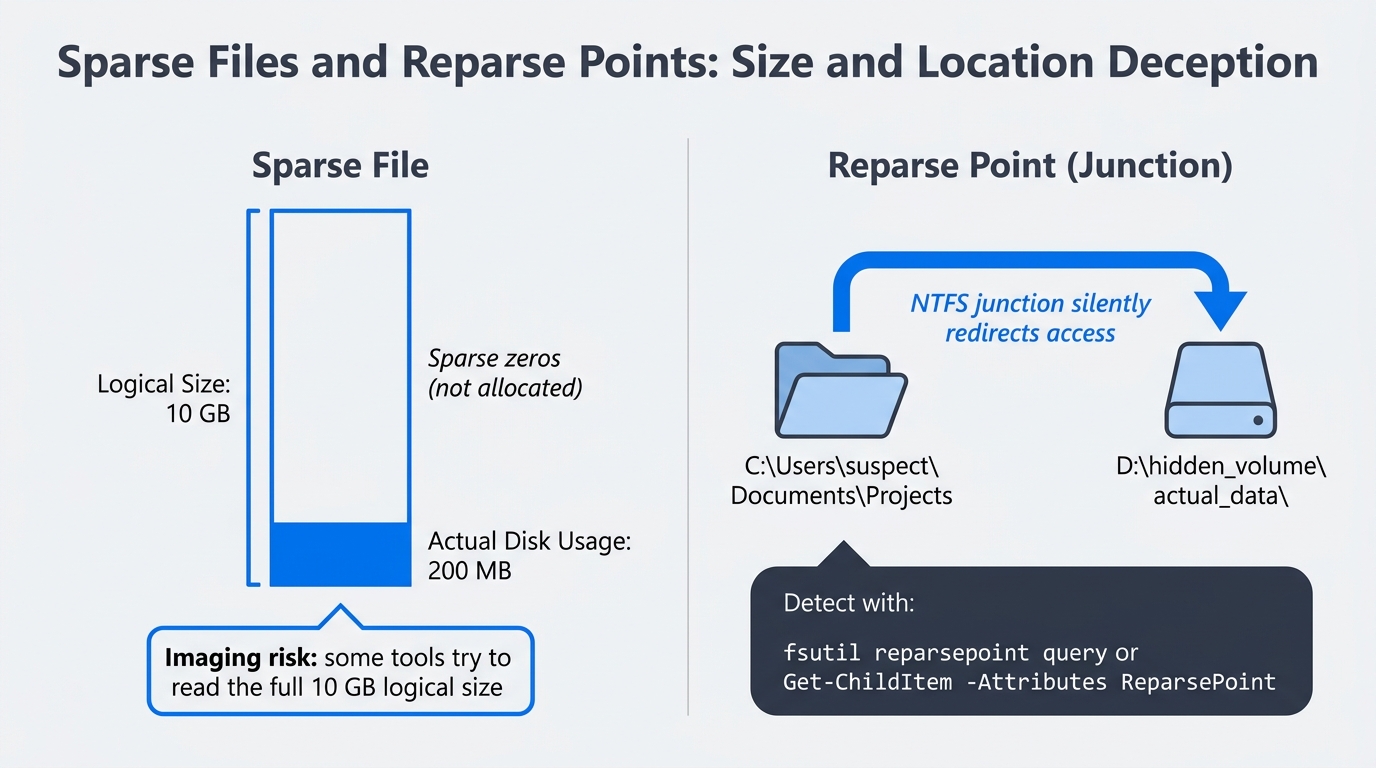
Figure 14.5: Sparse files and reparse points as hiding mechanisms. A sparse file reports a 10 GB logical size while consuming only 200 MB on disk. A junction reparse point makes a folder appear to live in one location while silently redirecting access to another volume.
Detection from cmd.exe:
fsutil sparse queryflag C:\Users\suspect\reports\large_dataset.bin
fsutil reparsepoint query C:\Users\suspect\Documents\Projects
Detection from PowerShell:
Get-Item .\large_dataset.bin -Force | Select-Object Name, Length, Attributes
Get-ChildItem -Recurse -Force | Where-Object { $_.Attributes -match 'ReparsePoint' }
Warning
Some imaging and triage tools silently expand sparse files when they read them, which inflates the working evidence and can blow past disk space budgets. Confirm your tool's sparse handling before imaging a system known to use deduplication, virtual machine disks, or large database files.
14.6 Steganography and Container Based Hiding
Steganography is the practice of hiding data inside an unrelated carrier so that the existence of the hidden data is itself concealed. In real cases, true steganography is rare. When it does appear, it usually involves least significant bit (LSB) manipulation of an image file, which alters the lowest order bit of each pixel's color values to encode hidden bytes. The visual change is imperceptible, and a 5 megapixel image can carry roughly 2 MB of hidden content.
Audio and video carriers work on similar principles, exploiting bits the human ear or eye cannot perceive. Encrypted containers are a more common cousin: VeraCrypt volumes, BitLocker To Go drives, and password protected .7z or .zip archives all hide content not by camouflaging it but by making it inaccessible without a key.
Detection rarely relies on visual inspection. The signals that point to steganography include:
- Entropy spikes. Hidden encrypted payloads inflate a file's entropy. Tools like
binwalk -Eand DensityScout flag files whose entropy is inconsistent with their declared format. - Size anomalies. A 12 MB JPEG of a wedding photo is suspicious. A
.docxwhose internal media folder contains a 200 MB image is suspicious. - Helper application traces. Suspects rarely embed payloads by hand. Look for steganography tools, archive utilities, or VeraCrypt in
Prefetch,AmCache, and the user's installed programs. The presence of the tool is corroborating evidence even if the carrier is gone. - Magic byte mismatches. A file declared as
.pngwhose first bytes are not89 50 4E 47deserves attention.
Open source tools worth knowing include stegdetect (legacy but useful), zsteg for PNG and BMP, binwalk for file embedding, exiftool for metadata, and DensityScout for entropy scans. None of them produce a confession; they produce leads. Figure 14.6 organizes the four primary detection signals as a quick-reference card set.
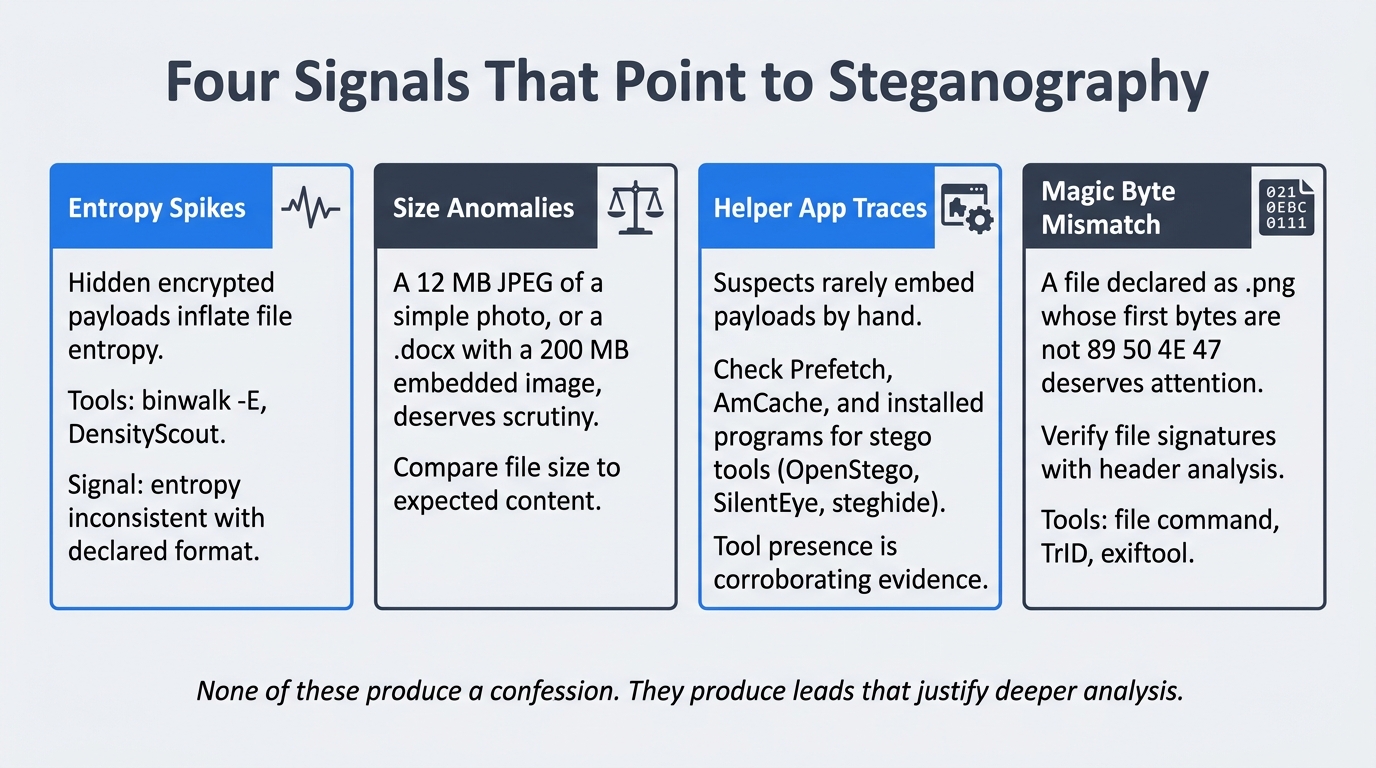
Figure 14.6: Four signals that point to steganography. Each card names the indicator, the tools that surface it, and the investigative logic. These produce leads, not conclusions; deeper analysis and corroborating evidence are required to build a case.
Putting It Together: The CSV in the JPG
Picking up the exfiltration scenario from Chapter 13, imagine the suspect copies a customer list out of a CRM, opens it in a steganography tool, and embeds it inside a vacation photo. The photo is then dropped into the user's OneDrive folder, which syncs it to the cloud and shares the link with an external recipient.
A purely browser based investigation would find nothing alarming. A file system level review changes the picture. The OneDrive ODL logs (Chapter 13) show the file's upload event. AmCache shows that a stego helper application ran on the workstation forty seconds before the file's modification time. An entropy scan with binwalk -E flags the JPEG as anomalously high entropy for an image of its dimensions. None of these alone proves wrongdoing, but together they form a chain that justifies asking the user to produce the original photo and explain the discrepancy.
Analyst Perspective
Real steganography cases often hinge on circumstantial proof. The math behind LSB hiding is sound enough that you may never recover the exact payload without the password or the original tool. Build your report around the supporting evidence: tool execution, timeline correlation, file size anomalies, and witness statements. Juries understand "the suspect ran a tool that hides data, and within one minute a suspicious file appeared in their cloud folder" even when they cannot read the hidden bytes.
14.7 Registry and Memory as Hiding Surfaces
The Windows registry is structured to hold small configuration values, but nothing in the registry's design forces a value to be small or to look like configuration. Suspects and malware authors take advantage of this by storing payloads inside REG_BINARY values, oversized REG_SZ strings, or base64 blobs that a Run key decodes at startup.
Common patterns to look for:
- A Run or RunOnce key that points to
powershell.exe -EncodedCommand <base64>. The base64 is the payload. - A custom
HKCU\Software\<vendor>\<key>whose values are unusually large and binary, especially when the vendor name is not recognized. - A scheduled task whose action references a script that reads from a registry value.
Memory is the other surface where data can live without ever touching disk. Fileless malware decrypts a payload directly into a process's address space and never writes the decrypted form to a file. Chapter 8 and Chapter 9 covered memory acquisition and analysis in depth. The lesson to bring forward into this chapter is that registry and memory are not separate disciplines from data hiding. They are alternative containers, and the same investigative discipline applies: enumerate every container, audit it against expected baselines, and document what you find.
14.8 Building a Repeatable Hidden-Data Audit Workflow
A systematic audit beats a clever one. Use the following triage order when you suspect hidden data on a Windows endpoint, and adjust it to the case rather than skipping steps.
- Attribute sweep. Enumerate Hidden, System, and Offline files with
Get-ChildItem -Force -Recurseacross user profiles. Note anything unexpected. - Alternate Data Stream sweep. Run a recursive
Get-Item -Stream *walk and flag any file that owns a stream other than the unnamed default andZone.Identifier. - Slack and unallocated carve. Process the working image with Autopsy or
bulk_extractoragainst unallocated and slack regions. Set realistic carve filters; do not let the tool spend ten hours carving every JPEG fragment unless you need them. - Sparse and reparse point audit. Enumerate sparse files and reparse points with
fsutiland PowerShell. Verify that each one is consistent with installed software. - Entropy and signature scan. Run
binwalk -Eand a magic byte scan against media folders, OneDrive folders, and any directory the user owns that contains large or numerous files. - Registry and memory review. Pull Run keys, scheduled tasks, and oversized binary registry values with RegRipper. If you have a memory image, search for command lines containing
EncodedCommandand known stego tool names. - Document everything. Every command run, every output observed, every recovered artifact, hashed and entered into the case log.
A baseline KAPE target and module stack for this workflow includes !SANS_Triage for initial triage, the !ADS module for stream enumeration, RegistryHives for offline registry parsing, and MFT plus UsnJrnl for the file system journals. Customize per case.
The discipline of repeating the same audit on every case matters more than the specific tools. Hidden data rewards examiners who refuse to skip steps, and it punishes examiners who rely on intuition.
Chapter Summary
- Data hiding succeeds because users and tools make assumptions. The examiner's job is to challenge every assumption with a verifiable check.
- User level hiding (attributes, naming, obscure paths) is the most common technique and the easiest to defeat with
dir /a:hsorGet-ChildItem -Force. - NTFS Alternate Data Streams are a legitimate file system feature that hides arbitrary content inside an unrelated carrier file. Both
cmd.exe(type >,dir /R,more <) and PowerShell (Set-Content -Stream,Get-Item -Stream *) can create and detect them. - Slack space, unallocated clusters,
$LogFile, and$UsnJrnlpreserve fragments of deleted or hidden data long after the user believes it is gone. - Sparse files, NTFS compression, and reparse points can disguise the size, content, or location of evidence, and can interact poorly with imaging tools that do not honor their semantics.
- Steganography is rare but real, and detection usually depends on circumstantial evidence: entropy anomalies, size mismatches, and the presence of helper tools in execution artifacts.
- Registry values and memory regions are alternative containers for hidden data. Audit them with the same discipline you apply to the file system.
- A repeatable triage workflow (attributes, ADS, slack, sparse, entropy, registry, document) is more reliable than ad hoc searching.