CH10: Anti-Forensics & Data Hiding
Chapter Overview
In Chapters 1 through 9, we built a comprehensive toolkit for finding digital evidence—from the Registry artifacts that track user behavior, to the memory dumps that capture running malware, to the email headers that trace a phishing campaign back to its origin. Every chapter assumed that the evidence was there, waiting to be found by a skilled investigator.
This chapter confronts the other side of the equation. Sophisticated suspects do not simply commit crimes and walk away. They actively work to prevent, delay, or corrupt the forensic process. This discipline is known as Anti-Forensics, and it targets every phase of the forensic lifecycle we established in Chapter 1.
Anti-forensics is not theoretical. Investigators encounter these techniques in the majority of serious criminal and corporate cases. A ransomware operator encrypts the victim's data and their own command infrastructure. An insider threat runs CCleaner before returning their company laptop. A suspect renames incriminating files and hides them inside alternate data streams. Understanding these techniques is not optional—it is prerequisite to detecting them. You cannot find what you do not know to look for.
This chapter covers four categories of anti-forensics: Encryption (making data unreadable), Data Hiding (concealing data in plain sight), Artifact Destruction (wiping evidence), and Trail Obfuscation (falsifying what remains). For each technique, we examine how it works, how to detect it, and which forensic artifacts survive despite the suspect's efforts.
Learning Objectives
By the end of this chapter, you will be able to:
- Define anti-forensics and categorize techniques into four classes: encryption, data hiding, artifact destruction, and trail obfuscation.
- Differentiate between Full Disk Encryption (BitLocker) and container-based encryption (VeraCrypt), and explain investigative strategies including key recovery from RAM.
- Compare password cracking methodologies (dictionary, rule-based, brute-force, mask) and demonstrate familiarity with John the Ripper and Hashcat for recovering passwords from extracted hashes.
- Explain steganography at the technical level (LSB substitution), identify its components (carrier, payload, stego-key), and apply steganalysis detection methods using statistical analysis tools.
- Analyze data hiding techniques including Alternate Data Streams (ADS), file extension mismatch, and slack space manipulation, using both command-line and forensic tool-based detection.
- Evaluate evidence destruction methods (secure wiping, timestomping) and identify the forensic artifacts and Windows Event IDs that reveal attempted cover-ups.
10.1 Defining Anti-Forensics
Anti-forensics is any deliberate attempt to compromise the availability, usefulness, or integrity of digital evidence. It is the adversary's direct countermeasure to the investigator's methodology. Where the forensic lifecycle aims to Identify, Collect, Preserve, Examine, Analyze, and Present, anti-forensics aims to disrupt each of those phases.
The Four Categories
The techniques covered in this chapter fall into four broad classes, each targeting a different aspect of the forensic process:
- Encryption: Renders data mathematically unreadable without the correct key. Targets the Examination and Analysis phases—the data is collected and preserved, but it cannot be interpreted.
- Data Hiding: Conceals data within the file system or inside innocent-looking files so the investigator does not know it exists. Targets the Identification phase—you cannot examine what you have not found.
- Artifact Destruction: Deletes, overwrites, or purges the logs, history, and metadata that investigators rely on to build timelines and prove user activity. Targets the Collection and Examination phases—the evidence is gone before the investigator arrives.
- Trail Obfuscation: Manipulates timestamps, plants false evidence, or injects misleading data to corrupt the investigator's analysis. Targets the Analysis and Presentation phases—the evidence exists, but it tells the wrong story.
The Investigator's Advantage
There is a fundamental asymmetry that works in the investigator's favor: anti-forensics techniques themselves leave artifacts. A wiping tool creates a Prefetch entry (Chapter 6). An encrypted volume's metadata partition is visible even when the contents are locked. The act of clearing Windows Event Logs generates its own Event Log entry. Running a timestomping tool modifies the $STANDARD_INFORMATION attribute but cannot easily alter the $FILE_NAME attribute (Chapter 4).
The suspect must execute their cover-up perfectly. The investigator only needs to find one mistake.
| Category | What It Targets | Example Techniques | Forensic Countermeasure |
|---|---|---|---|
| Encryption | Data readability | BitLocker, VeraCrypt, LUKS | RAM capture for decryption keys; recovery key retrieval |
| Data Hiding | Evidence discovery | ADS, extension mismatch, steganography | Stream enumeration, magic byte validation, statistical analysis |
| Artifact Destruction | Logs and metadata | CCleaner, secure wipe, log clearing | Prefetch of wiping tools, $UsnJrnl, Event Log gap analysis |
| Trail Obfuscation | Timeline integrity | Timestomping, log injection | $SI vs. $FN timestamp comparison, SIEM cross-reference |
10.2 Encryption: The Primary Barrier
Encryption is the most effective anti-forensic technique because, when implemented correctly, it is mathematically unbreakable with current technology. Unlike every other technique in this chapter—where the investigator can usually find traces of the hidden or destroyed data—strong encryption used with a proper key genuinely prevents access to the plaintext data.
Full Disk Encryption (FDE)
FDE encrypts the entire volume. When the computer is powered off, the drive is a block of unreadable data. When the user enters the correct credentials at boot, the system decrypts the data transparently—files appear normal to the user and to any forensic tool running on the live system.
BitLocker (Windows) is the most commonly encountered FDE in corporate and criminal investigations. It encrypts the volume using AES-128 or AES-256. The decryption key can be stored in the Trusted Platform Module (TPM), protected by a user PIN, or backed up as a 48-digit Recovery Key. From a forensic perspective, BitLocker leaves detectable metadata: a $BitLocker metadata partition is visible in tools like FTK Imager even when the volume is locked. The investigator can confirm encryption is present—they just cannot read the contents.
FileVault (macOS) is Apple's FDE implementation using XTS-AES-128. It is enabled by default on modern Macs and ties the decryption key to the user's login password and an institutional recovery key if configured.
LUKS (Linux Unified Key Setup) is the standard for Linux FDE. It stores encryption metadata in a header at the beginning of the partition, which forensic tools can identify.
Container-Based Encryption
Rather than encrypting an entire drive, container-based encryption creates a single encrypted file that mounts as a virtual drive.
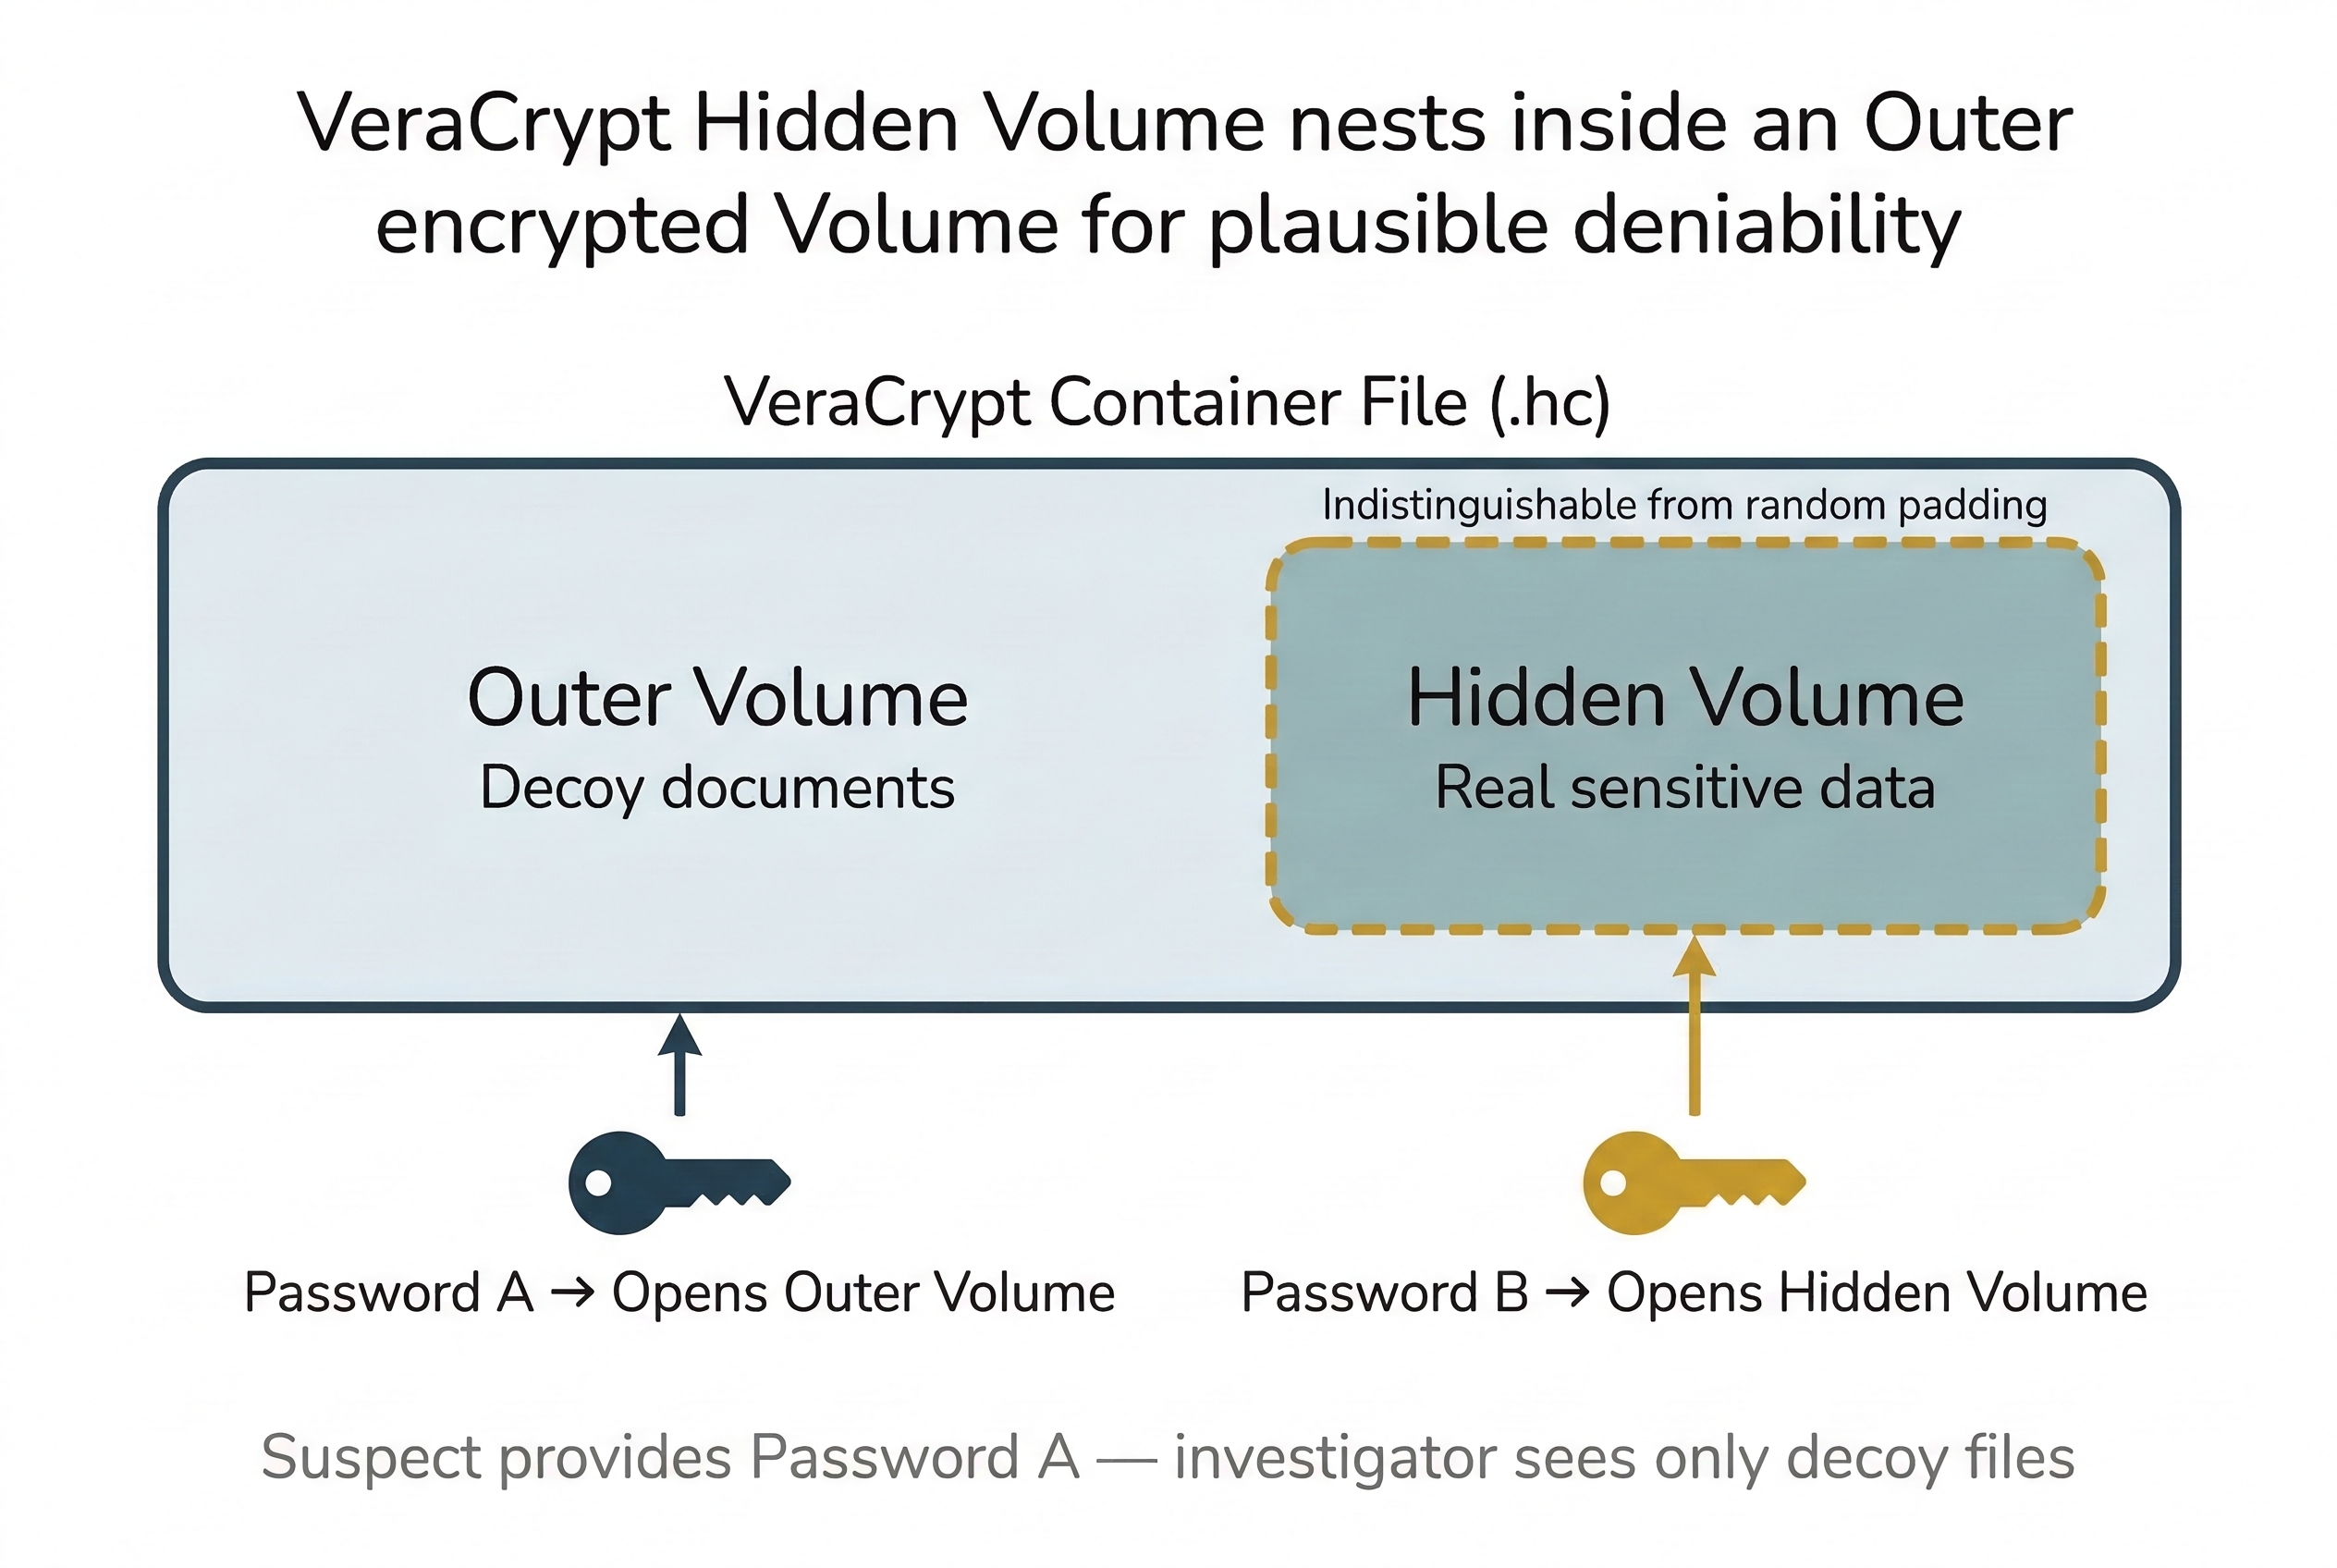
VeraCrypt (the successor to TrueCrypt) is the most common container tool. It creates .hc files that, when mounted with the correct password, appear as a new drive letter in Windows. The container file exists on the disk and is visible to the investigator, but its contents are inaccessible without the password.
VeraCrypt also supports Hidden Volumes—a plausible deniability feature. An outer volume is encrypted with one password and contains decoy data (innocent documents). A hidden volume is nested inside the unused space of the outer volume, encrypted with a second password, and contains the real data. The hidden volume is mathematically indistinguishable from the random padding data in the outer volume. Even if compelled to provide a password, the suspect can provide the outer password, and the investigator cannot prove the hidden volume exists.
Key Recovery Strategies
When encryption is encountered, the investigator has several avenues:
- RAM Capture: If the system is running and the encrypted volume is mounted, the decryption key exists in memory. This is the single most important reason for live acquisition (Chapter 3) and memory forensics (Chapter 8). Tools like Volatility plugins and Elcomsoft Forensic Disk Decryptor can extract BitLocker, FileVault, and VeraCrypt keys from memory dumps.
- Recovery Keys: BitLocker recovery keys may be stored in Active Directory, Azure AD, or the user's Microsoft account. Corporate IT departments frequently escrow these keys. Ask the IT administrator before attempting brute force.
- Legal Compulsion: Courts can order suspects to disclose decryption passwords, though this intersects with the Fifth Amendment's protection against self-incrimination. The legal landscape on compelled decryption is actively evolving and varies by jurisdiction.
Putting It Together: The Encrypted Laptop Decision
You are part of a team executing a search warrant at a suspect's home office. The suspect is seated at a running laptop. You can see a VeraCrypt drive mounted as V:\ in the taskbar. The moment the suspect sees you, they reach for the power button.
The decision tree:
- Prevent shutdown: Physically prevent the suspect from closing the lid or pressing the power button. The mounted VeraCrypt volume means the decryption key is in RAM right now.
- Capture RAM immediately: Insert your forensic USB drive and run a memory capture tool (DumpIt, WinPmem). Document the process.
- Image the live disk: With the volume still mounted, you can image the decrypted contents directly.
- Then power down: Once RAM and live data are captured, power down and image the physical disk for the encrypted container file.
Warning
If you pull the power on an encrypted system, the decryption key in RAM is destroyed. The data may be permanently inaccessible. Always evaluate whether live acquisition is possible before shutting down a suspect's machine.
10.3 Steganography: Hiding in Plain Sight
While encryption makes data unreadable, steganography makes data invisible. The word comes from the Greek steganos (covered) and graphein (writing). Steganographic techniques hide secret data inside ordinary-looking files—images, audio, or video—without visibly altering them. A JPEG photograph of a sunset still looks like a sunset, but embedded within its pixel data is a hidden message or file. Unlike encryption, which announces that something is hidden (the ciphertext is obviously unreadable), steganography conceals the very existence of the secret communication.
The Components of Steganography
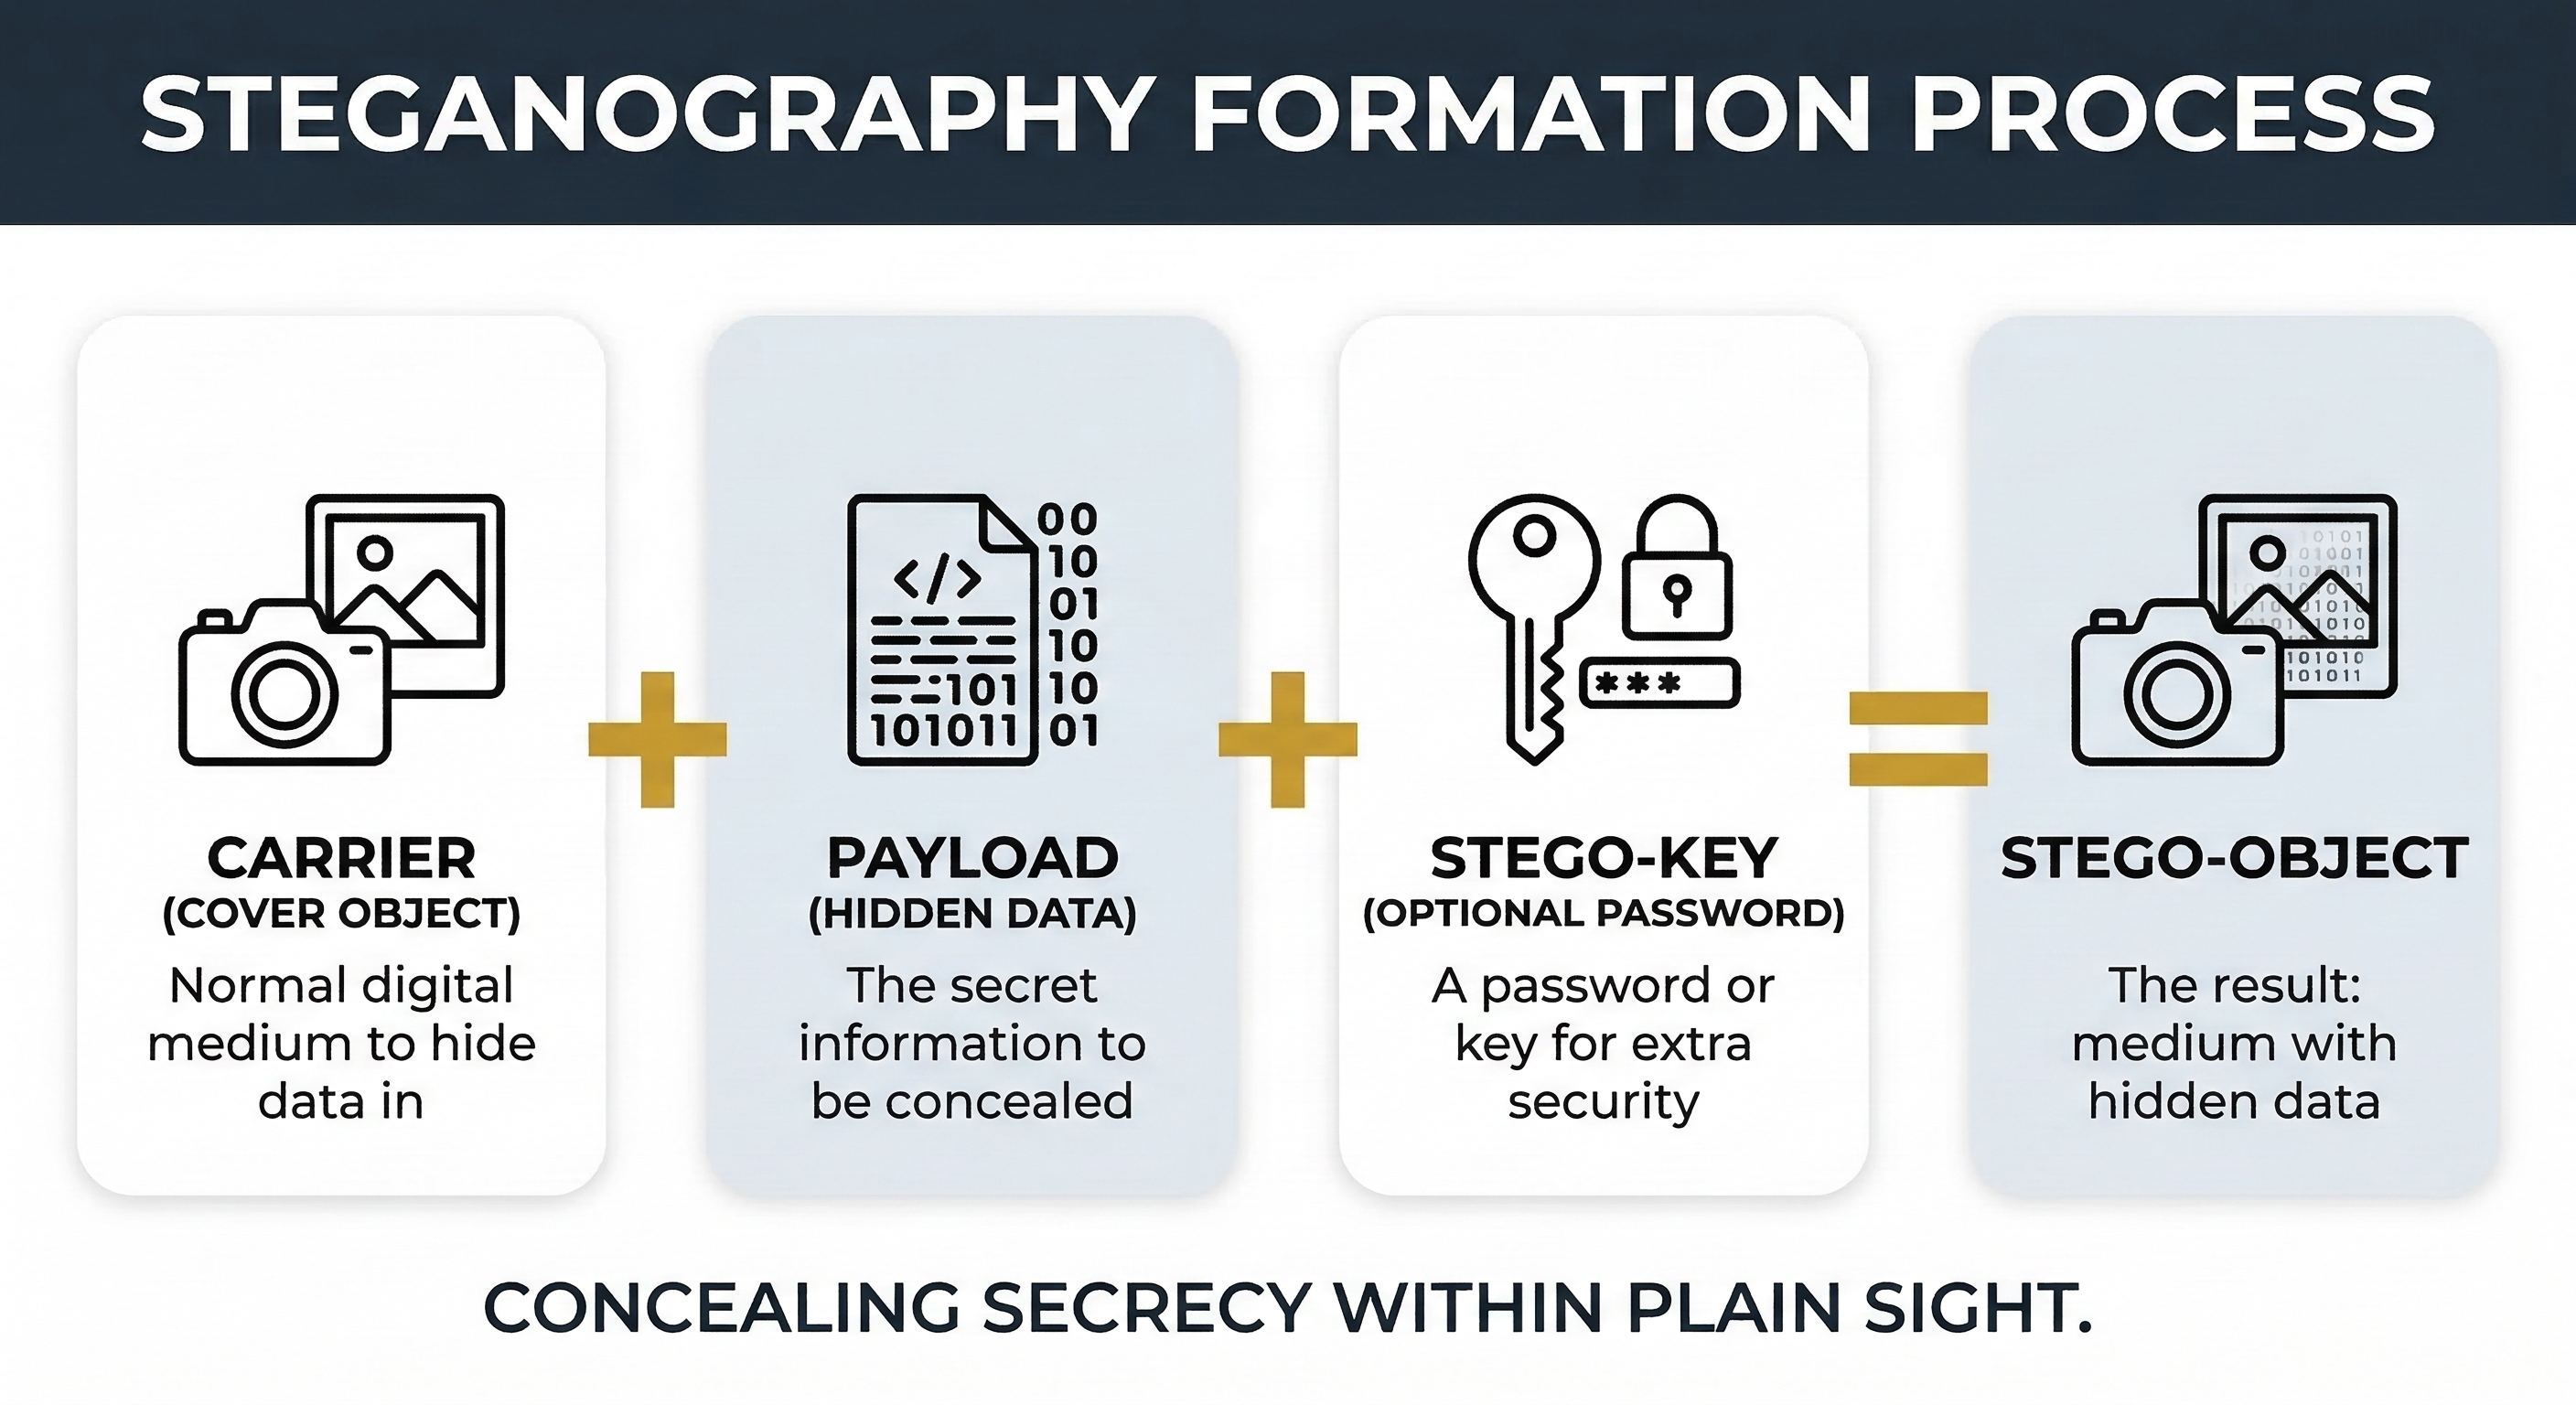
Every steganographic operation involves three fundamental components. Understanding this terminology is essential for both analysis and reporting:
- Carrier (Cover Object): The innocent-looking file that hosts the hidden data. This is typically an image (JPEG, PNG, BMP), an audio file (WAV, MP3), or a video file. The carrier must be large enough to absorb the hidden data without noticeable degradation. The carrier file exists before and after the embedding process—it is the "container" that travels openly.
- Payload (Hidden Data): The secret information embedded inside the carrier. This can be anything: a text message, a document, a compressed archive, or even an executable. The payload is what the sender wants to conceal and what the investigator wants to extract.
- Stego-Key: An optional password or key used to encrypt the payload before embedding it into the carrier. When a stego-key is used, even if an investigator detects that steganography is present and extracts the payload, the extracted data is encrypted and unreadable without the key. This creates a two-layer defense: steganography hides the data's existence, and the stego-key protects its content. Tools like Steghide and OpenStego support password-protected embedding natively.
The output of the process—the carrier file with the payload embedded inside it—is called the stego-object. To a casual observer (or an automated scanner), the stego-object appears identical to the original carrier.
Use Cases: Legitimate and Malicious
Steganography is not inherently criminal. It has legitimate applications that investigators should recognize to avoid false positives, as well as malicious applications that are the focus of forensic analysis.
Digital Watermarking: Media companies embed invisible watermarks into images, audio, and video to prove ownership and track unauthorized distribution. If a copyrighted photograph appears on an unauthorized website, the embedded watermark identifies the licensee who leaked it. Watermarking is a form of steganography designed to survive common transformations (cropping, compression, resizing) rather than to remain secret.
Secure Communication: Journalists, whistleblowers, and activists operating under repressive regimes use steganography to communicate without detection. In environments where encrypted communication draws scrutiny from state surveillance, hiding a message inside an ordinary photograph posted to a social media platform may be the only safe channel. The goal is to avoid triggering the same monitoring systems that flag encrypted traffic.
Malicious Use and Data Exfiltration: This is where steganography intersects with forensic investigation. Attackers use steganographic techniques for several purposes:
- Data Exfiltration: An insider threat embeds stolen proprietary data inside image files and emails them to a personal account or uploads them to social media. Data Loss Prevention (DLP) systems scanning for document file types or keyword matches do not flag an innocent-looking JPEG.
- Command and Control (C2) Communication: Advanced malware retrieves instructions embedded in images hosted on legitimate websites (like social media profile pictures). The malware downloads the image, extracts the hidden commands, and executes them. Because the traffic is a simple image download from a trusted domain, it bypasses network security tools.
- CSAM Distribution: Steganography has been used to conceal illicit material inside apparently innocent images for distribution through public channels.
Least Significant Bit (LSB) Substitution
The most common steganographic technique is LSB substitution, and understanding it requires a brief return to the binary concepts from Chapter 4.
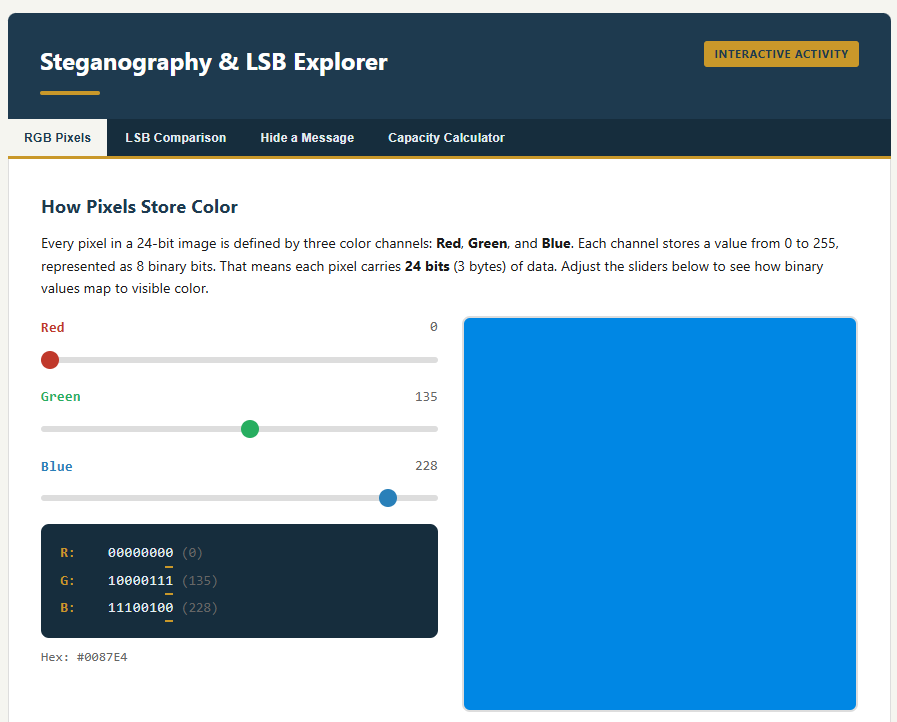
Every pixel in a digital image is defined by color values. In a standard 24-bit RGB image, each pixel has three channels (Red, Green, Blue), each stored as a single byte (8 bits). A byte value of 11010110 represents a specific shade. The least significant bit—the rightmost bit—contributes the smallest amount to the color value. Changing it from 0 to 1 shifts the color value by exactly 1 out of 256 possible values. This change is imperceptible to the human eye.
LSB steganography works by replacing the least significant bit of each color channel byte with one bit of the secret payload. Three pixels provide 9 bits of hiding capacity (3 pixels × 3 channels × 1 LSB each). Across an entire image, this adds up significantly:
A 1920×1080 image contains approximately 2,073,600 pixels. Each pixel offers 3 bits of LSB capacity, yielding roughly 6.2 million bits—approximately 777 KB of hidden data in a single photograph, with no visible change to the image.
Steganography Tools
Investigators should be familiar with both the hiding tools (to understand what they produce) and the detection tools (to identify and extract payloads):
Hiding Tools:
- Steghide: Supports JPEG, BMP, WAV, and AU formats. Provides password-protected (stego-key) embedding with encryption. One of the most commonly encountered tools in forensic cases.
- OpenStego: Open-source tool supporting both data hiding and digital watermarking. Produces PNG stego-objects.
- snow: Hides data in the whitespace (tabs and spaces) at the end of text file lines. Extremely difficult to detect visually but trivial to detect programmatically by checking for trailing whitespace patterns.
- Invisible Secrets: Commercial tool supporting a wide range of carrier formats.
Detection and Analysis Tools:
- StegExpose: Batch statistical analysis tool that runs Chi-Square, RS Analysis, and Sample Pairs tests across directories of image files. Outputs a detection probability score for each file.
- zsteg: Specialized tool for detecting LSB steganography in PNG and BMP files. Can extract payloads automatically when detected.
- binwalk: Scans binary files for embedded files, compressed archives, and appended data. Useful for detecting the "append after EOF" technique.
- stegsolve: Java-based visual analysis tool that displays individual bit planes of an image, allowing the investigator to visually inspect the LSB layer for patterns that indicate embedding.
- Steghide with
--infoflag:steghide info suspect_image.jpgreports whether the file contains embedded data (though it requires the stego-key to extract).

Analyst Perspective
Steganography is relatively rare compared to encryption and wiping. When it does appear, it is typically in espionage, data exfiltration, or CSAM cases. The first indicator is often behavioral rather than technical—why does the suspect have 500 nearly identical stock photos downloaded from the same source? Why are image files being emailed to an external address on a regular schedule? Why is a process downloading JPEG files from a social media CDN every 30 minutes? The anomaly leads to the steganalysis. Start with the behavior, then apply the tools.
10.4 Password Cracking: Breaking the Lock
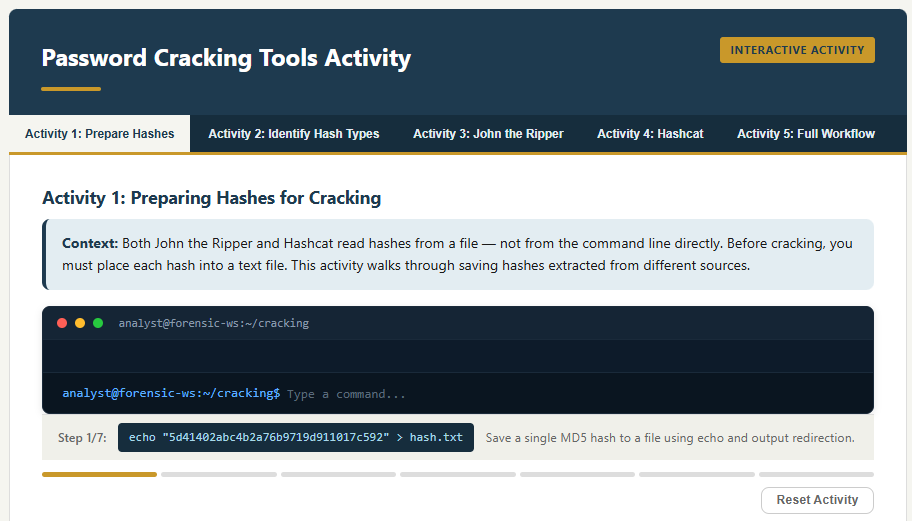
Encryption is only as strong as the password protecting it. When an investigator encounters a BitLocker-protected drive, a VeraCrypt container, a password-protected ZIP archive, or even a locked user account, the next step—after attempting key recovery from RAM and checking for escrowed recovery keys—is often password cracking. This section covers the fundamental concepts of how passwords are stored, the attack methodologies used to recover them, and the two industry-standard tools every forensic examiner should know.
How Passwords Are Stored: Hashing
Modern systems do not store passwords in plaintext. When a user creates a password, the system runs it through a one-way hash function (the same concept from Chapter 3) and stores the resulting hash value. When the user logs in, the system hashes the entered password and compares it to the stored hash. If they match, access is granted.
The critical forensic implication is that an investigator who extracts a password hash from the SAM hive (Chapter 5), a Linux /etc/shadow file, or a database dump does not have the password—they have the hash. To recover the original password, they must find an input that produces the same hash output.
Common Hash Types
Different systems and applications use different hashing algorithms. Identifying the correct hash type is the first step before launching any cracking attempt:
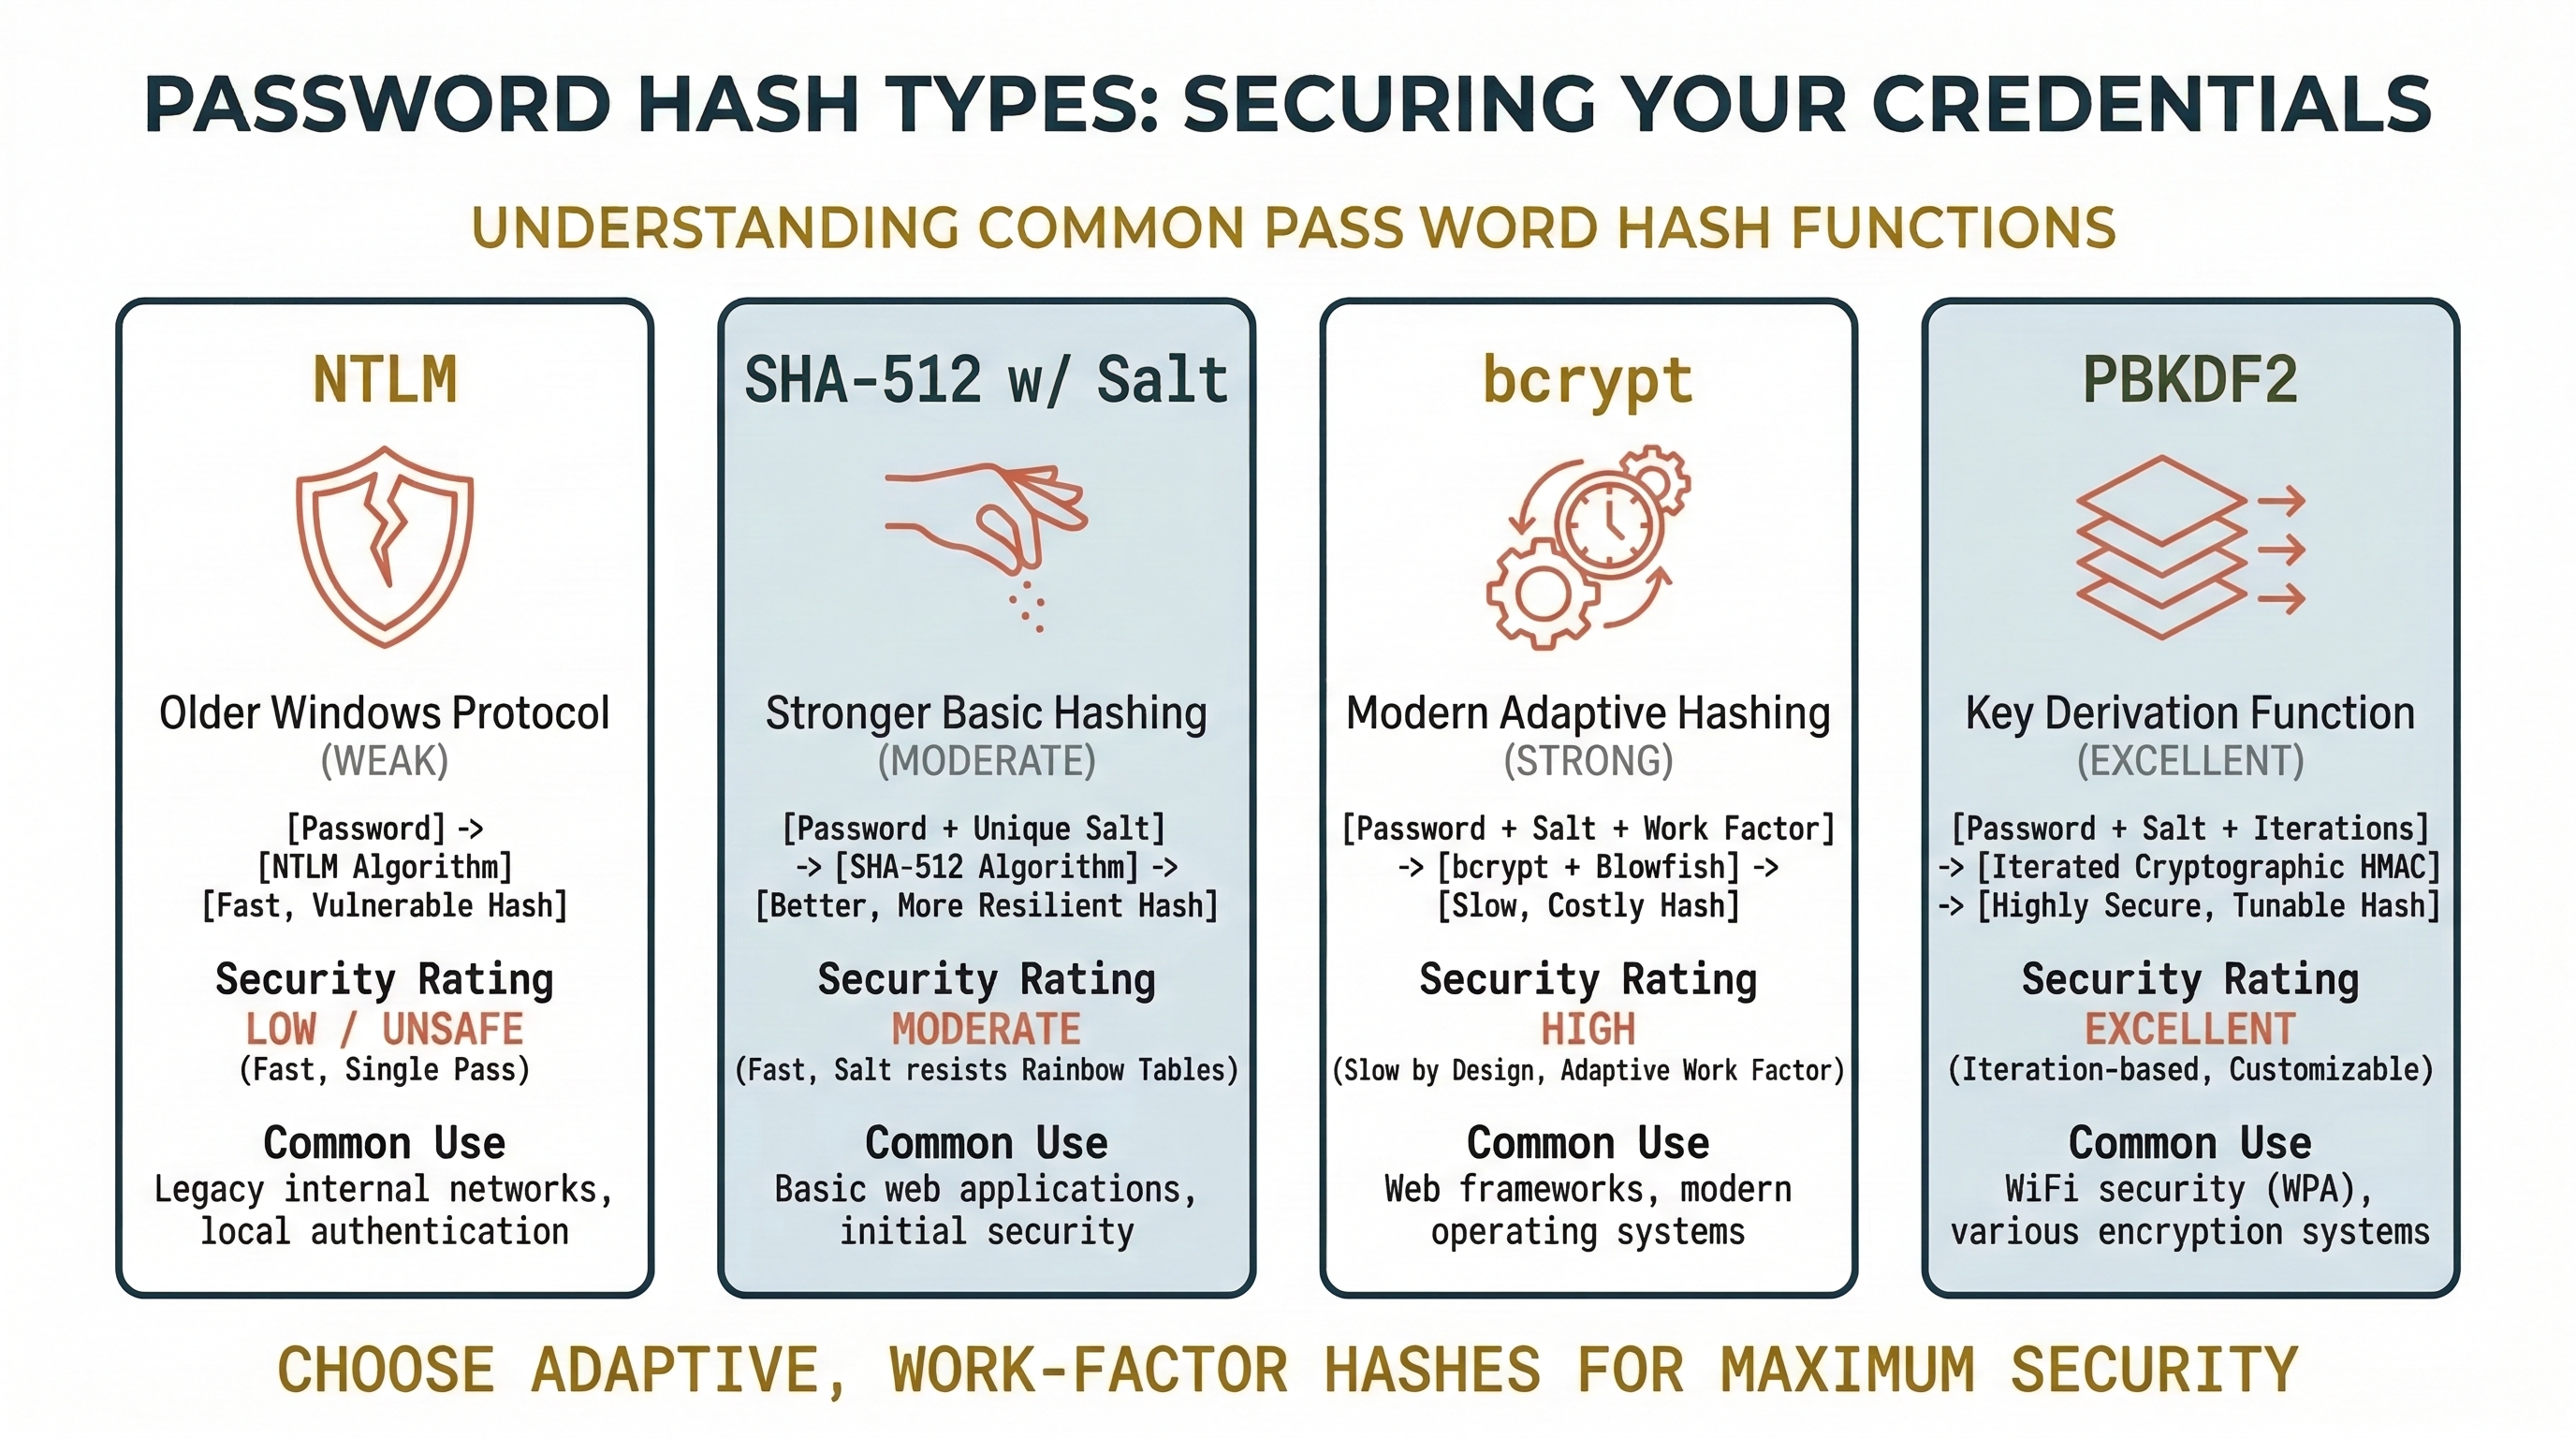
- NTLM: The hash format used by Windows for local account passwords. Stored in the SAM registry hive. NTLM is fast to compute, making it relatively fast to crack. Extracted using tools like
secretsdump.py(Impacket),mimikatz, or from a forensic image using Registry Explorer. - NTLMv2: Used for Windows network authentication. Captured from network traffic or memory. More complex than NTLM but still crackable.
- SHA-512 (with salt): The standard for modern Linux systems. Stored in
/etc/shadow. The salt (a random value prepended to the password before hashing) prevents pre-computed attacks. - bcrypt: Used by many web applications and some Linux distributions. Deliberately slow to compute, making brute-force attacks significantly more time-consuming.
- PBKDF2 / Argon2: Key derivation functions used by full-disk encryption (BitLocker, VeraCrypt, LUKS) and password managers. These apply thousands of hash iterations to slow down cracking attempts by orders of magnitude.
Warning
The hash type determines cracking speed. An NTLM hash can be tested at billions of attempts per second on a modern GPU. A bcrypt hash may only allow thousands of attempts per second. An investigator who does not identify the hash type before choosing attack parameters will waste hours or produce no results.
Identifying the Hash Type: The Critical First Step
Before launching any cracking attempt, you must identify the hash algorithm. Both John the Ripper and Hashcat require you to specify the hash type—John uses format names (e.g., --format=NT), and Hashcat uses numeric mode values (e.g., -m 1000). If you specify the wrong type, the tool will either refuse to run, produce zero results, or silently test against the wrong algorithm and never find a match.
In some cases, the source of the hash tells you the type. If you extracted the hash from a Windows SAM hive, it is NTLM. If you pulled it from a Linux /etc/shadow file and the hash string begins with $6$, it is SHA-512. But in many scenarios—particularly when dealing with database dumps, application password stores, or unknown file formats—the hash type is not immediately obvious.
How to Identify an Unknown Hash:
Hash algorithms produce output with characteristic lengths, character sets, and prefixes. An MD5 hash is always 32 hexadecimal characters. A SHA-256 hash is always 64 hexadecimal characters. Linux shadow hashes use identifiable prefixes: $1$ (MD5), $5$ (SHA-256), $6$ (SHA-512), $2b$ (bcrypt). NTLM hashes are 32 hexadecimal characters but lack the prefix structure of Linux hashes.
When these visual cues are ambiguous, use a dedicated identification tool:
- hashes.com Hash Identifier: A free online tool at
https://hashes.com/en/tools/hash_identifier. Paste the hash value and the tool analyzes its length, character set, and structure to suggest the most likely algorithm(s). This is the fastest way to identify an unknown hash during triage. - hashid (CLI): A Python-based command-line tool that performs the same analysis offline:
hashid -m '<hash_value>'. The-mflag includes the corresponding Hashcat mode number in the output. - hash-identifier (CLI): A similar offline tool included in many forensic and penetration testing Linux distributions.
Listing Supported Formats in John the Ripper:
John supports hundreds of hash formats, and the format names are not always intuitive. To see every format John can crack on your system:
john --list=formats
This outputs the full list of supported format names. To filter for a specific keyword (e.g., all Windows-related formats):
john --list=formats | grep -i ntlm
When you identify your hash type, use the exact format name from this list in your --format= parameter.
Hashcat Mode Reference:
Hashcat identifies every hash type by a numeric mode value. The complete list—with hash names, example hashes, and mode numbers—is maintained on the Hashcat wiki:
https://hashcat.net/wiki/doku.php?id=example_hashes
This page is an essential reference. Bookmark it. When you identify a hash as "SHA-512 with salt (Linux)," you look up the corresponding mode number (1800) and pass it as -m 1800 in your Hashcat command. Using the wrong mode number is the single most common mistake students make when first learning Hashcat.
Attack Methodologies
Password cracking tools do not "decrypt" hashes—they generate candidate passwords, hash each one using the same algorithm, and compare the result to the target hash. The speed and success of this process depends on the attack methodology:
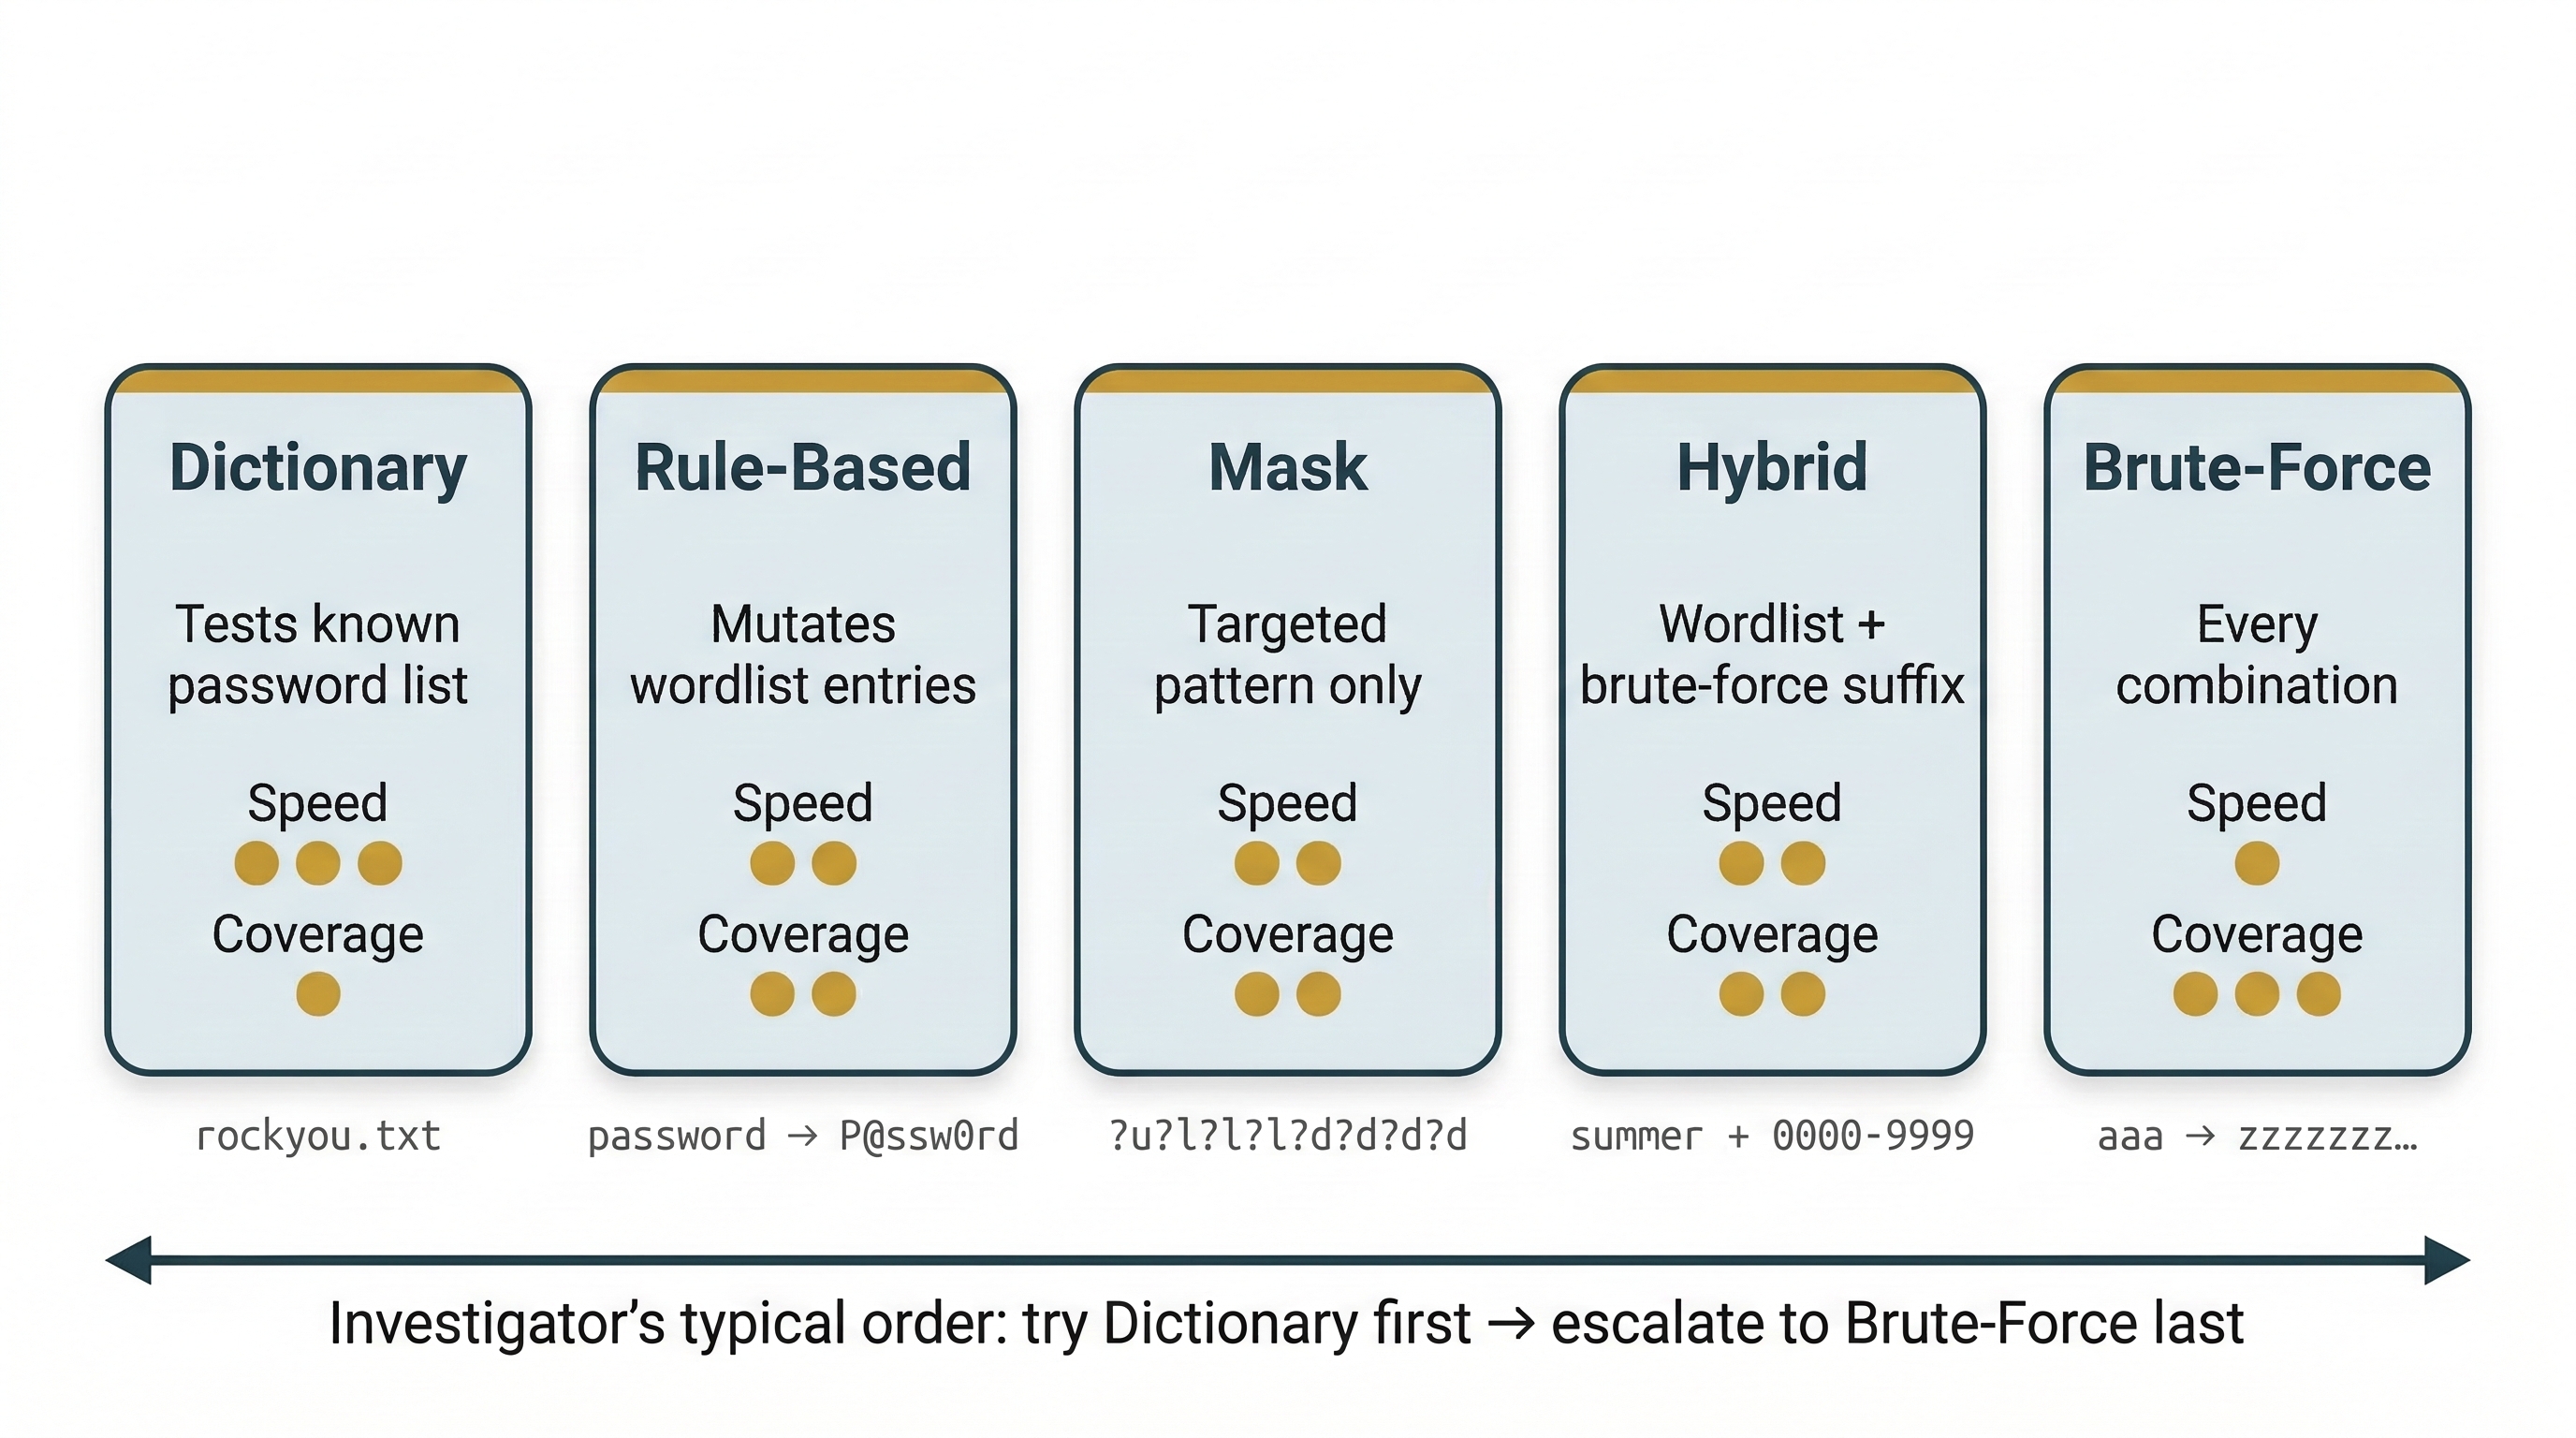
Dictionary Attack: The tool iterates through a pre-built list of known passwords (a "wordlist") and hashes each one. This is the fastest method when the password is a common word or a previously breached password. The most widely used wordlist is rockyou.txt, which contains approximately 14 million real passwords leaked from the RockYou breach in 2009. Specialized wordlists exist for specific languages, industries, and password patterns.
Rule-Based Attack: An extension of the dictionary attack. The tool applies transformation rules to each wordlist entry—appending numbers (password1, password2), substituting characters (p@ssw0rd), capitalizing letters (Password), reversing strings, and combining words. This dramatically expands the effective size of the wordlist without proportionally increasing the file size. Both John the Ripper and Hashcat support extensive rule sets.
Brute-Force Attack: The tool systematically tries every possible character combination up to a specified length. This guarantees eventual success but is exponentially slow. A 6-character password using lowercase letters has approximately 308 million combinations—trivial for modern hardware. An 8-character password mixing uppercase, lowercase, numbers, and symbols has over 6 quadrillion combinations—potentially taking years.
Mask Attack (Hashcat): A targeted brute-force approach where the investigator specifies a pattern. If forensic analysis suggests the suspect's password policy requires the format Uppercase + lowercase + 4 digits (e.g., Sarah1987), the mask ?u?l?l?l?l?d?d?d?d tests only that pattern. This reduces the keyspace from trillions of possibilities to millions.
Hybrid Attack: Combines a dictionary with brute-force. For example, take every word in the wordlist and append every possible 4-digit number: password0000 through password9999. This targets the common human behavior of using a real word followed by a number sequence.
John the Ripper
John the Ripper (often just "John") is an open-source password cracking tool that has been a staple of forensic and security work for decades. It is primarily CPU-based (though the "Jumbo" community version adds GPU support) and is known for its flexibility and automatic hash detection.
Key Features:
- Auto-detect: John can often identify the hash type automatically, making it beginner-friendly. (It is still recommended to always attempt to identify the hash type.)
- Incremental Mode: John's implementation of brute-force, using character frequency tables to try more likely combinations first.
- Wordlist Mode with Rules: Supports a powerful rule syntax (compatible with its own format and a subset of Hashcat rules).
- Session Management: Cracking jobs can be paused and resumed, which is critical for long-running attacks.
Basic Usage:
# Crack NTLM hashes using the default wordlist and auto-detect
john hashfile.txt

# Specify the hash format explicitly
john --format=raw-md5 hashfile.txt

# Use a specific wordlist
john --format=raw-md5 --wordlist=/usr/share/wordlists/rockyou.txt hashfile.txt

# Use a wordlist with rule-based mutations
john --format=raw-md5 --wordlist=/usr/share/wordlists/rockyou.txt --rules hashfile.txt

# Full example: crack Linux shadow hashes with rockyou wordlist and rules
john --format=sha512crypt --wordlist=/usr/share/wordlists/rockyou.txt --rules hashfile.txt

# Show cracked passwords
john --show hashfile.txt
Hashcat
Hashcat bills itself as the "world's fastest password recovery utility," and for GPU-accelerated cracking, this is accurate. While John is versatile and CPU-friendly, Hashcat is the tool of choice when raw speed matters—particularly for computationally expensive hash types like bcrypt or PBKDF2.
Key Features:
- GPU Acceleration: Hashcat leverages NVIDIA (CUDA) and AMD (OpenCL) GPUs, achieving cracking speeds orders of magnitude faster than CPU-only tools. A modern RTX 4090 can test over 100 billion NTLM hashes per second.
- Extensive Hash Support: Hashcat supports over 350 hash types, each identified by a mode number (e.g.,
-m 1000for NTLM,-m 1800for SHA-512 Linux,-m 13400for KeePass). - Attack Modes: Dictionary (
-a 0), Combination (-a 1), Brute-force/Mask (-a 3), Hybrid (-a 6and-a 7), and Rule-based attacks. - Mask Syntax: Uses positional character sets:
?u(uppercase),?l(lowercase),?d(digit),?s(special character),?a(all).
Basic Usage:
# Dictionary attack on NTLM hashes
hashcat -m 1000 -a 0 hashfile.txt /usr/share/wordlists/rockyou.txt

# Dictionary attack with rules
hashcat -m 1000 -a 0 hashfile.txt rockyou.txt -r rules/best64.rule

# Mask attack: 8-character password, uppercase + lowercase + 4 digits
hashcat -m 1000 -a 3 hashfile.txt ?u?l?l?l?d?d?d?d

# Hybrid: wordlist + 4-digit suffix
hashcat -m 1000 -a 6 hashfile.txt rockyou.txt ?d?d?d?d

# Show cracked results
hashcat -m 1000 hashfile.txt --show
Forensic Context and Legal Considerations
Password cracking in a forensic context is subject to the same legal authority requirements covered in Chapter 1. An investigator must have legal authorization (warrant, consent, or corporate policy) to crack passwords on seized evidence. Cracking passwords on systems you are not authorized to access is a criminal offense under the Computer Fraud and Abuse Act (CFAA) and equivalent statutes.
In corporate investigations, the organization typically has the legal right to access its own systems and data, but the investigator should confirm this authority is documented before proceeding. In criminal cases, the search warrant should explicitly authorize attempts to bypass security measures on the seized device.
Analyst Perspective
Before spending hours on a cracking rig, exhaust the low-hanging fruit. Check the suspect's browser saved passwords (Chapter 7, LaZagne). Look for password hints in documents, sticky notes photographed during the scene seizure, or patterns in previously cracked passwords from the same case. Many users reuse passwords or follow predictable patterns—cracking one account password often reveals the pattern used across all their accounts.
10.5 Data Hiding Techniques
The techniques in this section exploit features of the Windows file system and file format specifications to conceal data in places that normal file browsing does not reveal. Unlike encryption (which the investigator can detect but not read) or steganography (which requires statistical analysis), these techniques rely on the investigator simply not looking in the right place.
Alternate Data Streams (ADS)
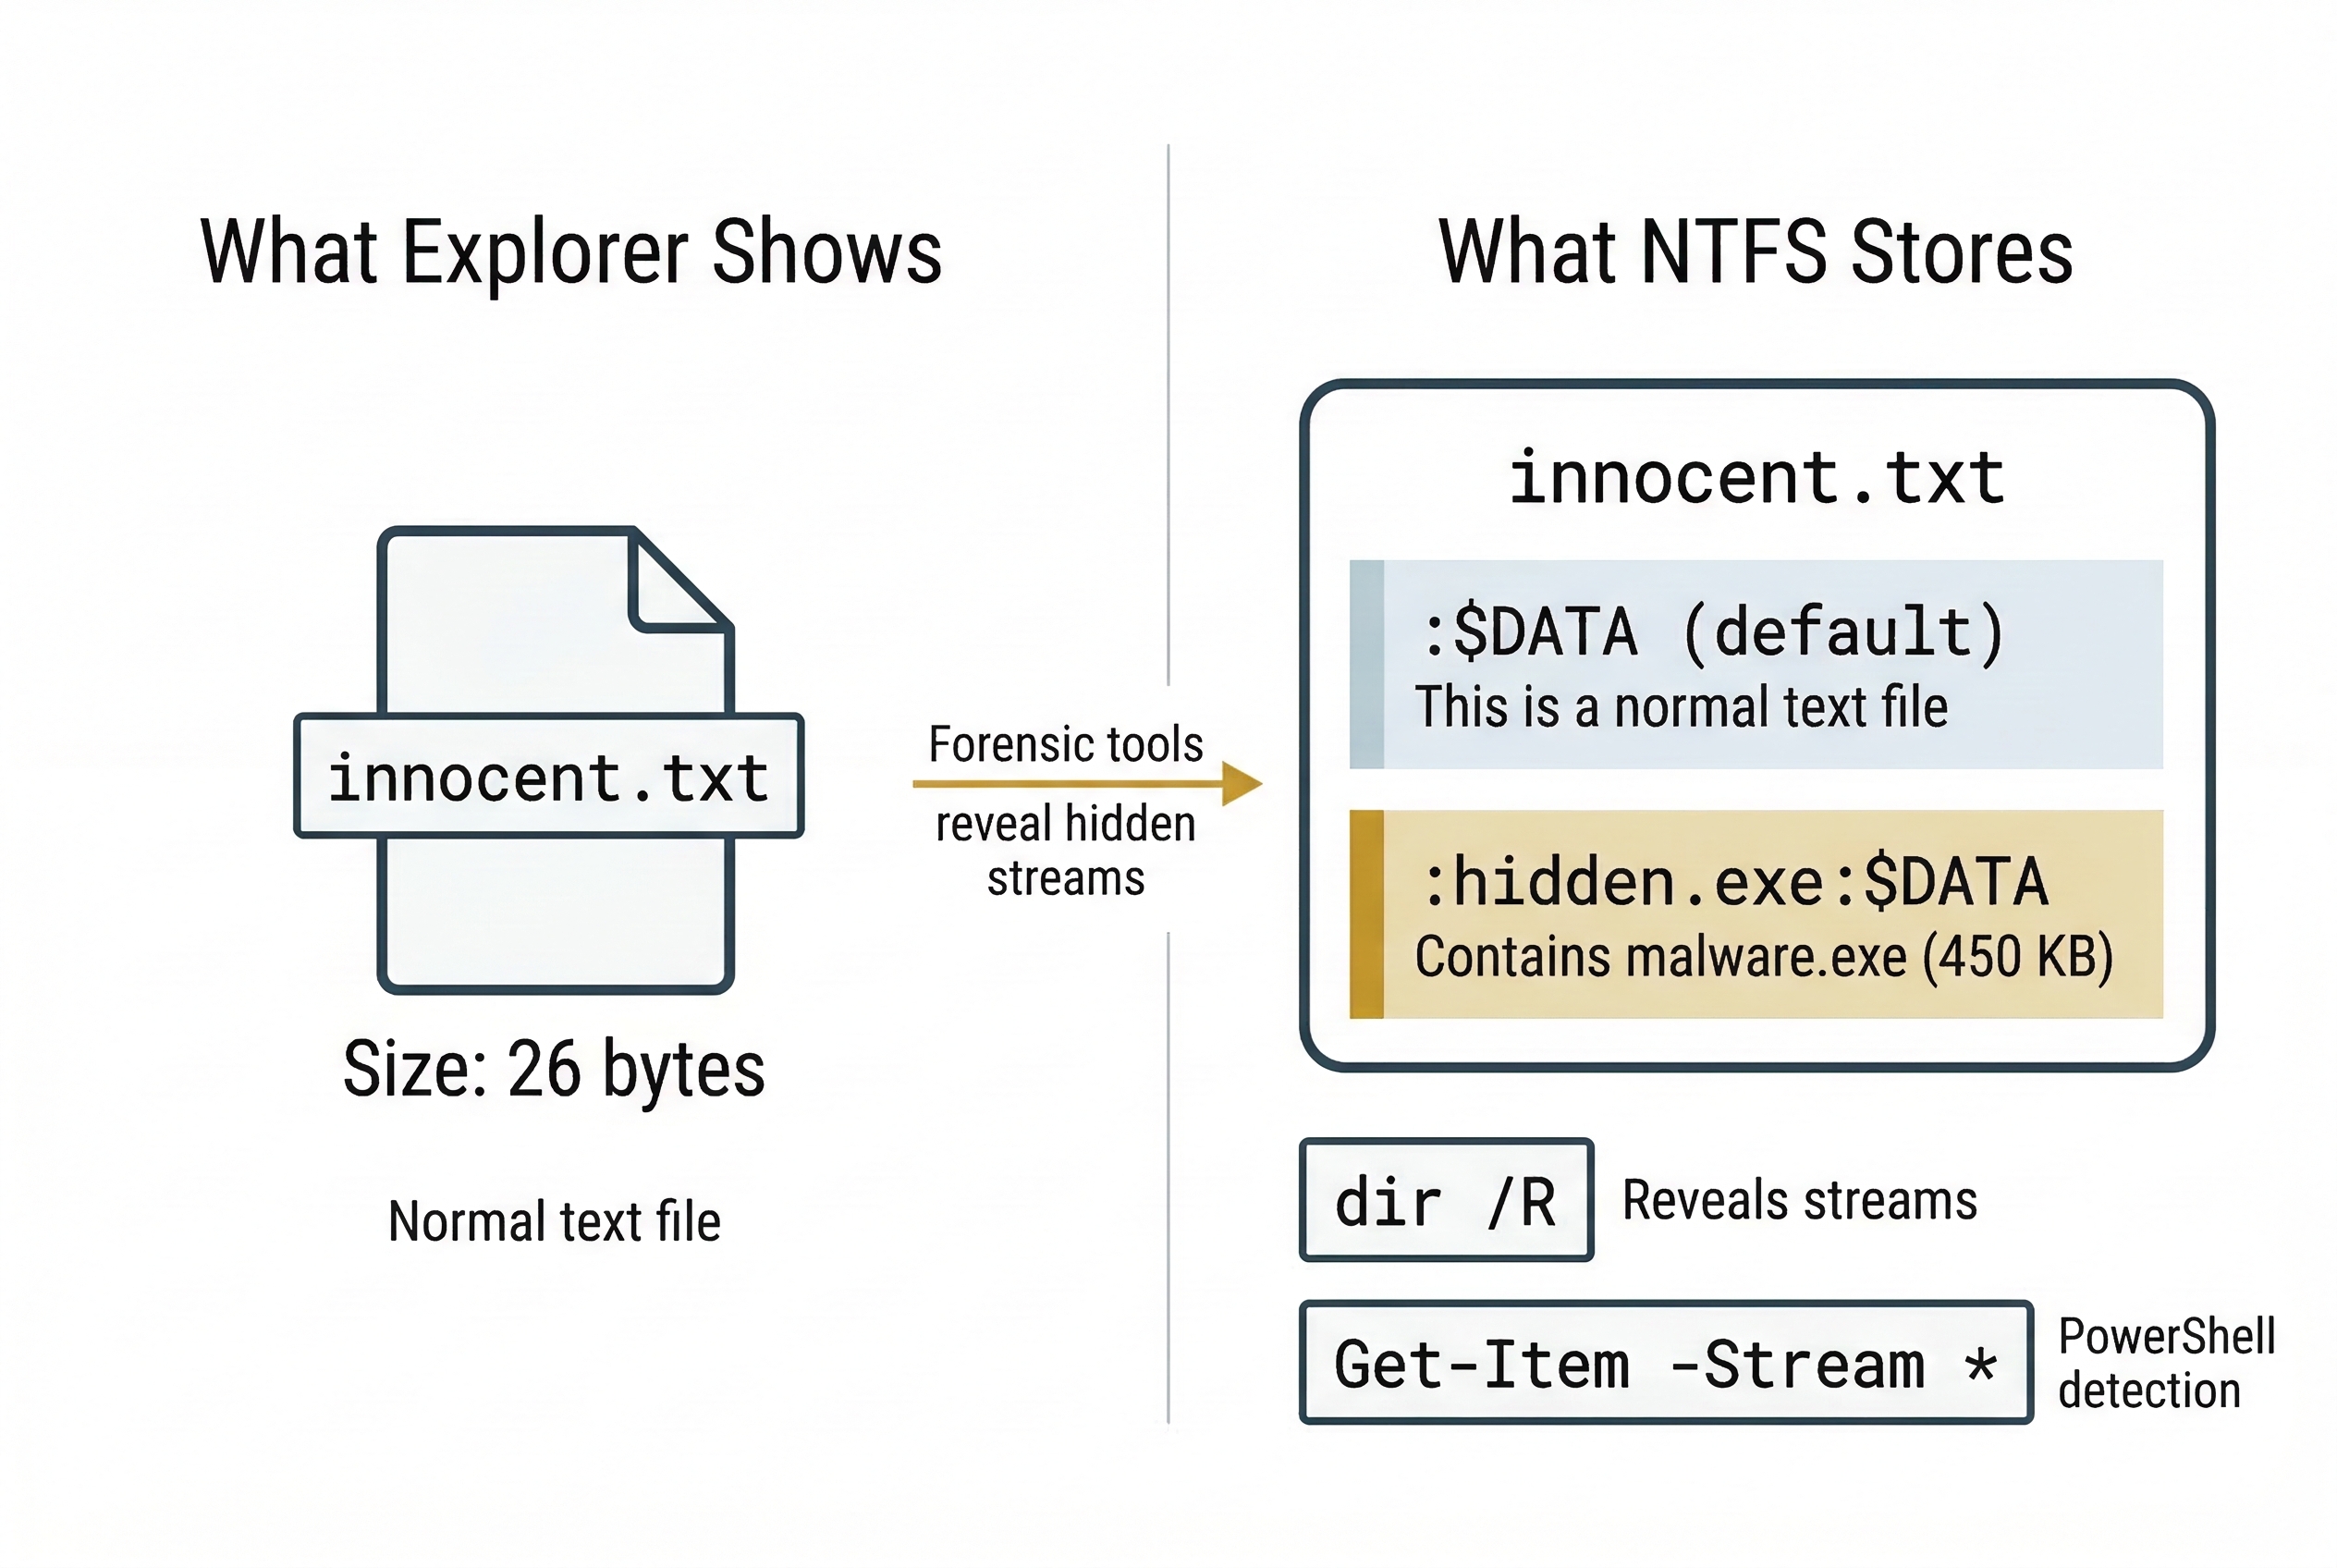
Alternate Data Streams are a feature of the NTFS file system that allows multiple data streams to be attached to a single file. Every file has a default (unnamed) stream—this is the content you see when you open the file. NTFS also supports additional named streams that are invisible to Windows Explorer, most command-line directory listings, and many basic forensic tools.
Attackers exploit ADS to attach malicious executables, stolen data, or contraband to innocent-looking files. A text file named notes.txt could have a hidden stream containing an entire executable.
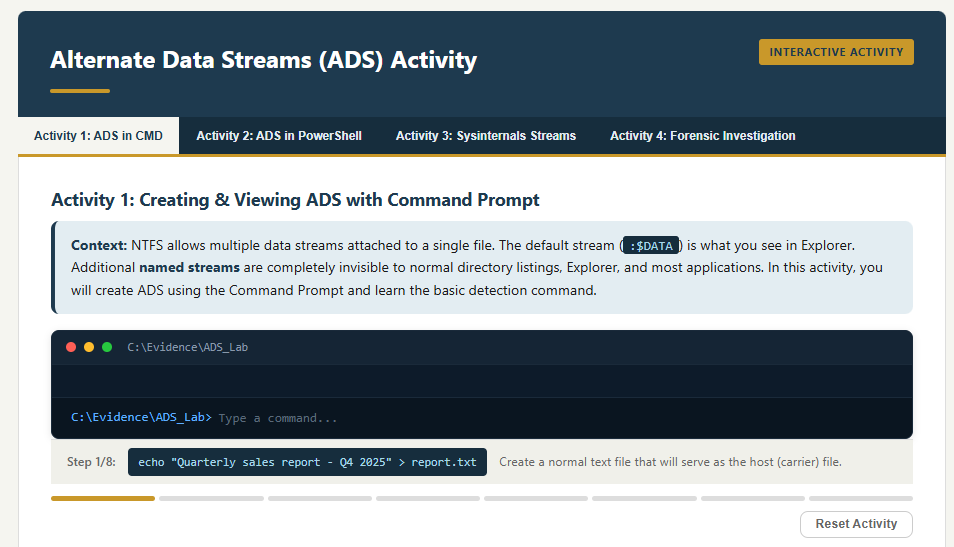
Creating ADS (Command Prompt):
echo "This is a normal text file" > innocent.txt
type malware.exe > innocent.txt:hidden.exe
The second command redirects malware.exe into a named stream called hidden.exe attached to innocent.txt. The file size of innocent.txt in Explorer does not change, and the stream is invisible to dir.
Creating ADS (PowerShell):
Set-Content -Path .\innocent.txt -Value "Normal content"
Set-Content -Path .\innocent.txt -Stream "hidden.exe" -Value (Get-Content .\malware.exe -Raw)
PowerShell's -Stream parameter provides native ADS manipulation.
Detecting ADS (Command Prompt):
dir /R
The /R flag displays alternate data streams for every file in the directory. Streams appear as filename:streamname:$DATA.
Detecting ADS (PowerShell):
Get-Item -Path .\innocent.txt -Stream *
This lists all streams attached to the file, including the default $DATA stream and any hidden named streams.
Extracting ADS Content (PowerShell):
Get-Content -Path .\innocent.txt -Stream hidden.exe -Raw | Set-Content -Path .\extracted_malware.exe
Forensic Tool Detection:
FTK Imager displays ADS when browsing an NTFS volume. Autopsy's ADS Detected ingest module automatically flags files with alternate streams during case processing. Both tools allow the investigator to extract and hash the stream content.
File Extension Mismatch
One of the simplest hiding techniques is renaming a file to change its extension. A suspect renames evidence.jpg to evidence.dll or readme.txt. Windows Explorer shows the wrong icon, and a casual search for "all JPEG files" misses it entirely.
Detection: Magic Bytes (Chapter 4 Review)
Every file type has a unique header signature. A JPEG always begins with FF D8 FF regardless of what the file is named. Detection compares the file's internal header against its extension:
Linux file Command:
file suspect_document.txt
The file command reads the magic bytes and reports the actual file type. If the output says suspect_document.txt: JPEG image data but the extension is .txt, you have a mismatch.
ExifTool:
exiftool suspect_document.txt
ExifTool reads the embedded metadata of the file and reports the true MIME type, image dimensions (for image files), creation software, and other metadata—regardless of the file extension. If ExifTool reports MIME Type: image/jpeg for a .txt file, the extension has been deliberately changed.
Autopsy Ingest Module:
Autopsy's Extension Mismatch Detected module automates this check across the entire drive during case processing. It compares every file's internal signature against its extension and flags discrepancies. On a large case with millions of files, this automated approach is essential.
Forensic Significance: File extension mismatch is often the first indicator that a suspect is actively trying to hide files. It is trivial to execute but also trivial to detect with the right tools—making it common among less sophisticated actors.
Slack Space Hiding
In Chapter 4, we explored slack space as a forensic artifact—leftover data from previous files sitting in the unused tail of a cluster. Attackers can deliberately exploit this space by writing data into the gap between the end of a file's logical content and the end of its allocated cluster.
Tools like bmap (Linux) and slacker (from the Metasploit framework) allow writing arbitrary data into the slack space of specified files. Since the file system does not track data beyond the logical file boundary, the hidden data is invisible to normal directory listings and file copy operations.
Detection: Forensic tools that analyze the raw content of allocated clusters beyond the logical file size. Hex editor examination of cluster tails, entropy analysis (hidden encrypted data in slack space will show high entropy compared to the typical zeros or residual fragments), and tools like Sleuth Kit's blkstat can identify anomalous slack content.
| Technique | NTFS-Specific? | Survives Copy to FAT32? | Primary Detection Method |
|---|---|---|---|
| Alternate Data Streams | Yes | No — streams silently stripped | dir /R, Get-Item -Stream *, FTK Imager, Autopsy ADS module |
| File Extension Mismatch | No — works on any file system | Yes | file command, ExifTool, Autopsy Extension Mismatch module |
| Slack Space Hiding | No — works on any block-based FS | No — only raw cluster content | Hex editor, entropy analysis, Sleuth Kit blkstat |
10.6 Evidence Destruction: Wiping and Artifact Removal
When a suspect cannot hide data, they destroy it. Evidence destruction targets the data itself (secure wiping), the metadata that proves user activity (artifact removal), and the system logs that record what happened (log clearing). Unlike simple deletion—which merely removes the file system pointer while leaving the data intact on disk (Chapter 4)—destruction aims to make recovery impossible.
Secure Wiping
Secure wiping overwrites the physical sectors occupied by a file with zeros, random data, or patterns, preventing recovery through file carving or hex analysis.
The DoD 5220.22-M Standard: The legacy U.S. Department of Defense standard specifying multiple overwrite passes (typically three: a pass of zeros, a pass of ones, and a pass of random data). This standard is frequently referenced in court proceedings and corporate data destruction policies. On modern magnetic drives, a single-pass overwrite with zeros is widely considered sufficient to prevent recovery with any commercially available tool. The multi-pass approach is largely a holdover from an era of lower-density magnetic media.
Common Wiping Tools:
- Eraser: Open-source Windows tool that integrates into the right-click context menu. Overwrites files, folders, or free space using configurable algorithms.
- BleachBit: Open-source cleaner for both Windows and Linux. Wipes browser data, logs, temp files, and free space.
- CCleaner: Commercial tool popular with both legitimate users and suspects. Its "Drive Wiper" function overwrites free space; its cleaning modules purge browser history, cookies, and temporary files.
- SDelete (Sysinternals): Microsoft's command-line secure deletion utility.
sdelete -p 3 target_file.txtperforms a three-pass overwrite. dd(Linux): The same tool used for forensic acquisition (Chapter 3) can be used for destruction. Writing from/dev/zeroor/dev/urandomto a drive or partition overwrites all data:
sudo dd if=/dev/zero of=/dev/sdb bs=4M status=progress
This command writes zeros to every sector of /dev/sdb, destroying all data, file system structures, and partition tables. The dd command is particularly relevant because it is pre-installed on every Linux distribution—no additional tools need to be downloaded.
sudo dd if=/dev/urandom of=/dev/sdb bs=4M status=progress
Using /dev/urandom instead of /dev/zero writes random data, which makes it harder to distinguish wiped areas from encrypted data during analysis.
Artifact Removal (Anti-Forensic Cleaning)
Beyond wiping files, sophisticated suspects target the forensic artifacts that prove user activity:
- Browser History: CCleaner, BleachBit, and browsers' built-in "Clear browsing data" functions purge History, Downloads, Cache, and Cookies databases (Chapter 7).
- Registry Cleaning: Tools that scrub UserAssist entries, RecentDocs, RunMRU, and ShellBags (Chapter 5). Privacy-focused tools like PrivaZer specifically target forensic artifacts.
- Log Deletion: Clearing Windows Event Logs using the built-in command:
wevtutil cl Security
wevtutil cl System
wevtutil cl Application
These commands clear the specified event log channels. On Linux, attackers may truncate or delete /var/log/auth.log, /var/log/syslog, or use journalctl --rotate --vacuum-time=1s to purge systemd journal entries.
The Investigator's Countermeasure: Artifacts of Destruction
The critical insight of this section is that destruction itself leaves traces. A suspect who runs a wiping tool has eliminated the target data, but the act of wiping is recorded in multiple places:
Prefetch Evidence (Chapter 6): Windows creates a Prefetch file for every executed program. CCLEANER64.EXE-XXXXXXXX.pf, ERASER.EXE-XXXXXXXX.pf, BLEACHBIT.EXE-XXXXXXXX.pf, or SDELETE.EXE-XXXXXXXX.pf in the C:\Windows\Prefetch directory proves the tool was executed. The Prefetch file records the execution count and last run time—even if the wiping tool was subsequently uninstalled.
USBStor Evidence (Chapter 5): Registry entries in USBSTOR and MountedDevices prove that external drives were connected, even if the drives themselves are gone and the files copied to them have been wiped from the source machine.
$UsnJrnl (NTFS Change Journal): The NTFS Update Sequence Number Journal records file creation, deletion, renaming, and modification events at the file system level. Even after files are deleted and free space is wiped, the $UsnJrnl may retain entries showing that thousands of files were deleted from a specific directory at a specific time. Tools like MFTECmd parse this journal.
Volume Shadow Copies (VSS): Windows may maintain point-in-time snapshots of the volume. If the suspect wiped data but did not delete the shadow copies (using vssadmin delete shadows /all), previous versions of files may be recoverable. Forensic tools like Arsenal Image Mounter can mount shadow copies from a forensic image.
Windows Event Log Indicators: Clearing event logs generates its own event entries—the system records the fact that logs were cleared before the clearing takes effect. Key Event IDs to monitor:
- Event ID 1102 (Security Log): "The audit log was cleared." Records the user account that performed the clearing. This is the single most important indicator of log tampering.
- Event ID 4688 (Security Log): "A new process has been created." If process auditing is enabled, this records the execution of wiping tools with their full command-line arguments.
- Event ID 4663 (Security Log): "An attempt was made to access an object." When file auditing is configured, this captures file deletion events on monitored directories.

Analyst Perspective
In court, the act of destruction is often more damaging than the content itself. A jury draws powerful inferences from evidence that a suspect deliberately ran a wiping tool the night before an investigation began. You do not always need to recover the wiped data—proving the destruction attempt may be sufficient to establish consciousness of guilt. Prefetch timestamps for CCleaner at 11:45 PM, combined with USBSTOR showing a drive was connected at 11:30 PM, and $UsnJrnl showing 2,000 file deletions at 11:40 PM tells a story that no amount of wiping can erase.
Putting It Together: The Departing Employee
A corporation suspects departing employee Sarah Chen of stealing proprietary source code before her last day. By the time IT receives her laptop, the browser history is empty, the Documents folder contains only default Windows files, and the Recycle Bin is clean. At first glance, the laptop looks factory-fresh.
The forensic examination tells a different story:
- Prefetch Analysis (PECmd):
CCLEANER64.EXEshows a RunCount of 3, with the last execution at 11:47 PM the night before Sarah's final day.BLEACHBIT.EXEshows a RunCount of 1 at 11:52 PM. - Registry — USBSTOR: A "Samsung T7 Portable" drive (Serial:
0x3A8F29D1) was connected at 11:22 PM.MountedDevicesmaps it to drive letterE:. - $UsnJrnl Analysis (MFTECmd): Between 11:25 PM and 11:40 PM, 4,312 files were deleted from
C:\Users\SChen\Documents\ProjectX\. The journal records the filenames—including.cpp,.h, and.pysource files. - Event Logs: Event ID 1102 in the Security log shows the audit log was cleared at 11:55 PM by user
SChen. Event ID 104 shows the System log was cleared at the same time. - Shellbags (SBECmd): Shellbag entries prove Sarah browsed the
E:\Backup\ProjectXfolder on the Samsung drive at 11:35 PM—indicating she verified the copied files before wiping the source.
The source code files are gone from the laptop. But the Prefetch, Registry, $UsnJrnl, Event Logs, and Shellbags collectively prove that Sarah connected an external drive, copied thousands of source files to it, then systematically wiped the evidence using two different cleaning tools, and cleared the event logs. The data is unrecoverable—but the narrative of the theft is complete.
10.7 Trail Obfuscation: Timestomping and Falsification
The most insidious form of anti-forensics does not destroy evidence—it manipulates it to mislead the investigator. If an investigator builds a timeline based on falsified timestamps, the entire analysis is compromised.
Timestomping
Timestomping is the deliberate modification of file timestamps (Created, Modified, Accessed) to create a false timeline. The goal is to make a recently created file appear old (to avoid "recently modified" filters) or to align timestamps with an alibi.
How It Works:
Tools like Timestomp (from the Metasploit framework) and NirSoft's BulkFileChanger allow attackers to set any NTFS timestamp to any arbitrary value. The attacker can make a file created today appear as though it was created in 2019.
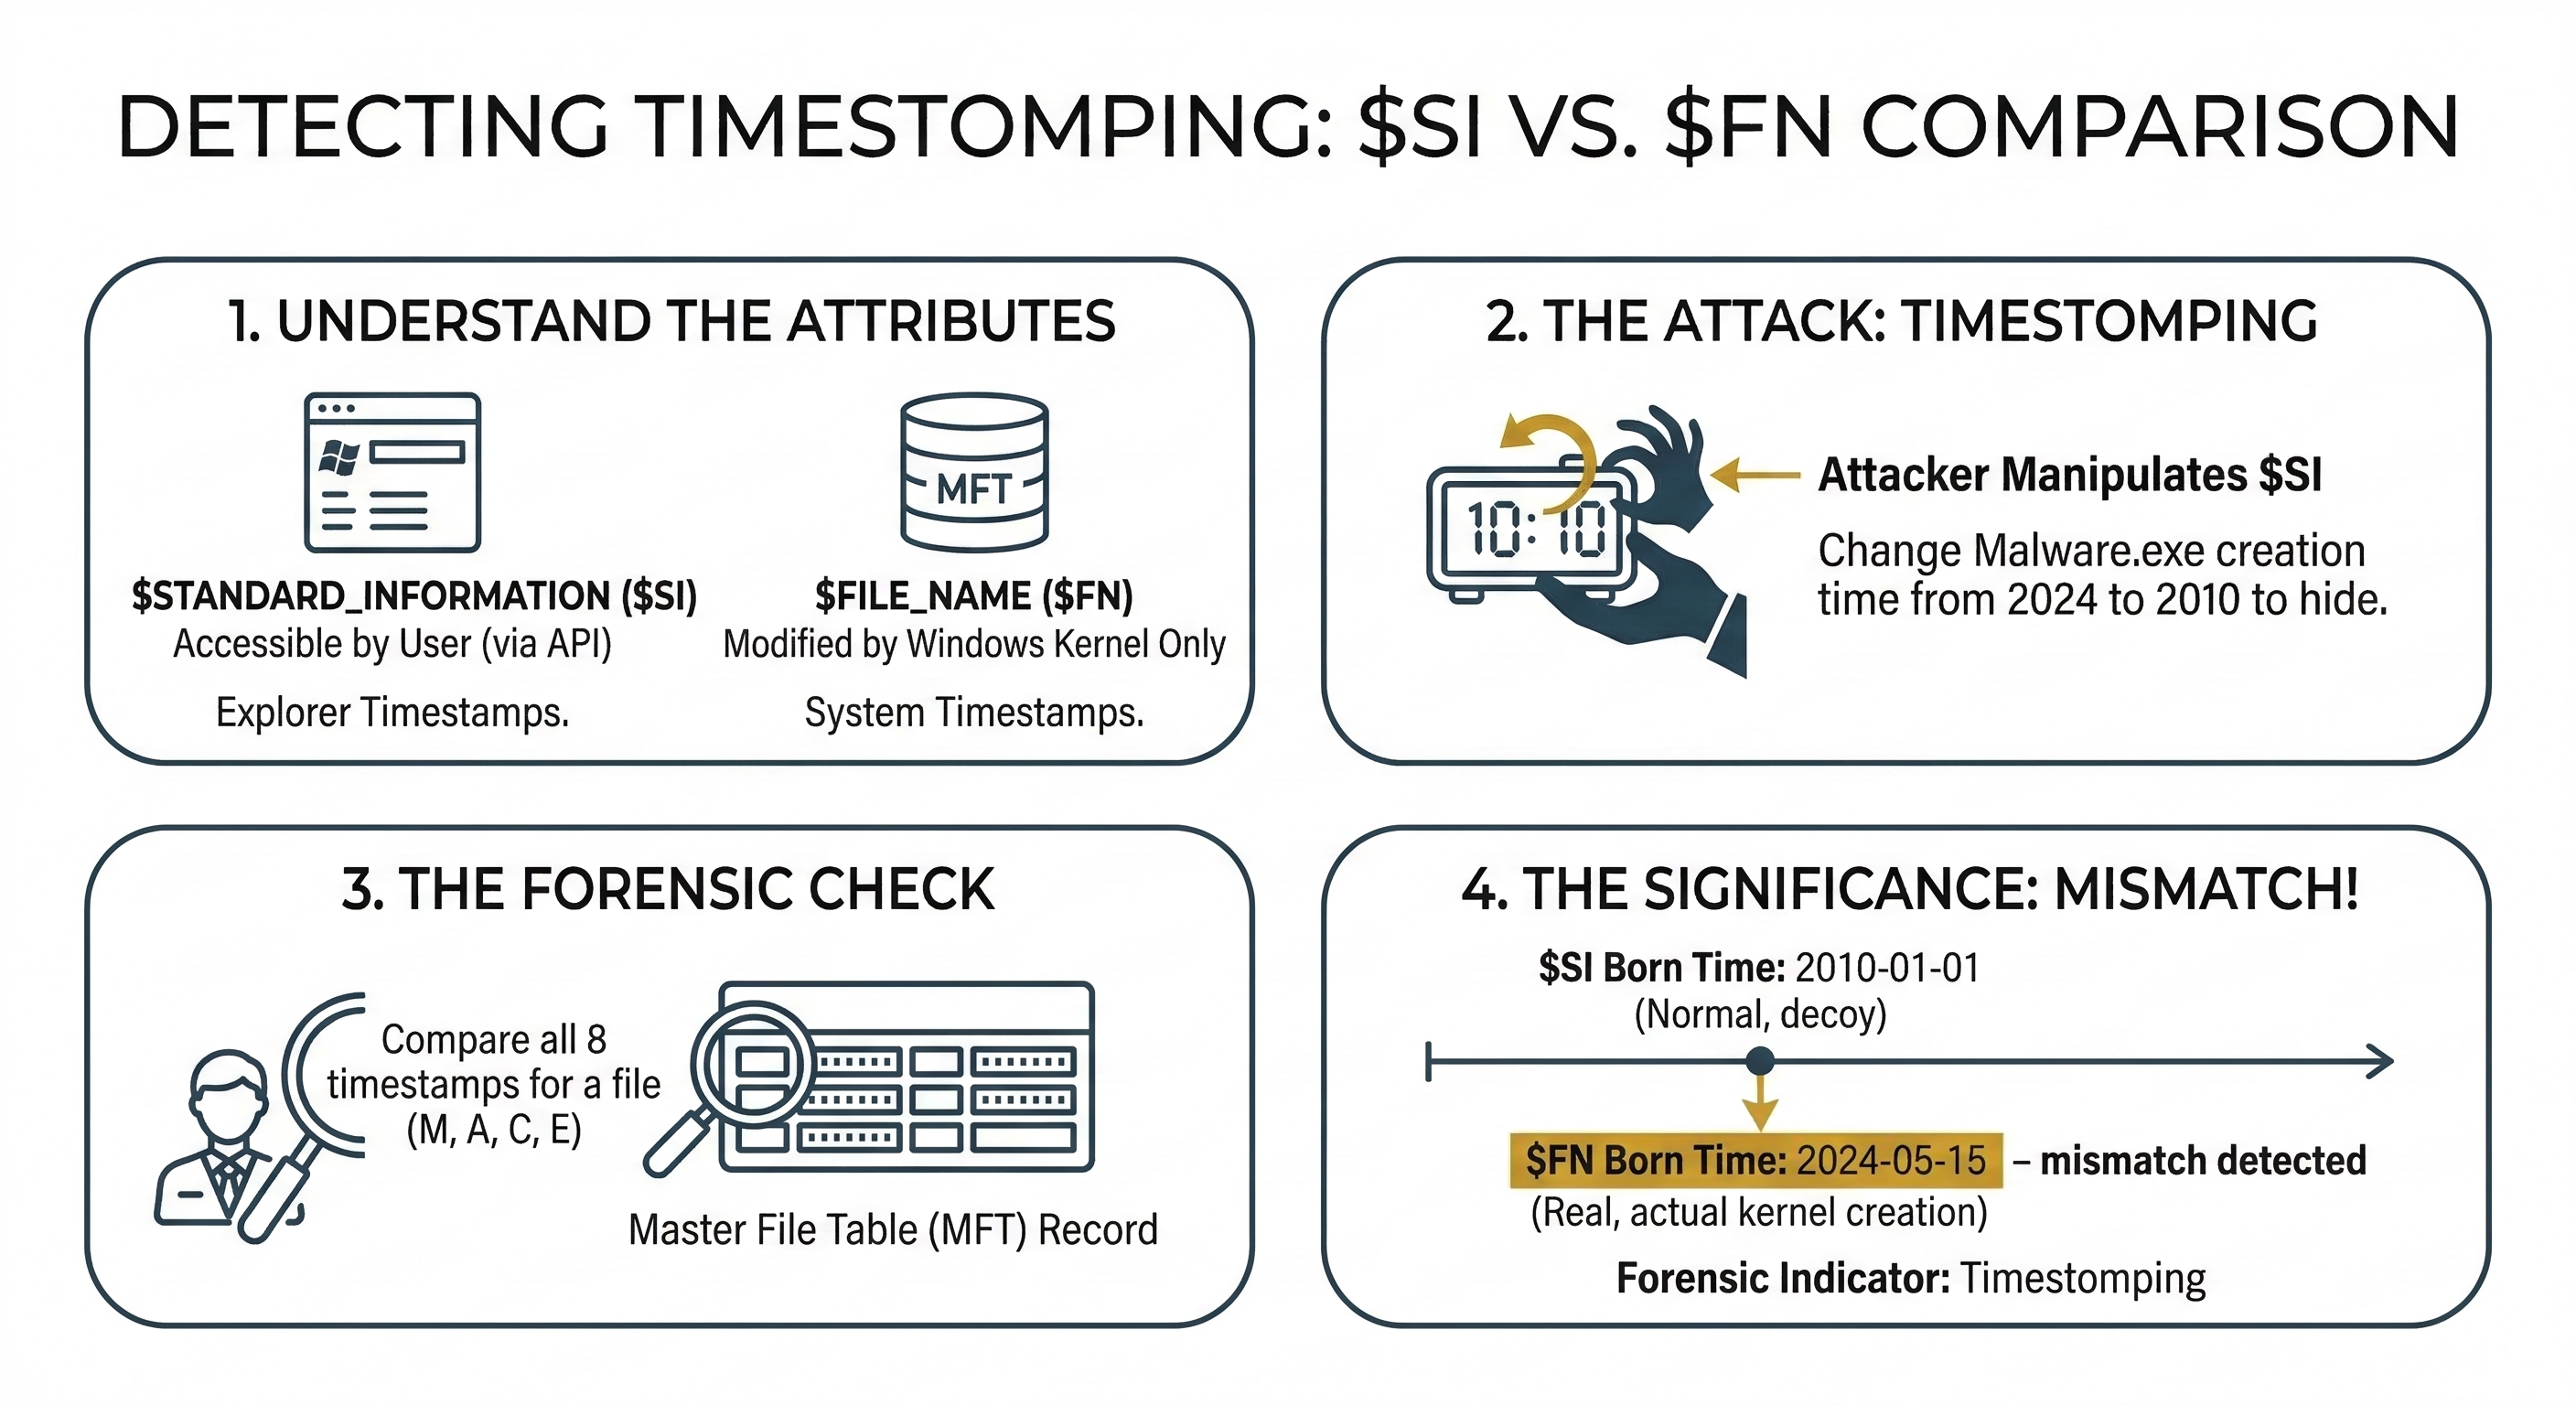
These tools modify the $STANDARD_INFORMATION ($SI) attribute in the MFT record. This is the attribute that Windows Explorer, dir, and most basic forensic tools read when displaying file dates.
Detection: The $SI vs. $FN Comparison
NTFS stores timestamps in two separate MFT attributes (introduced in Chapter 4):
$STANDARD_INFORMATION($SI): User-accessible. This is what timestomping tools modify. It stores Created, Modified, Accessed, and Entry Modified timestamps.$FILE_NAME($FN): System-controlled. Updated by the operating system when the file is created, moved, or renamed. Timestomping tools cannot easily modify this attribute without low-level disk editing.
The detection rule is straightforward: if the $SI Created timestamp is older than the $FN Created timestamp, the file has been timestomped. A file cannot logically exist in $SI before the file system created the $FN record.
Detection Tools:
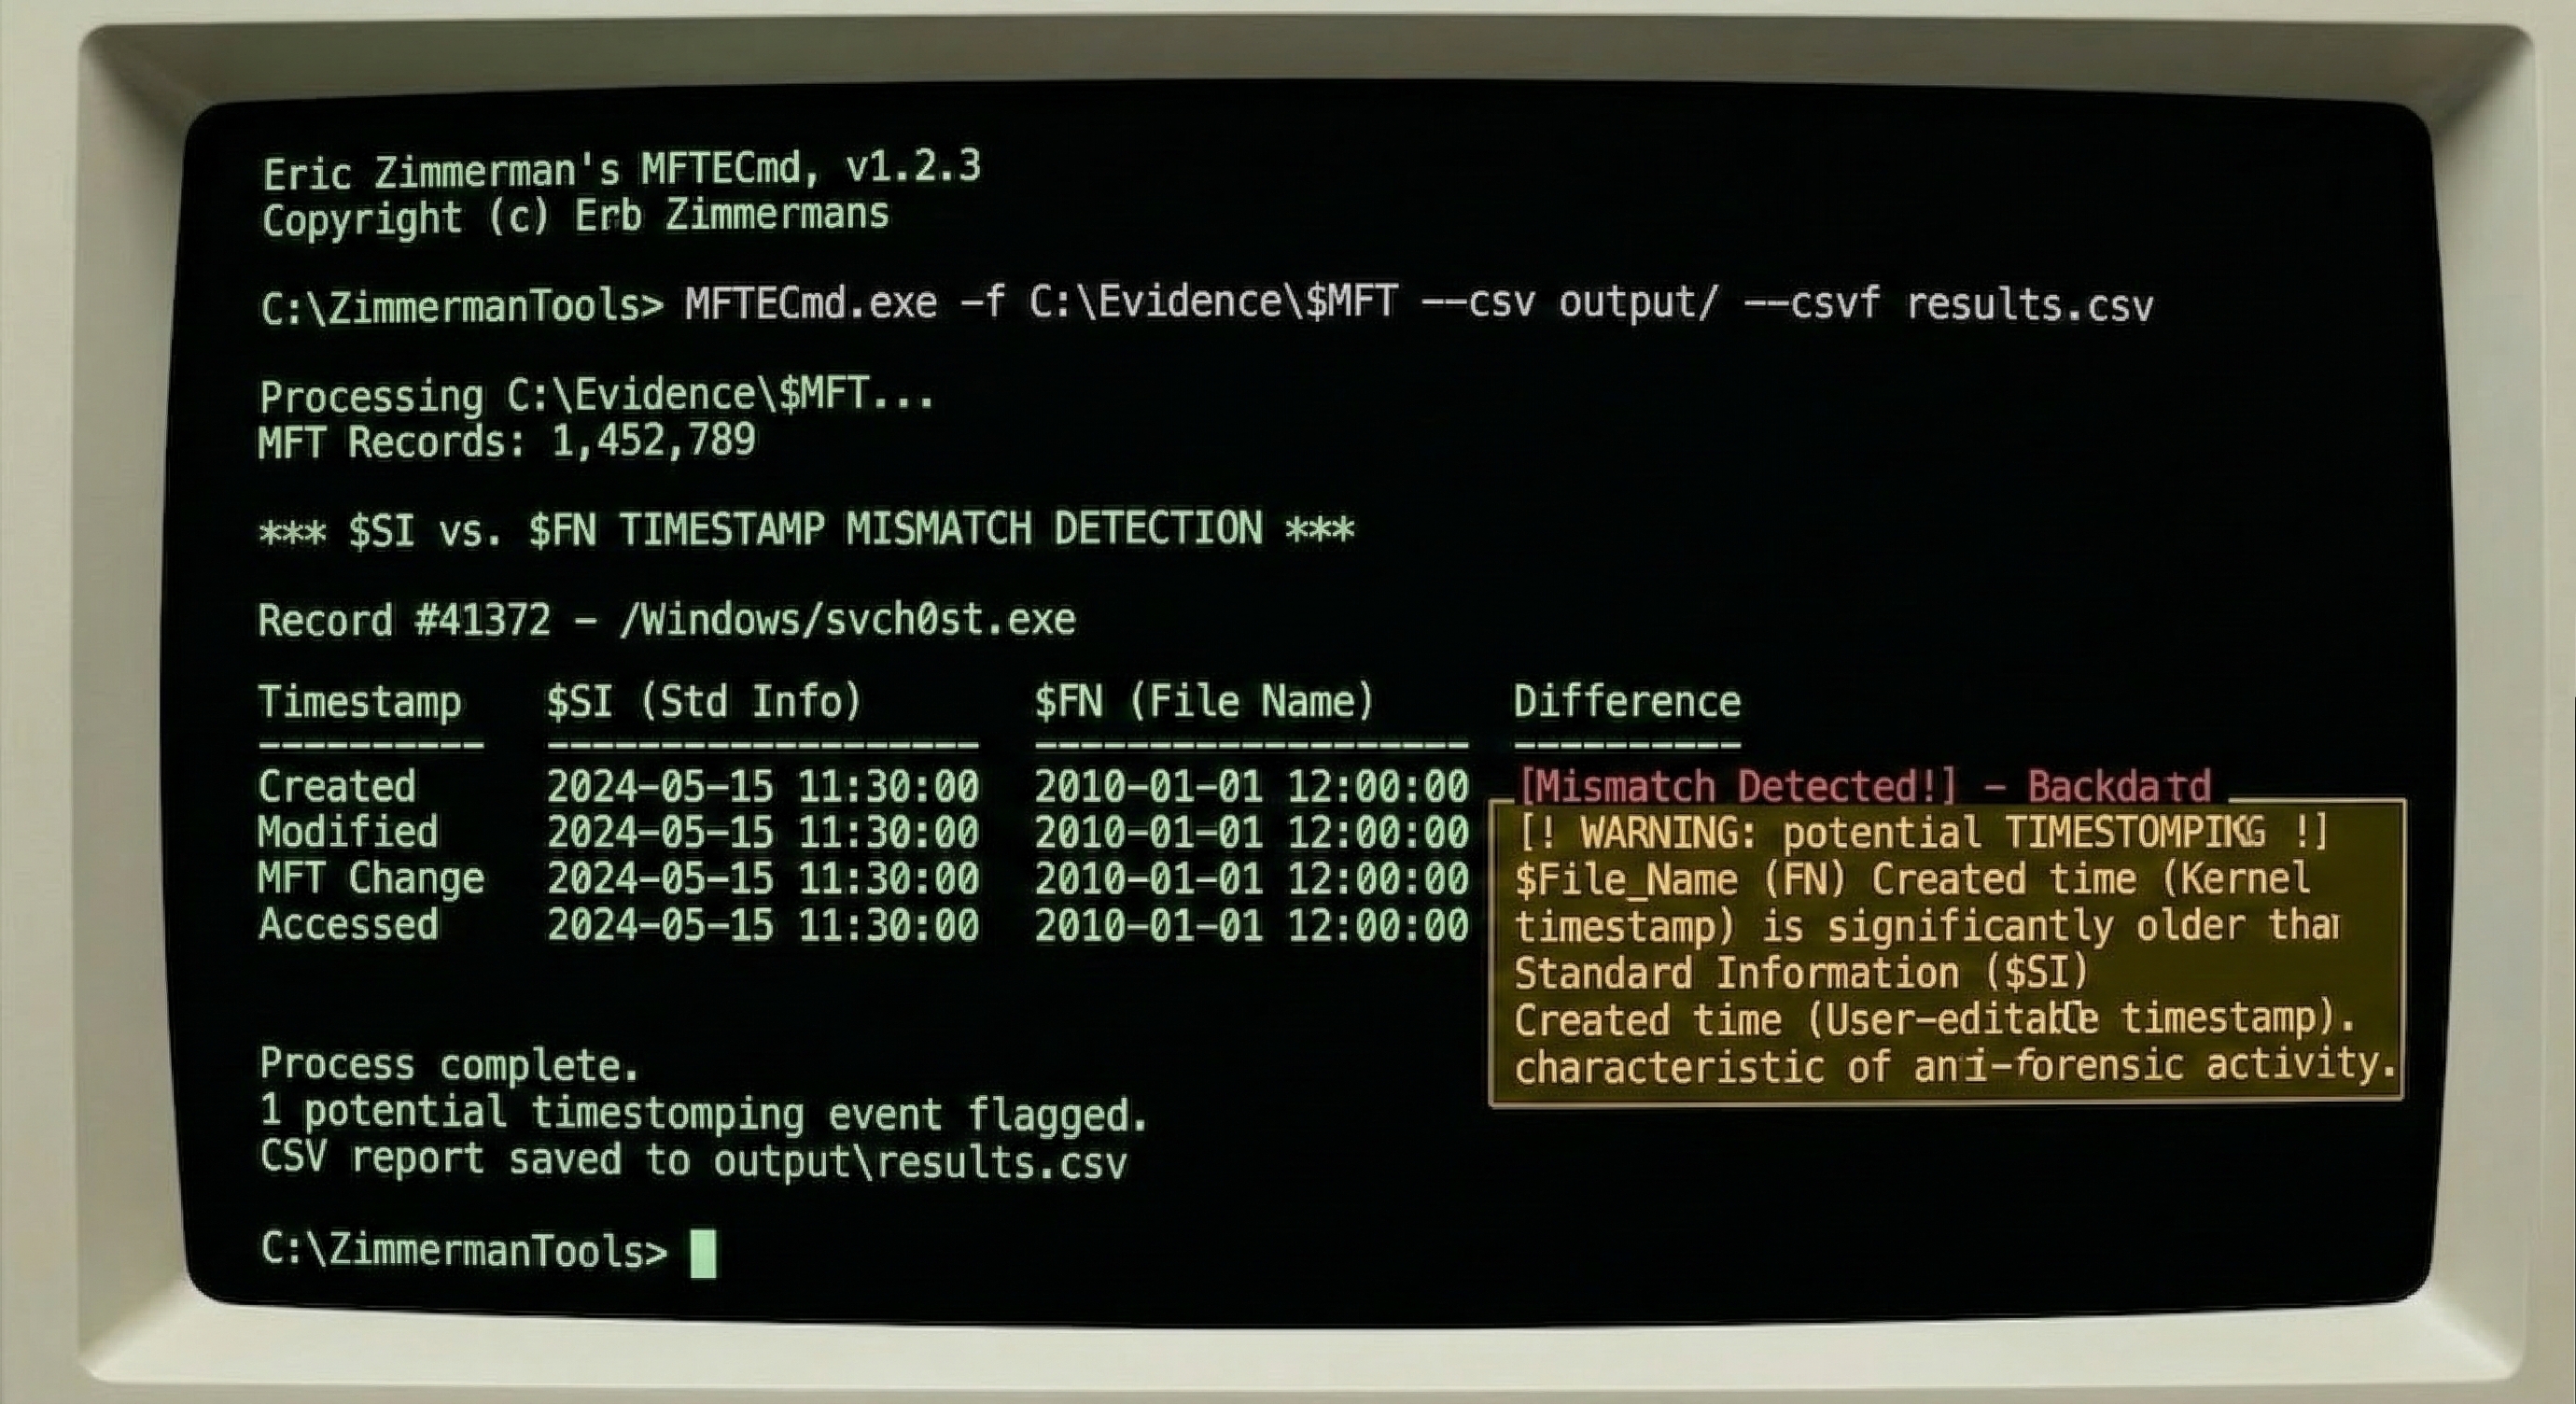
- MFTECmd (Eric Zimmerman): Parses the raw MFT and outputs both
$SIand$FNtimestamps in a CSV. Filter for rows whereSI_Created < FN_Created. - Autopsy: Timeline analysis module can flag timestamp inconsistencies when configured to compare attribute sources.
- istat (Sleuth Kit): Displays both attribute timestamps for a specific MFT entry.
Log Manipulation
Beyond modifying file timestamps, attackers may inject false entries into event logs or web server access logs to create alibis or misdirect investigations. On a compromised system where the attacker has administrative access, they can insert log entries with fabricated timestamps, IP addresses, and user accounts.
Detection: If the organization forwarded logs to a centralized SIEM (Security Information and Event Management) system in real time, the original unmodified entries exist on the SIEM server. Comparing the local logs against the centralized copies reveals insertions, deletions, and modifications. This is one of the strongest arguments for centralized log collection—it creates a tamper-resistant second copy that the attacker cannot easily reach.
Planting False Evidence
In rare but high-stakes cases, attackers place incriminating files on a victim's computer to frame them. This could be a disgruntled employee planting contraband on a colleague's workstation, or a sophisticated attacker staging evidence to misdirect investigators.
Detection: Timeline analysis is the primary defense. Do the file creation timestamps align with periods when the user was actually logged in? Do the MFT sequence numbers fit the expected pattern? Does the browser history show the user downloading the file, or did it appear without any corresponding web activity, email attachment, or USB connection? If a file exists on the disk but no artifact (Prefetch, LNK file, Jump List, Shellbag, browser history) shows the user interacting with it, the file's provenance is suspicious.
10.8 Chapter Summary
Anti-forensics is the adversary's direct response to the investigator's toolkit. This chapter covered four categories of techniques and, critically, the countermeasures available for each:
- Encryption (BitLocker, VeraCrypt, LUKS) renders data unreadable without the key. The primary countermeasure is live acquisition—capturing the decryption key from RAM before the system is powered down. Recovery keys, legal compulsion, and cold boot attacks provide additional avenues.
- Steganography hides data inside carrier files using techniques like LSB substitution. Detection relies on steganalysis—statistical methods (StegExpose, zsteg) rather than visual inspection. Understanding the carrier, payload, and stego-key components is essential for both analysis and reporting.
- Password Cracking targets the keys that protect encrypted data and locked accounts. Dictionary, rule-based, brute-force, and mask attacks using John the Ripper (CPU, auto-detect) and Hashcat (GPU, maximum speed) recover passwords from extracted hashes. Always exhaust low-hanging fruit (saved passwords, recovery keys) before committing to cracking.
- Data Hiding exploits file system features to conceal data. Alternate Data Streams are detected with
dir /RandGet-Item -Stream *. File extension mismatches are caught by comparing magic bytes against extensions usingfile, ExifTool, and Autopsy's ingest modules. Slack space hiding is detected through hex analysis and entropy measurement. - Evidence Destruction (secure wiping, artifact removal, log clearing) eliminates data but leaves its own trail. Prefetch proves wiping tools were executed. The $UsnJrnl records file deletions. Event ID 1102 records log clearing. Volume Shadow Copies may contain pre-wipe snapshots.
- Trail Obfuscation (timestomping, log manipulation) falsifies evidence rather than destroying it. The
$SIvs.$FNtimestamp comparison is the standard detection method. Centralized logging (SIEM) provides a tamper-resistant reference copy.
The overarching lesson is that anti-forensics is not invincible. Every countermeasure an attacker deploys introduces new artifacts. The investigator who understands these techniques—and knows exactly where to look for the traces they leave behind—turns the suspect's cover-up into additional evidence of guilt.
In Chapter 11, we shift from the Windows-centric analysis of Chapters 5 through 10 to investigating Linux and Unix-based systems, which have their own file systems (EXT4), logging mechanisms (syslog, journald), and persistence methods (cron, systemd, SSH keys).